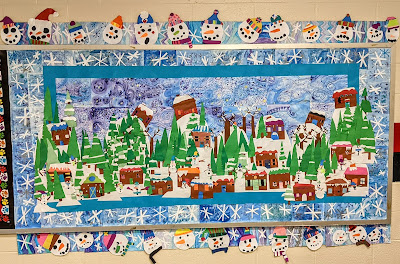
Need ideas for winter bulletin boards?!?! Here are several I’ve done over the years that might get some ideas cookin’ for you! I don’t do holidays because that is limiting for students and the length you allow something to stay up! A winter board can be up till the end of February.
(I’m currently working on this year’s with my students!).
This is a great time to do a school wide collaborative project! Every year I have my students create a different component for a large collaborative mural. If I have any left over parts…I usually hang up smaller displays in other parts of the school. The students are always so excited to try to find the part they created! The project range from watercolor, collage, marker, colored pencil, crayon…and everything in between!! You can make this work based on the supplies and space you have available to you at your school!
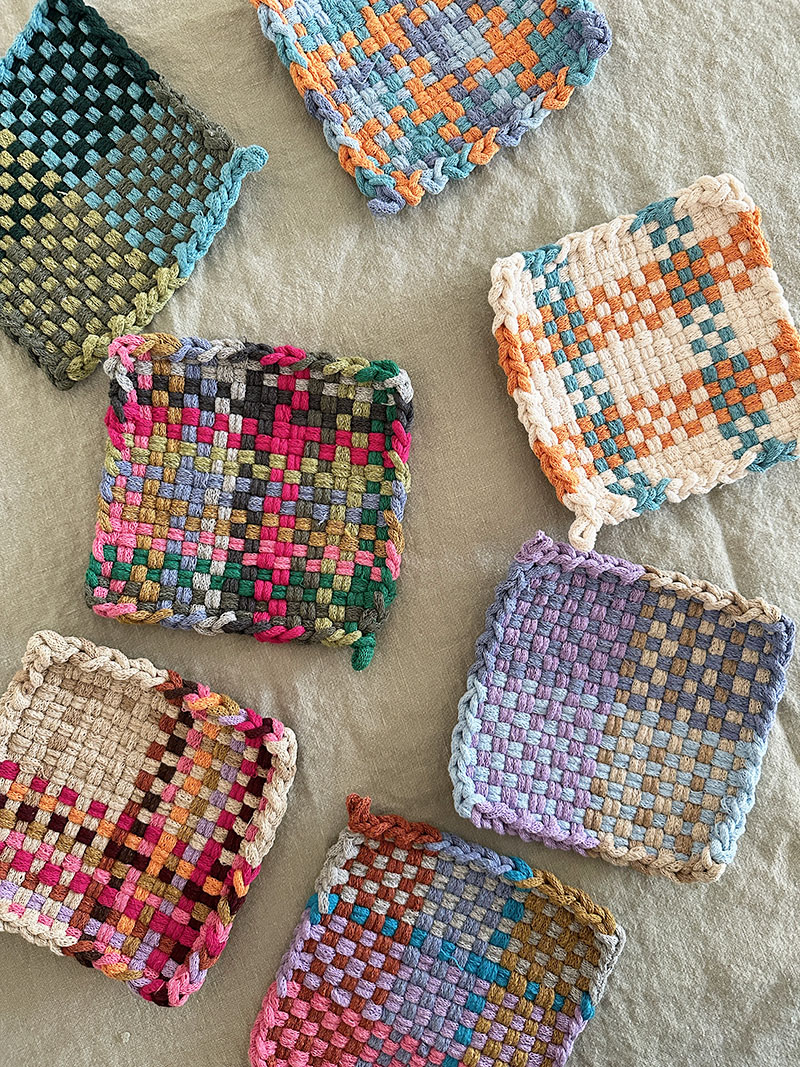
I recently discovered my old-school potholder looms when I was reorganizing all my art supplies and materials in the basement. (Well, my daughter did the organizing since she could “not live with the mess one more minute,” as spoken like a true Virgo.) The loops were old and in bad colors, like the ones that come with those potholder weaving from long ago. I searched online for where I could buy some new cotton loops, and oh my word… I found my happy place. Shall I just stop working and make potholders now and forever? (Kate Kilmurray has literally made a career of it, and so can I!)
The shop is called Friendly Loom and their cotton loops product is called Lotta Loops. They come in these incredible colors in either packs of mixed colors or in one single color. Let’s just say if I became a full-time potholder maker I don’t even think I would ever tire of finding color combinations. Ever.
1. Begin by choosing your color story. There are so many options: warm colors, cool colors, complimentary, rainbow, earth tones, one color, two colors, ombré, or just random. Anything works!
2. Set up the loom by hooking the loops from top to bottom in a row all the way across. This will act as your “warp” where all horizontal “weft” loops will weave through.
3. Start weaving from the top (I use my fingers until the end when I use the weaving hook). Just hook the end onto the peg, then go over & under until you get to the other side and hook it to the corresponding peg on the other side.
4. The next loop will go under and over in the opposite way, so if you begin by going over the first “weft” then begin the 2nd row by going under.
TIP: It’s easier going through the middle where it’s looser and then pushing the loop up with your fingers after you hook it on the other side. (You will be adjusting loops continuously throughout to make sure they are straight.)
5. When you get to the bottom it’s trickier to weave because it gets too tight for fingers. This is where using the weaving hook makes sense. Weave the hook over and under all the way across, then slip a loop over the hook and pull it back through.
Finishing the potholder:
This is a little tricky to describe. It’s actually easy but becomes wordy when writing instructions. You can always look up videos on YouTube (I will make one soon, too).
6. Starting at one corner, reach through the first loop with the weaving hook then hook the second loop and pull it through the first. It helps to use your fingers to stretch the first loop as you pass the 2nd loop through.
7. Now do it again — hook the 3rd loop and pull it through the 2nd. Continue all the way around, using your fingers to stretch the loops as you go, keeping in mind that there will always be one loop on the weaving hook.
8. As you finish one side, it helps to loop one of the finished stitches from the middle back onto the loom temporarily. It took me a while to discover this trick but it helps keep the tension because as you get to finishing the last side, all the loops start popping off the loom. (When you are doing this in real time you will understand these helpful tips much more.)
9. When you get to the end and you have the last loop left on the weaving hook, leave it on as you pull on the sides to even them out. Then what I like to do is hook the last loop through itself just to double-secure it.
That’s it you’re finished! Once you make one you won’t be able to stop. And you will get better and faster with each new potholder.
I made all my potholders and used all the best colors before taking photos of the process, which is why the colors in this how-too are a bit strange. But it’s also good to show that if you get these gorgeous Lotta Loops from Friendly Loom, you can’t really go wrong with any combo!
Share your potholders with me on Instagram if you make some from this tutorial! I would love to see them.
xo Bar
– – – – – – – – – – – – – – – – – – – –
Did you like this post? Here are more weaving ideas:
Doodle weaving with a cardboard loom6-Point God’s Eyes with SticksRainbow Tube Knitting with a TP Roll Loom
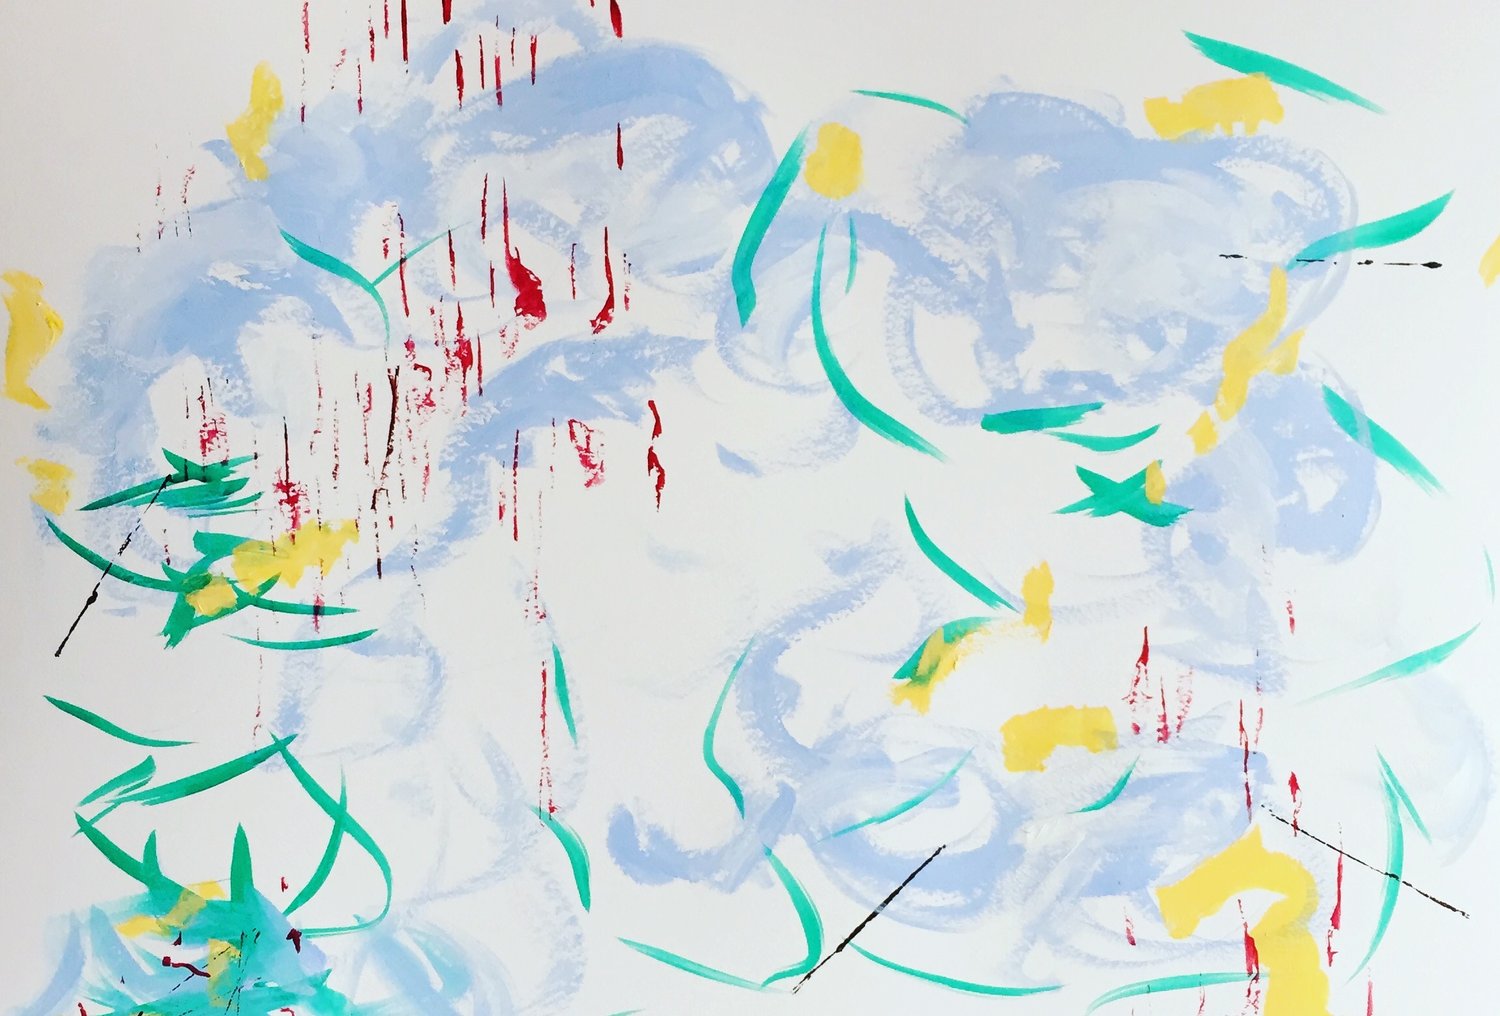
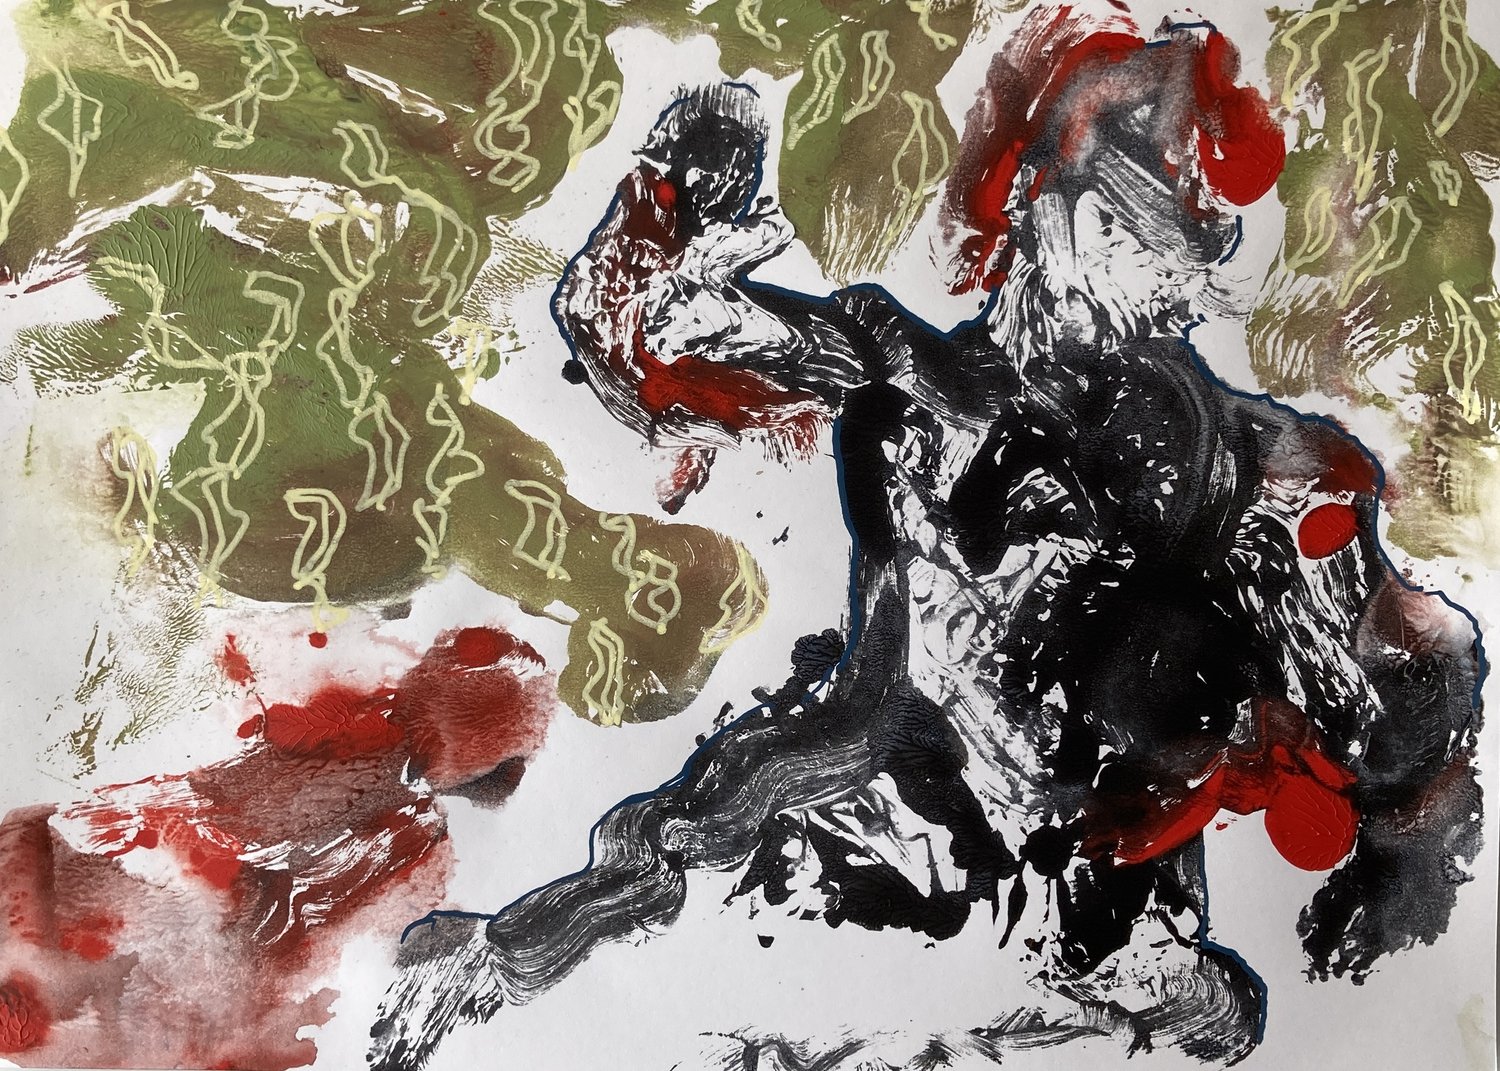
I’m finding this interview in the artist’s studio inspiring in several ways. I love their description of what is on the wall and why.
“One wall of Bastos’ studio is lined with a huge piece of mass-produced wallpaper, featuring large-scale roses in an almost dreamy but restrained colour palette of soft pinks and greys, and overlaid with a smaller painting that pops with lurid green and blue scrawl. This is the process wall, where works are made and composited and amalgamated. It’s the wall of experimentation, Bastos tells us. The wall opposite is the space for pseudo-finished work, where many works go into a space for contemplation, and from there sometimes they go back to the other wall. It’s currently dotted with belts that hang and curl sculpturally. On this wall, Bastos comes to perceptively understand and link the evolving visual gestures in their work. They liken the process of placing the materials on the wall to tarot card reading, a process of divination that works by confirming what intuition and the right side of the brain already know. “I’m obsessed with salon hangs. I love it, because with a practice like mine, form really navigates. You find the commonality in the gesture, in the materials, but it’s not necessarily like everything is gonna look very similar. And when you do a salon hang… it’s easier to pinpoint the thread.””
— Berlin Art Link, Dec 12 2023, Studio Visit with Cibelle Cavalli Bastos
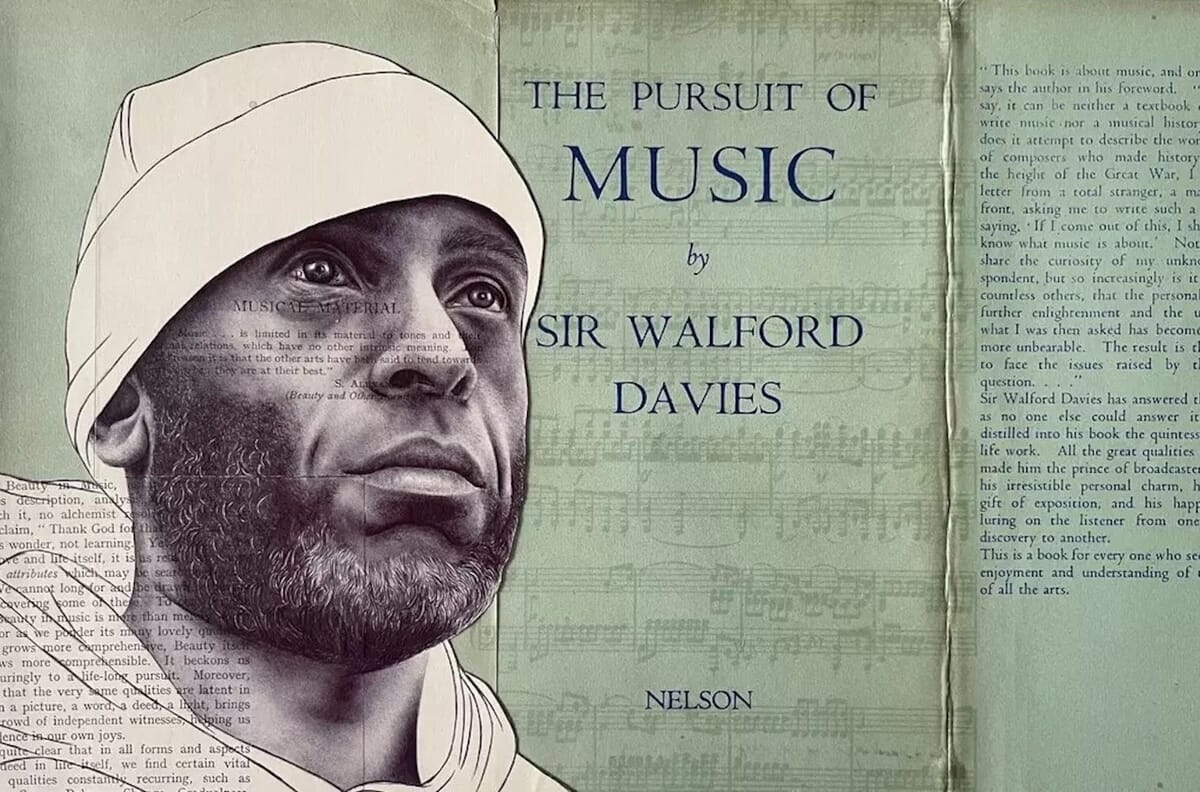
Through his intricate ballpoint pen drawings and use of antique texts, Habib Hajallie explores the powerful connection between art and music, creating multi-sensory experiences that challenge the way we perceive history and identity. In this article, we discuss the “sound of form” in his work, the echoes of cultural narratives, and the embodied, almost musical act of composition.
By Sophie Heatley | 17 Mar 2025
“I can never draw in silence,” Habib Hajallie tells me. “It allows me to get into the flow state. Songs carry me through when I’m in a lull.” If I listen to music while writing, I’ll start typing the song lyrics, I half-joke. Hajallie’s music does find its way into his work, though; you can feel it in the rhythm and the pace of his mark-making. A maestro with a ballpoint pen, he orchestrates his portraits with the precision of a master conductor. A practice that takes so much patience, time and concentration, being able to lose himself in the music and moments of detail are a relief and a necessary part of Hajallie’s creative process. That’s not to say he’s not present with the process; the music is a way in, to embody each stroke of what can be a very unforgiving medium. “If I don’t understand the pressure of my pen, I won’t get the outcome I want, and there’s no escaping mistakes.”
Music allows Hajallie to connect more deeply with both the time periods he references and the figures he brings to life. For example, when depicting West African figures, he immerses himself in Afro-beats or classical African music. “There’s a real vibrancy to these sounds. They give me energy and help me capture their essence.” Different genres accompany different subjects, scales, and scopes. The Grime Series, featured in The Sound of Form exhibition, overlays prominent grime artists onto London tube maps – London being the birthplace of Grime. “When I drew JME, I was listening to a lot of his music.”
JME by Habib Hajallie (Limited Edition Giclée Print on Hahnemühle Photo Rag 308gsm, 2022, 30 x 21 cm) Edition of 50
The life-like resemblance to Hajallie’s subjects is breathtaking and envy-inducing, and yet their exquisite detail is the least interesting thing about them. Drawing is so much more than figurative representation for the artist; the creative act is one of reawakening dormant histories, elevating underrepresented voices, his pen a quiet instrument of rebellion and reclamation.
Armed with pragmatism and an “unromantic” level of organisation, Hajallie begins his process by collecting antique texts, largely from vintage shops, charity stops, and eBay. “I have stacks of philosophical books. I’ll go through them one by one and highlight certain sections that resonate.”
From his vast collection of saved quotes, prints, and book covers, Hajallie embarks on the next step: recontextualisation and subversion. With a focus on challenging ethnocentric views and fostering cross-cultural understanding and empathy, he superimposes both prominent contemporary figures and those from antiquity — many of whom were erased from history or overlooked — on the pages of problematic 18th and 19th century literature steeped in colonial ideologies.
By juxtaposing these outdated, harmful ideas of eugenics, race, and misogyny with modern themes, Hajallie subverts the narratives of the past. Drawing inspiration from artists like Godfried Donkor, known for using archival material to challenge stereotypes associated with Black figures, and Barbara Walker, who famously used found materials to raise awareness of racial profiling, Hajallie’s work becomes a dialogue between eras. This conversation reclaims historical texts and repositions marginalised figures on the front covers, “reincarnating” them and giving them a renewed, empowered presence — deepening the discourse surrounding minority voices.
This intersection is further enriched by Hajallie’s use of crosshatching and Renaissance-era techniques, all executed with his humble biro. In doing so, he bridges the simplicity of domestic, note-taking tools with classical artistic methods, creating a striking fusion of the old and the new, complex and yet accessible.
“I started drawing with pens. We had loads of Barclays pens and Argos pens when I was kind. I’ve always loved the immediacy of it; you don’t need to sharpen it, you don’t need to dip it in water. I guess it started as just a convenience, but now the accessibility of it has become so tied up in my practice. It’s important and nostalgic to me.”
In a world that is constantly shifting towards technology and a “more-is-more” mentality, analogue mediums seem to be gradually fading into obsolescence. However, the specialist remains resolutely uninterested in changing his medium, believing that there is still so much to discover and explore. “I like drawing because it’s an analogue medium. There’s something truly special about using your hands to create something—it becomes a part of yourself,” he explains.
Habib Hajallie in front of a self-portrait at Mall Galleries, London | Image courtesy of the artist
This sentiment is particularly evident in Hajallie’s “quasi-surrealist” self-portraits, which caricature himself to spark conversations around his dual heritage—Sierra Leonean and Lebanese. In these imagined scenarios and narratives, he explores the complexities of his background, and by extension, wider discussions around culture and identity. “I’ve since realised that my personal experience is enough to use myself as a sitter and convey what I want to share,” he reflects.
Hajallie’s cross-genre, cross-era works are rich with historical and personal resonance. Their painstaking conceptualisation and execution invite viewers to delve into multi-layered, literary-sonic spaces, urging them to listen to the stories long neglected or actively removed from the various canons. Ultimately, these portraits serve as a mirror to our biases and a poignant reminder to read the small print: What is this truly about? And what am I choosing to ignore, even advocating for, by not looking further?
It’s no secret that Dollar Tree is one of my favorite places!! Recently I found these Christmas gnomes that I thought were super cute. However, I saw the potential in using them at school with a little transformation. The image is printed on(except the gloves and boots are extra wood pieces added on top of the image. The snow flake and present were on the beard of the gnomes, and I knew I could easily paint over that area, and change things up a bit. I have them flanking a board in the hall where I hang students work they make me outside of class. They have become the art gnome guardians.
I wanted to share a few awesome art supplies for kids that I either recently discovered or just really love. I’m always on the lookout to spice things up in the art room. I know some budgets are tight, but you can always buy one set for a whole table and then the kids can share them. I used to think I needed many sets of everything, but honestly sharing, manners and taking turns are very good skills to practice. Similarly, you can have some of the special art supplies in a central location and kids can choose to try them out during the class period. In the next few sections, I will share the art supply and why I love it. And I will also give you an example of a project you can try with this media.
Art supply links are Amazon associate links. As an Amazon Associate, I earn from qualifying purchases at no extra cost to you. The small commission earned goes towards maintaining this website to help other teachers.
I recently discovered these from a suggestion in a Facebook art teacher group. These beeswax crayons are like regular crayons, but are nice and smooth and give a solid coverage. They have vibrant colors.
One project you could do with these crayons is an abstract artwork and tie it in with the artist Kandinsky. He was a Russian artist who has many beautiful abstract works with brilliant colors, shapes and lines. Here is the artwork titled Composition IV.
And here is an example of an artwork using the Beeswax Crayons that your students could try to make. Using lines, shapes and colors inspired by the works of Kandinsky, create an abstract work with your own creative ideas.
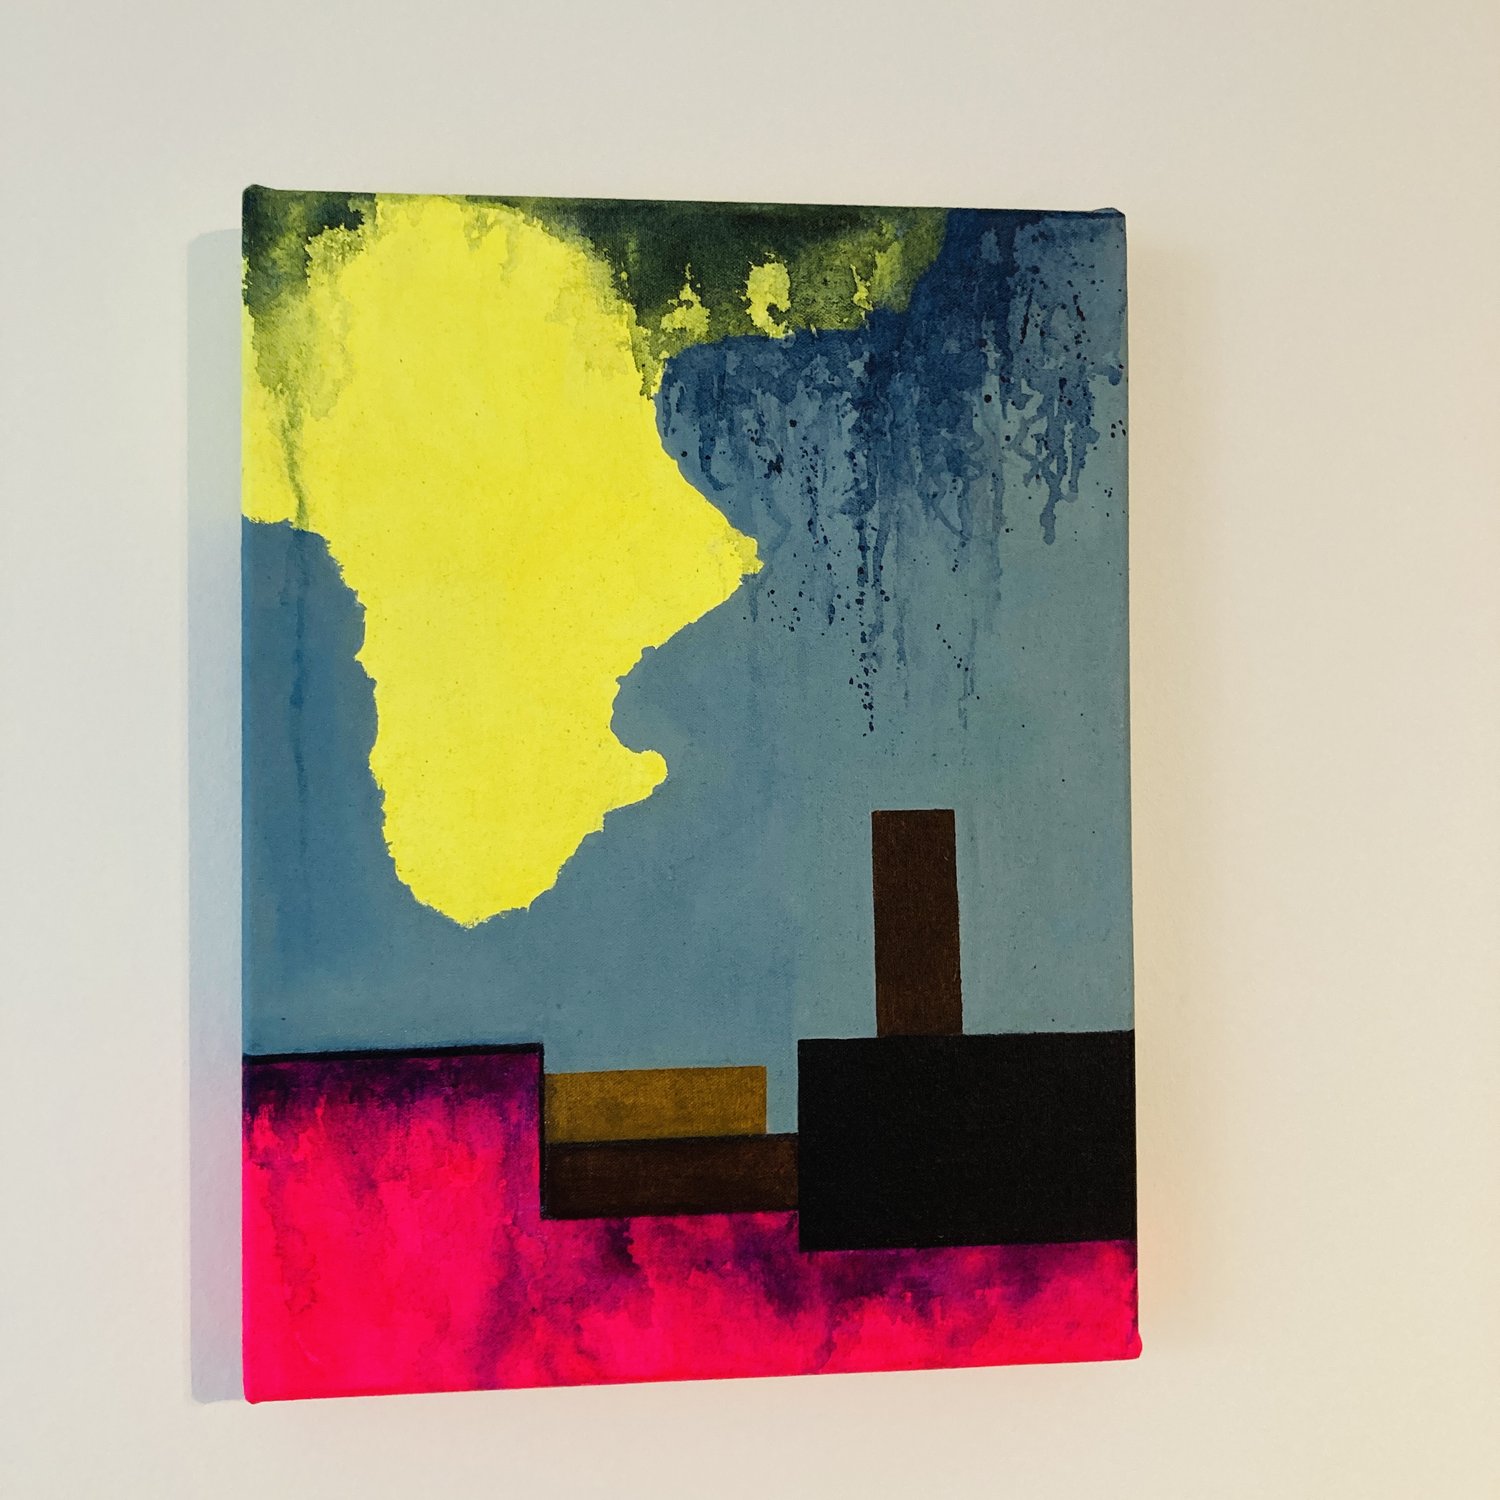
I saw these on Instagram and couldn’t believe how bright the colors were- super bright, in fact. I had to try them out myself and they did not disappoint!
The name of this supply is Super Bright Flourescent Paint Daubers. They are just like any other paint dotters you may have tried, but they are definitely brighter.
Here was what I made playing around with these paint daubers. No filter on this picture!
I have several other blog posts about using paint daubers in art projects and you could easily substitute the regular paint daubers with the flourescent colors.
Speaking of flourescent colors, if you haven’t had neon paint to try out, it’s so fun! I try to incorporate neon paint in a few art projects a year. I like Sax Versa Temp for most of my tempera paint needs. Handy art is another brand I’ve tried. And I know some people like the flourescent tempera cakes.
One art project I like to do is have the students create their own alebrije. Alebrijes are colorful, fantastical creatures from Mexican folk art. They often mix different animals—real and imaginary—into one fantastical design. The idea came from artist Pedro Linares in the 1930’s after he had a fever dream filled with these wild creatures shouting “alebrijes!” He turned them into art using papier-mâché, and later, Oaxacan artists began carving them from wood.
Today, alebrijes are a big part of Mexican culture and are often linked to Día de los Muertos. They also became popular when they were featured in the Pixar movie Coco!
I saw an awesome exhibit of huge alebrijes when they were at an outdoor exhibit in the Chicago area. The size, creativity and patterns were amazing!
Speaking of Posca paint pens, kids just seem to love them. My older child really enjoys using them for drawings and kids will ask to use these special sets. I don’t recommend using them with younger kids as they tend to shake them too much and splatter paint out of them and they are expensive, so save these for your older students.
I’m a big fan of the Mungyo chalk pastels. I don’t know how I discovered them. I think I may have got them from an art resale swap or something, but I love the variety of colors and they are fairly inexpensive.
We use these Crayola Metallic markers a lot! Anything metallic is fun to add to your art supply stash.
I like to use these on the backgrounds of other artworks, especially on black paper. The silver and gold in this picture were definitely the Crayola metallic markers. Some of the other colors may have been the chalk markers or paint pens that I mentioned before. The project below was inspired by the artwork of Yayoi Kusama and her dotted pumpkin series.
These are some of my favorite fun art supplies to use with kids! Do you have any awesome art supplies I should try out? Share in the comments!
One way I respond to her statements about what holds back women is to feel how they apply to my own art practice/life, then turn them around, and affirm the reversal:
i stand up in front of the world, unique and sovereign.
I have found reversed statements like this both bracing and encouraging. They have given me courage on days when being an artist feels so hard, such a waste of effort and precious time.
i throw prudence to the wind and
try to emerge beyond the given world
I can even try:
i have this madness in talent called genius
and if that sounds too much, I can still ‘try on’ the statement or ‘hold it against me to see how it might fit’.
This OWN-TURN-OWN practice of working with de Beauvoir’s words has been very formative for me. It has given me energy to continue on bad days, and to place my work in a larger perspective. It moves beyond a reprimand into spine-strengthening encouragement.
Next time: Themes and metaphors in Chapter 14, all the words
After all the work you’ve done to create your website, you as an artist and creative soon realize that no one visits your art gallery unless you give your web address. Bringing traffic to your art site is a must-have, but how do you stand out from a crowd of millions of websites?
While almost every artist obsesses over Instagram following as their art marketing strategy, few creatives consider the power of Google search. Yet, it’s the number one search engine that can bring you considerable traffic and a much higher ranking of your site over time. There is no free lunch as you have to put lots of hours, days, and weeks into your unique blog creation. However, when it all kicks in, you’ll be amazed with your results. Your blog can become very popular and have lots of organic traffic to it.
Here, I’ll share some savvy business strategies with you to generate more traffic to your website and art. These ideas didn’t fall from the sky to me. It was a lot of wasted money, sleep, and useless courses. However, I developed a workflow that brings me results because I made a ton of mistakes. Here is my secret about art marketing strategy no one talks about.
#1 Combine unique idea and trends
My posts combine 3 things: my expertise+searchable keywords+unique perspective+my images.
You need to come up with a unique spin on a topic that’s searchable. To do my research for content ideas and keywords, I use two unbelievably powerful tools, Ubersuggest and Answer the Public.
Ubersuggest shows not only popular keywords, but also gives me other blog ideas I could explore. It shows my website rank and the pages or issues I must fix to get higher ranking over time. It shows domain authority, and organic monthly traffic to any site you enter into this program! Another tool I use once in a while is “Answer the Public”. I learned a lot about SEO generation from free content posted by Neil Patel, and these are his tools. (They are both free and paid options to use the tools).
To get the most out of your blog post in terms of traffic, you need to leverage trends. I rarely do it myself because I focus on my interests, but if you find a trend that matches your passion, then you can potentially do well. One of my trending articles was about Leonardo da Vinci when his painting emerged as lost Leonardo. I had a lot of traffic to my article. However, this traffic isn’t consistent and it can decline if I don’t update the article once in a while or the trend disappears altogether.
#2 Use headlines with keywords
Pay attention to click bait headlines you see online to give you ideas about topic and headline generation. Magazines are good at this. It’s important to come up with a clickable headline that has specific keywords in it. You can also use a service for title generation like Vidiq
The subheadings must make sense with keywords to have a flow and clean article design. I often struggle with this part myself and tend to change some of my headlines over time.
Also, organize your content into sections from the start. So when you write, you create a useful article with specific sections (with keywords). I often think of the usefulness of the article and if I want to read it or not. Many sites write AI-generated, averaged content that’s useless and lacks personal experiences, but it’s our experiences that make us stand out from the crowd. However, if you truly struggle with content generation ideas and need help writing your articles, some AI tools for copy can help you. My advice is to be more precise with your prompts to generate good quality ideas.
#3 Update your blog post!
Update your posts every half a year. Consolidate small content pages into one solid article and delete all other useless posts because it confuses the Google search crawler. It’s better to have a few well-written, unique articles instead of having 100 pages of useless content. When you update your posts, it gives Google fresh content to crawl and include into its new search results. The example is this consolidated article I wrote about the colored pencil drawing.
#4 Optimize your images
Images must be named with a keyword or description of the image. Don’t name them ‘flat123.jpg’ because Google often can’t classify this.
Also, images must be optimized for fast download speed. I usually edit them to 700-800px for web use.
#5 Links generation & placement ideas
In art marketing, link placement is important. You need to reference some top sites with links to them. Wikipedia ranks high in search results because of all the links they get to and from them, not the content. For example, you can write about an artwork and place the link to a museum’s site.
However, what’s even more important is to have external links going back to your site! It often happens naturally because you write such awesome content that people reference your site in their writing. That’s the general idea behind it. Otherwise, link placement is quite difficult these days, and when the websites get higher ranking they won’t place a free link. Businesses often pay for link placement to bring their websites higher in search results and Google ranking. This is one unexpected side of the business I have. I have requests from businesses to place their links on my site.
#6 How some blog posts become popular
Some of my most popular posts are very long and others are quite short. I think that when I write unique content ideas that interest me and don’t have much written content about it on the internet, like the symbols of transformation in art. It gets pushed higher in the search results. I update these articles quite often, adding new information whenever I have it. Popular niche topics like ‘colored pencil drawing’ have a lot of content written already. So to compete with all that content I have to create a much more extensive post about the colored pencil drawing.
Finally, you can combine the power of Google search with two other powerful platforms, YouTube and Pinterest search engines. Post searchable content there and pin your images with direct links to your site to see even more traffic flowing to your art website! You need to post on both platforms consistently, especially on Pinterest. Pinning unique content from other cool sites benefits your account. It’s not just about pinning your content. I pin 75-80% of art content I love from other websites. This strategy grows your following on Pinterest. How cool is that?
I must add that Pinterest has implemented a new policy recently that strikes and bans art content that has nudes in them, including some classical art! I must say it’s annoying because if you want to close someone’s eyes on classical nudes, then adjust your algorithm not to show it to children under 18. Yet, the company prefers to punish everyone else with this. So don’t pin the nudes to keep your Pinterest account happy.
#8 Don’t miss this final step!
Your final step is to catch your incoming traffic to your art website by collecting emails or directing them to your art shop at the end of the article, or giving them a free download or discount, or perhaps to sell a low-price item that they would enjoy owning from you. 🙂
Selling art is about cultivating personal relationships with people. So, whenever you have a person interested in your art, try to develop a genuine relationship. Give him or her a call and stay in touch via email and phone. This is where most creatives fall out of a wagon, but this step is crucial to your success in art sales and beyond!
In conclusion, I hope you found these art marketing tips useful. If so, I’m very glad because I hate wasting my time and yours writing useless content! It does take time to write good content, in which you are an expert or have proficiency to distinguish yourself from others. You also need to enjoy this task and find your flow to create beautiful and searchable content that stays above everything else.
For years, I engaged in rational, analytic study of metaphor and empathy in dialogue. Despite my best academic intentions, the imagination resisted being quietened.
In the middle of life, after cataract surgery, I plunged into painting. Years of painting that required an intensive search for my lost intuition via personal development courses, including Tara Mohr Playing Big, Julia Cameron The Artist’s Way, Chris Zydel Painting with Fire, Wild Heart Expressive Arts Teacher Training. And contemplation of women’s lives through the lens of women philosophers: Bracha Ettinger, Iris Murdoch, Simone de Beauvoir, Simone Weil. And teaching my own online course Catching the Whispers. And continuing conversations, shared readings with creative women friends. Filling notebooks with ideas and thoughts.
Now, I’m bringing all this life together to offer exploratory workshops to enrich others’ creative practice.
If you join us, you will
· experience the impact of intuitive painting techniques (bring your painter self or your non-painter self)
· be led in intense conversations around your process
· discover what can happen when you ‘go beyond the given’