This made my heart so happy!! A few weeks ago I taught a lesson on the artist Romero Britto. A para-pro (someone who works with children that need extra assistance) loved the work I shared from Britto, and ordered a new phone case for herself. She had to share it with me!!
I wanted to share a few awesome art supplies for kids that I either recently discovered or just really love. I’m always on the lookout to spice things up in the art room. I know some budgets are tight, but you can always buy one set for a whole table and then the kids can share them. I used to think I needed many sets of everything, but honestly sharing, manners and taking turns are very good skills to practice. Similarly, you can have some of the special art supplies in a central location and kids can choose to try them out during the class period. In the next few sections, I will share the art supply and why I love it. And I will also give you an example of a project you can try with this media.
Art supply links are Amazon associate links. As an Amazon Associate, I earn from qualifying purchases at no extra cost to you. The small commission earned goes towards maintaining this website to help other teachers.
I recently discovered these from a suggestion in a Facebook art teacher group. These beeswax crayons are like regular crayons, but are nice and smooth and give a solid coverage. They have vibrant colors.
One project you could do with these crayons is an abstract artwork and tie it in with the artist Kandinsky. He was a Russian artist who has many beautiful abstract works with brilliant colors, shapes and lines. Here is the artwork titled Composition IV.
And here is an example of an artwork using the Beeswax Crayons that your students could try to make. Using lines, shapes and colors inspired by the works of Kandinsky, create an abstract work with your own creative ideas.
I saw these on Instagram and couldn’t believe how bright the colors were- super bright, in fact. I had to try them out myself and they did not disappoint!
The name of this supply is Super Bright Flourescent Paint Daubers. They are just like any other paint dotters you may have tried, but they are definitely brighter.
Here was what I made playing around with these paint daubers. No filter on this picture!
I have several other blog posts about using paint daubers in art projects and you could easily substitute the regular paint daubers with the flourescent colors.
Speaking of flourescent colors, if you haven’t had neon paint to try out, it’s so fun! I try to incorporate neon paint in a few art projects a year. I like Sax Versa Temp for most of my tempera paint needs. Handy art is another brand I’ve tried. And I know some people like the flourescent tempera cakes.
One art project I like to do is have the students create their own alebrije. Alebrijes are colorful, fantastical creatures from Mexican folk art. They often mix different animals—real and imaginary—into one fantastical design. The idea came from artist Pedro Linares in the 1930’s after he had a fever dream filled with these wild creatures shouting “alebrijes!” He turned them into art using papier-mâché, and later, Oaxacan artists began carving them from wood.
Today, alebrijes are a big part of Mexican culture and are often linked to Día de los Muertos. They also became popular when they were featured in the Pixar movie Coco!
I saw an awesome exhibit of huge alebrijes when they were at an outdoor exhibit in the Chicago area. The size, creativity and patterns were amazing!
Speaking of Posca paint pens, kids just seem to love them. My older child really enjoys using them for drawings and kids will ask to use these special sets. I don’t recommend using them with younger kids as they tend to shake them too much and splatter paint out of them and they are expensive, so save these for your older students.
I’m a big fan of the Mungyo chalk pastels. I don’t know how I discovered them. I think I may have got them from an art resale swap or something, but I love the variety of colors and they are fairly inexpensive.
We use these Crayola Metallic markers a lot! Anything metallic is fun to add to your art supply stash.
I like to use these on the backgrounds of other artworks, especially on black paper. The silver and gold in this picture were definitely the Crayola metallic markers. Some of the other colors may have been the chalk markers or paint pens that I mentioned before. The project below was inspired by the artwork of Yayoi Kusama and her dotted pumpkin series.
These are some of my favorite fun art supplies to use with kids! Do you have any awesome art supplies I should try out? Share in the comments!
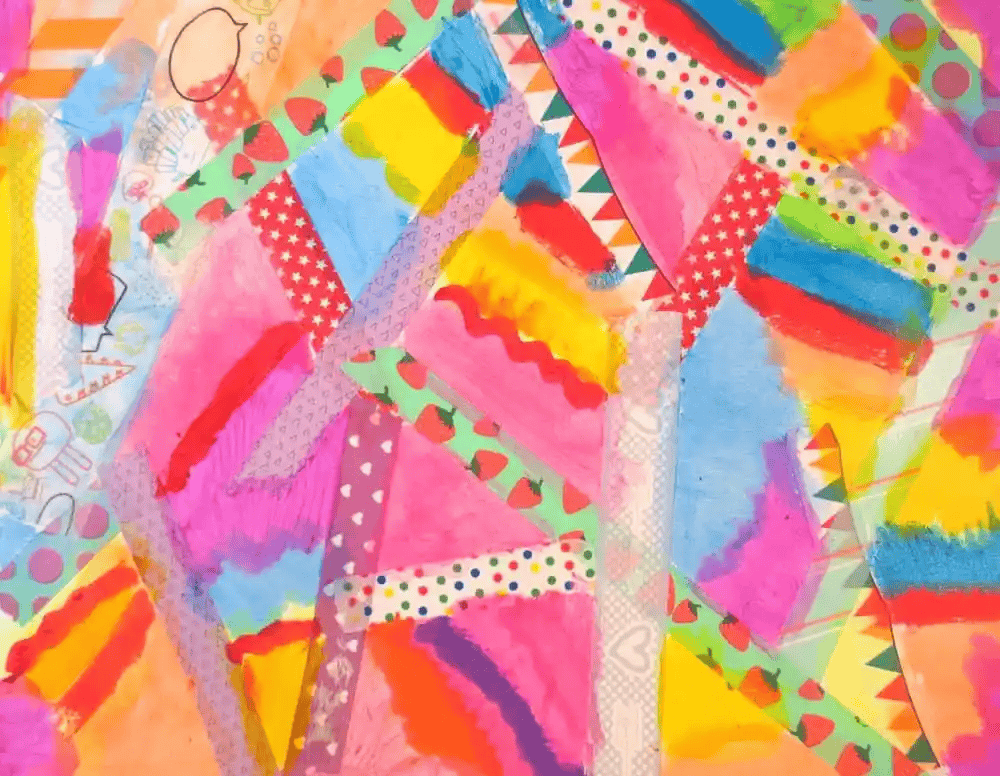
This is another project that is abstract and involves sticky materials! This washi tape art project is always a hit with kids! It uses two very fun art materials: patterned washi tape and Kwik Stix paint sticks.
● There are many different kinds of washi tapes that you might enjoy. I tested out several different sets to share with you and these vary in quality with some being completely useless, ripping as you try to unpeel them to others that unpeel and stick easily. The ones listed below I have tried out and like how they unpeel and stick. (The others I just returned!)
Set of 27 Monet Inspired Washi Tape rolls (some with gold foil)- when I first opened the package it didn’t look as bright in person, but when I unrolled the tape onto white paper, the colors were very nice. I say these are inspired because I’m not sure all of these patterns are directly from his paintings.
Are you looking for a fun Earth Day art project that would work for a variety of ages? This one was a hit with my students- with so many creative variations!
Earth Day Art Project for Kids
I wanted to quickly share with you this art lesson for Earth Day that was very successful with my students. I had to be out of school for a couple of days and the other art teacher at my school found this awesome art project to use while I was gone. This art lesson came from Seattle’s Child. Thanks so much for sharing! All of us art teachers are better together, when we share successful art projects.
I loved the results so much, I decided to do it with another grade level. So these were created by 5th graders and 2nd graders. I love how thoughtful and creative each of the pictures turned out.
Materials Needed:
● A large circle to trace – we used coffee can lids
● Pencil
● Sharpies
● Watercolor Paints
Steps to Make Your Earth Day Art Project
First, trace the circle in the center of your page.
Think about 3 or 4 things in nature that you love- animals, trees, plants, flowers, ocean, mountains, stars, moon, planets.. anything in nature!
Include those 3 or more things in your drawing. Use pencil to start.
Next, think about the background, and what you could do in the background to make your picture more interesting.
Outline everything with a black Sharpie or fine tip permanent pen.
Color everything using colored Sharpies, watercolor paints or BOTH!
You could substitute any coloring materials of your choice.