Ceramic artist Andrew Tarrant is an accomplished practitioner of sprigged decoration. Andrew’s work is a contemporary view of classical pottery forms influenced by historical and mythological themes and a modern humor. Born in the United Kingdom, and moving to Canada at a young age Andrew’s early memories of England promoted the evolution of his artistic career.
Chapter 1 contains information on resawing the plane blank into the two cheeks and the midsection. It also shows how to determine which would become the front, back, top, and bottom of the blank, and how to mark these parts out with a cabinetmaker’s triangle.
Following are the remaining techniques for making hand planes. Also included is a list of the tools needed for these procedures.
Tools and Supplies Needed • Six-inch combination square • Protractor • Pencil • Block plane • Practice stock: straight-grained hardwood, about 18 inches long, 3/4 inch thick, and 3 inches wide • Dowels (5/16 x 2 inches) • Brad-point drill bit (5/16 inch) • Drill press or power hand drill • Dovetail saw or razor saw • Chisel (1/2 inch) • Clamping cauls: two pieces of 3/4-inch particleboard or plywood about 12 inches long and 3 inches wide • Router with a 1/2-inch guide bushing and 3/8-inch bit
Optional Tools and Materials • Double sticky tape—thin type for carpet • Plug cutter (5/16 inch) • Sanding drum (3-inch diameter)
Preparing the Glue Surfaces The plane blank has been resawn into the two cheeks and the midsection, and the front, back, top, and bottom have been marked. The next step is to smooth and flatten the adjacent surfaces of the cheeks and the midsection that eventually will be glued back together. With experience, hand tools quickly do the job: a plane can be used to smooth the surfaces or a scraper can be used to remove defects like raised lines left by a chips in the planer knives. Avoid hand-sanding because the outer margins tend to get rounded, which only accentuates the glue lines. Another option is to leave the surfaces as they are off the machine; the glue lines may be apparent once the plane is assembled, but it should hold together securely.
Laying Out and Sawing the Front and Back Blocks
Determine the position of the throat opening on the midsection and lay out the angles that when sawn will create the front and back blocks. A strong word of caution: The layout and cuts occur on the midsection; be sure to separate it from the cheeks before proceeding. The plane blank is ruined if the cheeks are sawn mistakenly.
The throat opening will be slightly more than halfway along the bottom of the mid-section, closer to the front end than the back. (If you feel stranded without precise measurements, a throat opening located five-ninths of the total length will do. To determine this, multiply the length of the blank times five, divide this number by nine, and measure that result from the back end of the blank.)The exact location is not critical, but why should the throat plate be in this area? One of the most demanding planing tasks is preparing boards for edge-joining. It requires precise control of the plane. The planing stroke begins at a stand still and ends with the plane in motion. With the throat opening forward of center, less of the sole of the plane is resting on the board when the blade begins its cut, but the plane is easy to control because it is motionless. Because of the throat opening placement, when the blade finishes its cut more of the sole will be in contact with the board, which helps you balance the plane while it is in motion.
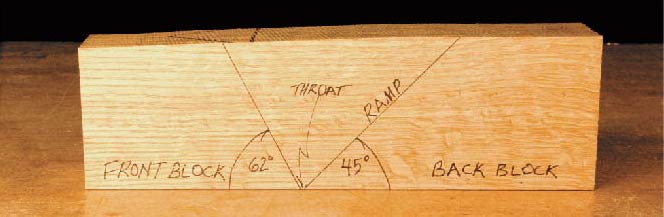
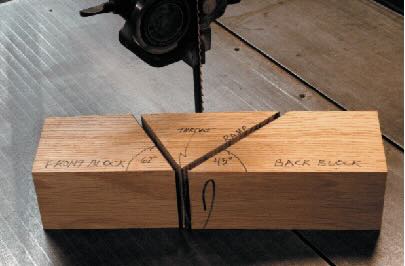
4–2. A plane blank with front-and-back-block layout on the midsection.
From the point of the throat opening, lay out a 45-degree line angled back toward the rear of the plane. This defines the back block and the ramp that the plane iron will eventually rest upon. From the point of the throat opening, move forward about 1/16 inch and draw a line angling to the front of the plane at 62 degrees. The center block is now divided into three sections: the back block, the triangular center section, which becomes scrap, and the front block, forming both the front of the throat opening and the front portion of the plane (4–2).
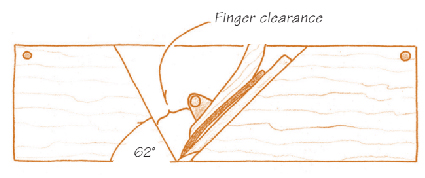
4–3. Finger clearance between the cross-pin and front block must be wide enough to conveniently extract jammed shavings.
The front block is angled at 62 degrees for several reasons. It’s about the steepest slope that gives sufficient clearance for shavings to exit between the front block and the cross-pin while allowing enough space for most people’s fingers to remove an occasional jammed shaving (4–3). If it were much steeper, the space between the cross-pin and front block would be so tight that if shavings collected and jammed there, removal would be an irritating task requiring a pencil point or needle-nose pliers.
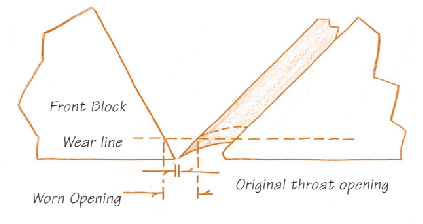
4–4. An enlarged view of the throat opening. It widens as the bottom wears. The steeper the angle at the tip of the front block, the slower the process.
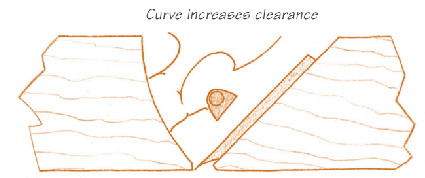
The angle can be made lower, but that may interfere with the shaping of shorter planes. Also, as the bottom of the plane wears, the throat opening widens; the lower the angle of the front block, the faster the widening occurs. One of our goals and one of the advantages of making your own plane is that the plane can have a very narrow throat opening (4–4); it pays to maintain this narrow opening as long as possible. Alternatively, the front block can be cut with a curve, keeping the angle steep at the throat opening and sweeping away in the vicinity of the cross-pin (4–5). This is a good solution. Still, I prefer a straight cut for the first plane because you can practice truing that cut before advancing to the critical job of truing the ramp of the back block, using the same techniques.
4–5. The curved front block increases finger clearance between it and the cross-pin.
Prepare the band saw for making the cuts along the angled lines by precisely squaring the blade to the table. The band saw may not seem the natural choice for this task over the table saw, but in actuality neither machine will make the cuts accurately enough. Making these angled cuts on short, thick stock feels dangerous with a table saw, and requires some setup time. I prefer to use the more benign band saw, carefully making the cuts freehand, and cleaning up the sawn surface to perfection with a block plane. Saw to the waste side of the lines—within the triangular area. Make the 45-degree cut first and don’t be concerned if the saw kerf nicks a bit of the 62-degree line (4–6). Save the triangular scrap.
4–6. The sawn-out front and back blocks.
Now clean up the cuts to produce smooth, square, and straight surfaces on both the front and back blocks. Use the block plane to do this. In experienced hands the task is completed in one or two minutes for each block. A complete novice may require half an hour for the first block and five or ten minutes for the second. This is time very well spent, for in the process you will have touched on almost all the skills needed for just about every other type of planing task. It is a challenging way to start off—trial by fire, if you will—but persevere and there will be great rewards.
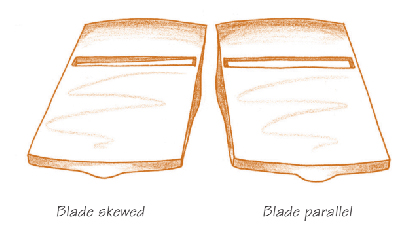
4–7. Bottom view of a block plane. Set the cutting edge precisely parallel to the bottom of the plane.
Cleaning Up the Cuts – Adjusting the Block Plane The block plane must be tuned up and effectively sharpened for the work to proceed smoothly (see Chapters 2 and 3). Set the blade for a very fine cut with the blade protruding evenly across its width. Back off the blade until it does not protrude through the bottom. View the cutting edge from the back of the plane with the plane turned upside down. As you slowly bring the blade forward, see if the cutting edge is skewed in relation to the bottom of the plane; it should appear parallel (4–7). To make adjustments, pivot the blade, bringing one corner up and the other down, using the plane’s lateral adjuster. For some inexpensive block planes that lack adjusting mechanisms, the blade is brought forward and adjusted laterally by gently tapping the back of it with a two- to three-ounce hammer, and it is backed up by tapping the back edge of the plane itself (see Making an Adjusting Hammer on pages 102 and 103). The plane must be properly tensioned for this to work well (see Chapter 2). You will probably find it more precise to adjust the plane with a hammer even if it has a mechanical lateral adjuster.
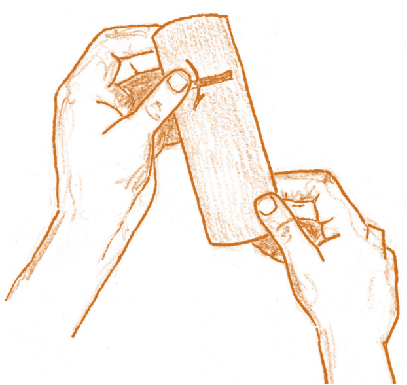
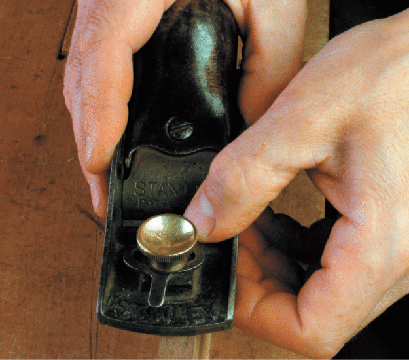
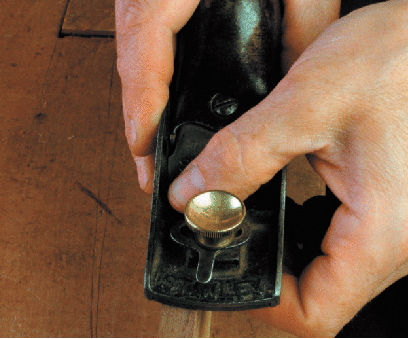
4–8. The thumb is used to feel for the protruding cutting edge.
When the blade is nearly protruding, let your sense of touch guide the adjustments. Gently caress both sides of the throat opening with the pad of the thumb while bringing the blade forward (4–8). Both corners of the blade should simultaneously become barely discernible. If not, make lateral adjustments until the same amount of slight drag is felt on the thumb at both corners. If the throat opening is very fine, you will be very close to the final setting. If the throat is wide, the blade will most likely need to come out a bit further yet. That is because the pad of the thumb dips into the larger opening and can feel the blade before it actually extends beyond the bottom of the plane.
Final Adjustments Begin a stroke on the practice stock. If the blade thunks against the wood and you feel yourself tensing to shove it through, stop: the blade is out too far. Though it is difficult to suppress the urge, there is no need to continue; the only likely result is damage to the planed surface, be it a serious dig or planing it out of true. Back the blade up and try again.
Ideally, the first stroke should either produce no shavings or take the smallest bit, requiring little if any effort to slide the plane across the wood. The shaving should be so thin that it falls apart and is almost dusty. This is because the jointed surface of the wood is not smooth, but slightly scalloped by the action of the jointer cutters; the blade hits the high points of each scallop and misses the low. Always adjust the depth of cut in this fashion, progressing from no shaving to a very thin shaving to the final setting. In this way, you will eliminate accidental digs and the frustrations of dealing with them.
To produce a shaving of equal thickness across its width requires setting the lateral adjustment of the blade exactly. The blade edge must be perfectly parallel to the bottom of the plane. This is crucial; if not done properly, it is very difficult to adequately true or polish a surface. When the blade takes a deeper bite from one side of a surface, either each subsequent pass dips it lower and lower or that corner of the blade may leave a prominent dig.
4–9. Planing with the left edge of the blade.
To check the lateral blade setting, take two shavings, first utilizing only the left side of the blade, and then only the right. The plane is held flat on the practice stock but offset to the left, and then the right, rather than planing right down the middle of the stock (4–9 and 4–10). Compare the thickness of the two shavings and be sensitive to the amount of resistance you feel; it takes more effort to produce a thicker shaving. You may find that one side takes a small bite and the other side produces nothing. Adjust the blade in the direction of the lesser cut and try again, until the resistance feels identical when planing with either corner of the blade. It may also be necessary to readjust the depth of cut.
4–10. Planing with the right edge of the blade.
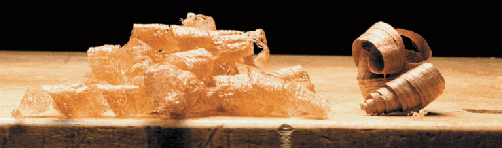
The shavings are of the proper thickness when they lose their “woodiness” or stiffness; instead they feel fluffy and soft when bunched together, like a cotton ball (4–11). Practice your stroke (see below) until continuous shavings can be consistently made from one end of the practice stock to the other. If the board gets out of true from the initial efforts, true it with the jointer; otherwise, it’s difficult to produce a continuous, thin shaving.
4–11. “Cottony” shavings on the left; “woody” shavings on the right.
With only a little experience, peeking at the throat opening and stroking your thumb across it will reveal almost all that is needed to know to set the blade properly. Practice stock becomes unnecessary. It takes just a few minor adjustments as you begin planing to set the blade; this is done without a second thought and with no time lost.
Brenton Duhan grew up between North Carolina and Kandern, Germany–home to two distinct and rich pottery traditions. Brenton studied at Brown University and RISD in Providence, practiced museum exhibit design in DC, and gave tours and made ceramics in New Orleans before moving to New Haven, Connecticut. Brenton is currently maintaining a ceramic practice while studying architecture at Yale University.
The preferred printing supplier for potters everywhere! SmallDogPrints.com
How important is predesigning in making a successful piece?
I would say almost everything I make has been sketched out beforehand. In some way that is the architect in me. So I always start with a sketchbook and that moves into either a paper mock up or an actually clay mock up. And then the final piece eventually.
How would you define a successful piece?
I think a successful piece is a piece that someone wants to live with, wants to have in their lives, and maybe also wants to pass down to someone else in their life after they are gone.
Are there elements to design that are critical to a good piece?
I would say obviously the most important thing is that it functions well, but that function can be determined by you. Maybe it’s a silly function or for me I love making lamps and all you have to do is make sure it lights up. Or with a candle holder, make sure it holds a candle.
Do you welcome critiques on your work?
Yeah, I honestly wish I had a forum or a place where I could get more constructive feedback, I would say. In a style, like an architectural pin up like I get in school because Instagram is not the same, you know. People are very friendly and nice the majority of the time but also they are not able to give you the dedicated time to talk about your piece for thirty minutes. And I think that is really important when you are trying to improve what you are working on.
How has your architectural studies influenced your making?
I think right now my time is spent in architecture so much of the time that when I actually get to the studio I have to be productive. So it’s made me way more productive and I made a lot more designs because of it. So I think it’s a matter of the design process that I learned through architecture and I am excited to make something quickly because buildings take a long time to design and ultimately construct.
Your handles fit your work so well. Do you pull your handles or form your handles?
I love this question. I do both. I start by forming them from a lug of clay that I pinch mostly to get the taper that I like and then It’s a quick dunk in water and a few pulls just to make sure I smooth it out so it feels nice in the hand. And that gets attached to the body of the mug and once it’s attached I further shape it, I dip my finger in the water and shape it with my finger.
“We’re going to make stuff out of beads that is going to take people’s breath away,” says Ralph Ziman in the trailer for “The MiG-21 Project,” a military jet that he and a transcontinental team coated nose to tail in millions upon millions of glass beads.
For the past 12 years, the Los Angeles-based artist has examined the impacts of the Cold War Era and the global arms trade through a trilogy titled Weapons of Mass Production, motivated by his upbringing in Apartheid-era South Africa. More than half a decade in the making, “The MiG-21 Project” completes the series.
The first installment, “The AK-47 Project,” reimagined the aesthetic of one of the world’s most ubiquitous wartime weapons, the Avtomat Kalashnikova 1947, by coating dozens of the guns in colorful glass beads. The second project revolved around the Casspir, a heavy-duty Mine-Resistant Ambush Protected Vehicle (MRAPV) introduced in the 1970s, which he likewise ornamented in vibrant geometric patterns.
“The idea was to take these weapons of war and to repurpose them,” Ziman says, flipping the narrative about icons of violence and transforming them instead into symbols of resilience, collaboration, and collectivity. Vehicles and firearms morph into a theater of hope and strength in the face of a terrible 20th-century legacy.
Apartheid, which in Afrikaans means “separateness,” is the name assigned by the minority white-ruled Nationalist Party of South Africa to a harsh system of racial segregation that began in 1948. The period lasted until 1991 and was closely linked within the context of international relations to the Cold War as tensions erupted between the U.S. and the former U.S.S.R. Spurred by the deterioration of the two countries’ WWII alliance and fears about the spread of Communism into the West, the war began in 1947 and also ended in 1991 when the U.S.S.R. was dissolved.
During this time, the Russians produced a fighter jet called the Mikoyan-Gurevich MiG-21. The plane is “the most-produced supersonic fighter aircraft of all time,” Ziman says. “The Russians built 12,500 MiG-21s, and they’re still in use today—just like the Casspir and just like the AK-47s. But it’s one thing to say, hey, I want to bead a MiG, and then the next thing, you’ve got a 48-foot MiG sitting in your studio.”
The MiG-21 cockpit
“The MiG-21 Project” combines photography and costume design with historical research and time-honored Indigenous craft. The project encompasses not only the jet but a series of cinematic photographs and elaborate Afrofuturist regalia inspired by military flight suits, African tribal textiles, and space travel.
Ziman’s team comprises numerous skilled artisans from Zimbabwe and Indigenous Ndebele women from South Africa’s Mpumalanga Province, who are renowned for their beadwork. For the Ndebele, beadwork is a means of expressing cultural identity and rites of passage, taking on powerful political connotations in the 20th century as it became associated with pre-colonial African traditions and identity.
Tapping into the lessons of our not-so-distant past, Ziman addresses current conflicts like war and the global arms race, modern colonialism, systemic racism, and white supremacy through the lens of Apartheid. Funds raised throughout the process, part of the mission of the Weapons of Mass Production trilogy as a whole, are being donated to the people of Ukraine in support of the country’s ongoing conflict with Russia.
You’ll be able to see the “The MiG-21 Project” later this year in Seattle, where it will be on view from June 21 to January 26, 2026, at the Museum of Flight. Explore more on Ziman’s website.
Photo by Mauricio HoyosPhoto by Mauricio Hoyos“Hero Of Cuito Cuanavale,” Inkjet on Moab Entrada paper, 43 x 56 inchesPhoto by Mauricio HoyosDetail of the MiG-21 cockpitPhoto by Mauricio Hoyos“The Raider and Her MiG-21,” Inkjet on Moab Entrada paper, 43 x 56 inchesPhoto by Mauricio Hoyos
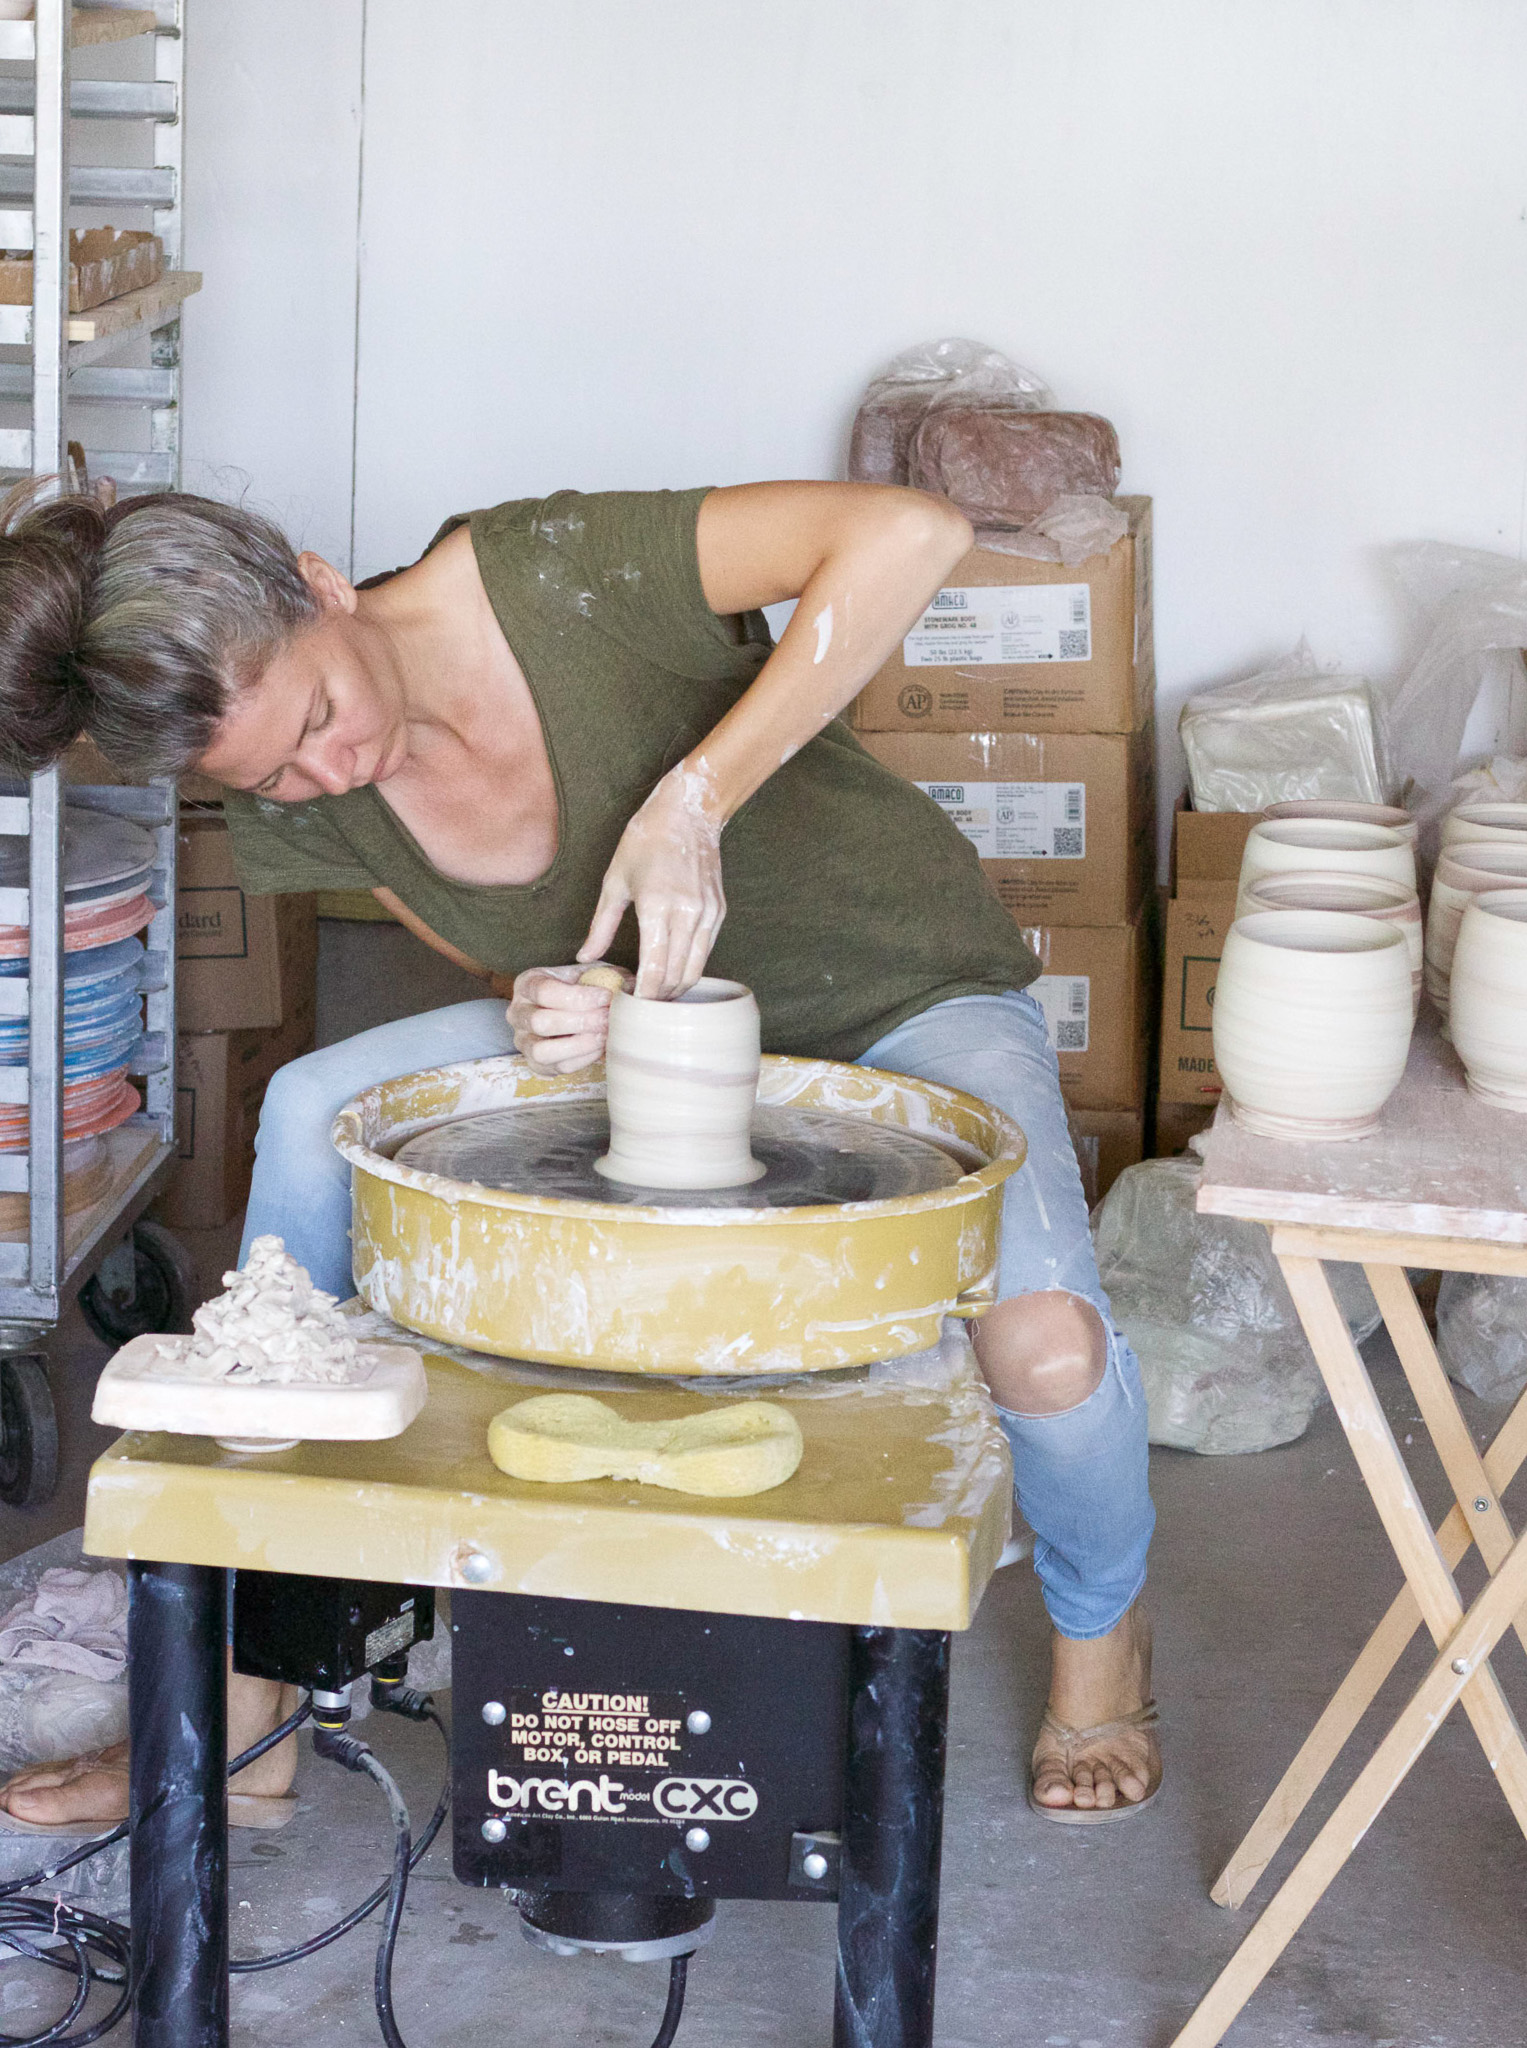
Emilie Bouvet-Boisclair is a Canadian born artist living in Illinois. Emilie’s approach to pottery is formed by a past of learning to throw with a production potter, and being immersed in the community studios of Chicago. Emilie has been a painter in her youth through her mid 20’s, holding a BA in Fine Art from the State University of New York, Geneseo. Emilie’s passion in the arts lies in the process of discovery.
How do you contain the dust as a maker inside the house?
You have to wipe things down. I have to say that I am only using the coil and pinch method inside and sometimes sculpture. But I am not having a lot of little scraps everywhere. The way I coil and pinch, there is almost no scraps when I am done with the piece; there might be a couple little dots here and there of clay, but it’s not a messy technique.
Are glazing inside also?
Nope. I don’t glaze inside. It’s way too messy for me!
In our interview on the podcast you mentioned that you will make on the dining room table so I am wondering if there is a concern for food safety?
That’s a really good question. I use Amaco clay that is used all over the country with children. So I am not worried about food safety, but I do keep it tidy- I wipe the surface down, I put everything away when I am done. So I keep it safe.
You mentioned that you leave the pieces on the table to dry, and I am curious how you control the drying process?
Coil and pinch is literally the only thing I do in the house. Ever since I started rolling my work out, I never have an issue with cracking. And the compression of the pinching is enough. These little details you learn on the way, I just don’t have cracks on my bottoms anymore, ever since I changed my technique. So it’s great that it dries fast because it isn’t going to dry in the garage!
Is clean up any different inside the home compared to clean up in the studio?
I just wet sponge everything. I should probably be using our sink downstairs that is more for laundry instead of the sink upstairs in the bathroom. So I am guilty there, but out in the studio when I am wheel throwing, I am not super neat; I am a pretty messy person so it takes a lot longer to clean in the garage studio than in the house. I keep it tidy inside because I have too.
What is your favorite form to make on the wheel, and what is your favorite form to make in coil and pinch?
With coil I have been having a lot of fun lately (because this is what I have been working on so of course I can talk about it) getting my bases as wide and as shallow as I can go and then bring them in. So I am really experimenting pushing that form to see what happens if the base is wider and the top is smaller and narrow. I just can’t kick it. Maybe I will be pinching all year! On the wheel I really like building altered forms on the wheel. I make these spice cellars on the wheel. I think the things that are hard end up being the things you are proud of. These spice cellars that have an insert on the inside that is a cross. It took me a long time to figure out how to dry those without warping them into a square every time. So I like a challenge when I am on the wheel.
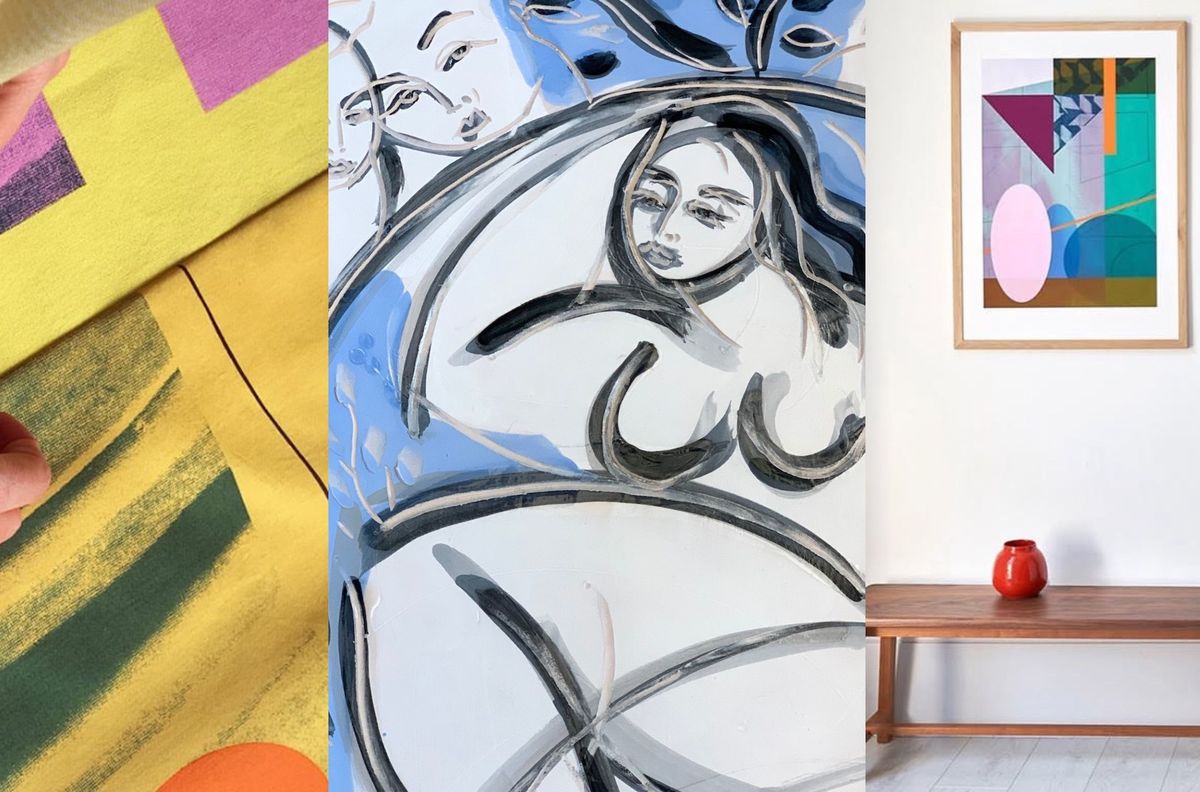
We’re forever inspired by artists who dare to create works without traditional gallery spaces in mind. Textile art and ceramics are reshaping how we experience the modern home, offering objects that blur the line between functionality and fine art.
By Sophie Heatley | 02 Dec 2024
Two artists at the forefront of this movement, Heidi Lanino and Michelle House, bring unique perspectives to their craft, turning everyday items and spaces into expressions of creativity, connection, and cultural storytelling. In this interview, we bring together their insights on presenting statement pieces the artist’s way.
Heidi Lanino: “My work is meant to interact with its environment.”
Heidi Lanino, known for her figurative drawings and paintings, describes her transition from drawing to clay as a natural evolution. “Working with clay connects me to the earth,” she explains. “It’s a material rich with history, deeply rooted in functionality and beauty.” Her ceramic plates, adorned with calligraphic lines and sgraffito designs, often depict women, birds, and foliage inspired by mythology and nature. “I want my work to celebrate the fabric of life,” she says, “transforming domestic objects into poetic vessels that merge the natural and the philosophical.”
Detail of La Femme Bleu by Heidi Lanino (clay, slip, ceramic, glaze, 2023, 9 x 38 x 38 cm)
Lanino’s process is as meditative as it is expressive. “The act of hand-building allows me to shape, draw, and paint directly into the clay, creating works imbued with texture and symbolism,” she shares. For Lanino, making a statement isn’t just about bold designs but about creating a dialogue between the piece and its surroundings.
“Arranging plates in clusters on a wall creates dynamic compositions that feel like visual poetry,” says Heidi Lanino | Pictured above: ceramic display of handmade bowls by Heidi Lanino
“My work is meant to interact with its environment,” she adds. “Arranging plates in clusters on a wall creates dynamic compositions that feel like visual poetry, telling a story that changes with the viewer’s perspective.” Her advice to collectors? “Let the pieces breathe—use neutral tones or minimal décor to allow the details to shine.”
Heidi Lanino’s Studio
Michelle House: “Don’t be afraid to hang colourful works on dark walls.”
For Michelle House, textiles are an opportunity to infuse spaces with vibrancy and texture. Her bold, multi-dimensional works, often layered with geometric patterns and intricate details, aim to spark a tactile and visual dialogue. “Textiles have a unique power to soften a room while adding energy,” she explains. House encourages collectors to be adventurous: “Don’t be afraid to hang colourful works on dark walls. I saw a yellow piece of mine displayed on a deep grey wall—it was striking!”
Young Vic Series: No 1 by Michelle House
From left to right: Traces #2 , Traces #1 , Traces #4 – Editions of 50 (Archival Hahnemuhle Photo Rag 308gsm (100% cotton) printed with pigment inks, 2019 – 2020, 84.1 x 59.4 cm)
Lanino also believes in the power of experimentation, encouraging designers to embrace creative risks. This approach was recently highlighted by a collector who paired her swirling pencil and charcoal marks with their precisely lined walls. The result was a striking visual contrast that maintained a harmonious balance, enhancing the composition without overwhelming the space.
Figure No.1 (SOLD) by Heidi Lanino in a collector’s home (charcoal and pastel on paper, 2023, 119.4 x 88.9 cm)
Similarly, House emphasises the versatility of her work, noting how it adapts to different environments. “Some pieces are hung from wooden dowels to create dimension, while others are framed behind anti-reflective glass to highlight the texture of the linen. I’ve created curtains for clients before with my work! The possibilities are endless,” she says.
A unique curtain commission by Michelle House using her signature geometric designs
“Even in narrow spaces like stairwells, textiles can make a statement while dampening sound and adding warmth.” Beyond their visual appeal, House explains, textiles absorb sound, adding warmth and calm to a space—qualities that enhance their presence as both art and functional design elements.
“A statement piece isn’t just about standing out; it’s about bringing meaning to the everyday.”
Both artists draw immense fulfilment from their commissions, which often push their creativity in unexpected ways. Lanino recalls creating ceramic pieces for hospitals and healing centres. “Knowing my work could bring comfort and familiarity to such spaces gave the process a deeper meaning,” she says.
Fleur Blue Flower by Heidi Lanino (clay, ceramic, slip, 2022, 10.2 x 35.6 x 35.5 cm)
Similarly, House shares her experience designing textiles for a historic building. “The British Academy commission was a fascinating challenge,” she reflects. “Drawing inspiration from the architectural details, I created textiles that echoed the building’s history while complementing its grandeur.”
British Academy Commission | Photography credits: Benjamin Hutton
Their work is as much about storytelling as it is about craftsmanship. Lanino sees her plates and vessels as “reflections of cultural storytelling,” while House considers her textiles “artworks that live and breathe within a space.” Together, they illustrate why ceramics and textiles are becoming the new statement pieces for modern interiors. As Lanino puts it, “These aren’t just objects—they’re an invitation to connect with beauty and meaning in everyday life.” And House agrees: “A well-placed textile or ceramic can transform a room, creating an atmosphere that feels both grounded and alive.”
Statement Pieces for Modern Interiors
Whether it’s a single bold plate on a table or a series of textiles adorning a stairwell, the power of a statement piece lies in its ability to transform a space—and invite conversation. As Lanino aptly concludes, “A statement piece isn’t just about standing out; it’s about bringing meaning to the everyday.”
Red Reeds by Michelle House (Archival Hahnemuhle Photo Rag 308gsm printed with pigment inks, 2014, 50 x 40 cm)
Make a statement at home with our Statement Pieces Collection, full of works that inspire conversation and leave a lasting impression.