برچسب: Printing

  • He Won A Potters Wheel… And He Does 3D Printing | Ike Lobel

    He Won A Potters Wheel… And He Does 3D Printing | Ike Lobel


    Ike Lobel | Episode 1030

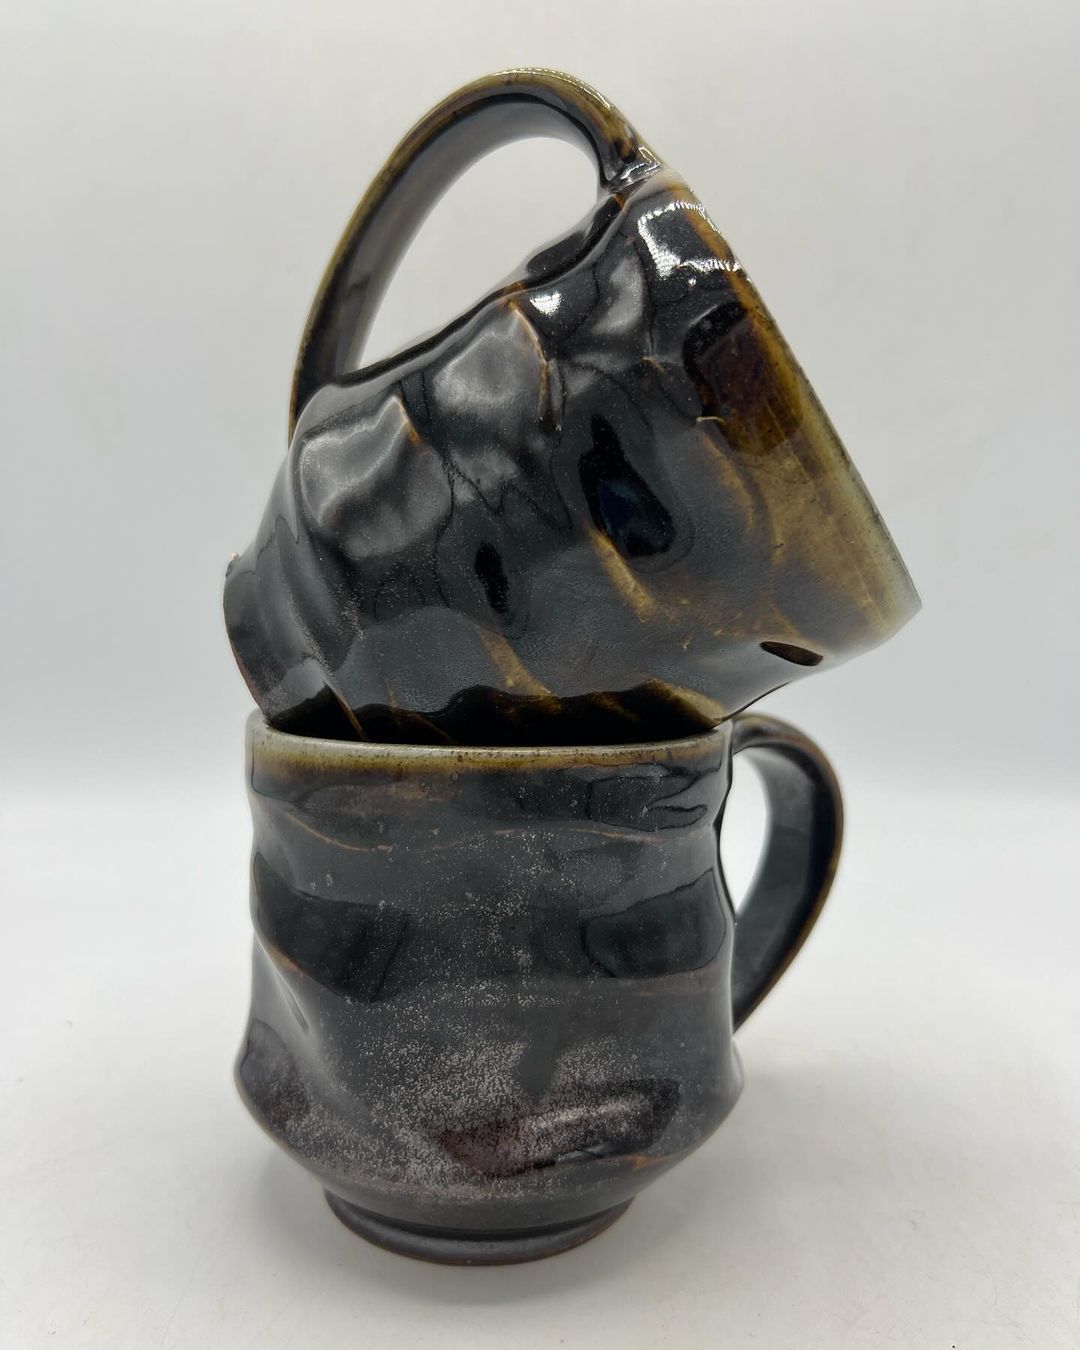
    Ike Lobel is a Ceramics major at Suny New Paltz. Ike’s work focuses on the use of 3D printing in ceramics and the potential results of it. Ike has been working with clay for the past 16 years, in this time Ike has developed his style focusing on high precision and creating results that respect both the history of ceramics but also technological advances.

    SPONSORS

    Image result for Patreon logo  You can help support the show!

    Skutt Logo


    Number 1 brand in America for a reason. Skutt.com


    Georgies Logo


    For all your ceramic needs go to Georgies.com


    Why 3D? What is the draw towards 3D?

    I think it is something born inside me but I was watching Youtubers from when I was six building things with 3D printers with plastic. I think it just left something inside me and having my two worlds combine in printing clay it was just meant to be.

    How  does 3D printing lend itself to more creativity?

    Well I have really bad handwriting. Most people cannot read it. And so being able to design something on a computer and then have it come into the real world is kind of magical and it’s nice that I do not have to worry about what my hands do and instead I can just worry about transmitting my brain to the computer and the 3D printer.

    Do you see the irony of you pursuing 3D printing and you won a potter’s wheel?

    Yeah, we’ve been thinking about this for awhile. My family is like, What are you doing with a potter’s wheel? I think it’s going to be co-ownership between me and my dad.

    How does taking a break from ceramics help you be a better ceramicist in the future?

    I think in school there is so much pressure for it to be graded and you are always trying to make work for your professors and that’s a lot of pressure and so I think taking a couple of years off and letting it reignite the love for ceramics could be amazing. And then I could start making ceramics for myself again instead of for a grade. I miss making mugs and stuff just so I could give them away.


    What is the first thing you are going to do when you graduate?

    I am graduating on the 19th and the first thing I am going to do as ironic as it sounds I am going to drive home and build a wheel. (laughter) I haven’t been home in five months so I am excited to go home and build that wheel.

    Book

    Advanced 3D Printing with Grasshopper by  D. Diego Garcia Cuevas 

    Contact

    Instagram: @ikes_pottery


    Source link

  • A Hand Builder Using Photo Polymer Printing Plates | Jonah Harjer

    A Hand Builder Using Photo Polymer Printing Plates | Jonah Harjer


    Jonah Harjer | Episode 1038

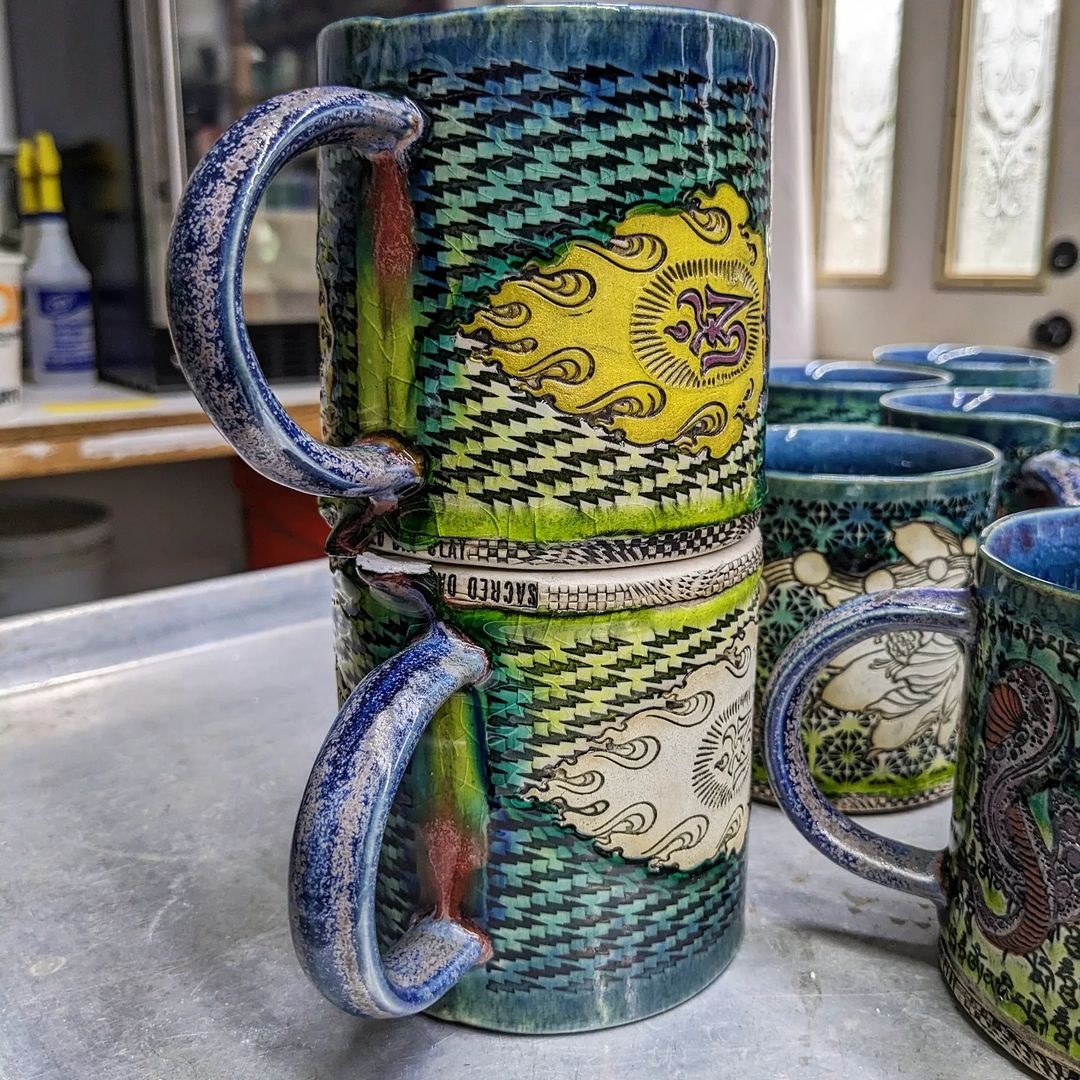
    Jonah Harjer is a Michigan based ceramic artist. His work is highly decorated intricate designs through the use of stamps and decals. Jonah’s stamps and decals have became central to his art. His process uses photo polymere printable plates to impress into the surface of his work.

    SPONSORS

    Image result for Patreon logo  You can help support the show!

    Skutt Logo


    Number 1 brand in America for a reason. Skutt.com


    Georgies Logo


    For all your ceramic needs go to Georgies.com


    How much time in general are you investing into each cup?

    I am investing, in general, I am going to say about two and half hours into each cup.

    That is a chunk of time.

    It is and that depends on the cup because there are some that are more time than that. I am not making those right now. I haven’t made any of those for about a year, but in average about two and half hours goes into a cup.

    Do you make a series and then after you have done enough cups do you throw the plates away so they can’t be repeated or do you save them for the future? Are you making in series?

    So that’s a great question. It’s the Dutch in me okay, I don’t throw them away and I know what you mean. I see people who do a lot of ceramic molds who retire their molds after awhile and I understand and I don’t know anything about those but as far as these plates go I have never thrown any of them away because for me they don’t seem to break down. They last and last and last. Sometimes I want to come back to a plate for a little particular reason and it’s nice to have those available.

    How important for your work is a spray booth?

    So a spray booth is very important for my work. I should add that last summer was the first time that I ever sprayed any kind of underglaze or paint or anything. I had bought a cheap Harbor Freight ten dollar paint sprayer a couple of years back and it sat on my shelf forever. I was watching other potters spraying and finally I decided to pick it up last summer and now I have bought another one and I have an air brush gun as well. I even built a spray booth last fall so I didn’t have to do an outdoor set up.

    Unique is one of the words I would use to describe your work. Is unique a goal or is it result of your creative approach?

    Wow, that’s a great question. I would say it is definitely a result. Definitively because I will often times start out with a goal but it ends up just being a result. Yeah, that’s really interesting, I’ve never thought about that. And as I am answering your question I am going to say it is a little bit of both I suppose. Somewhere in the deep down back of my mind there is part of me that wants to make something different. I always tell people I am making work that I don’t see and that I would like to buy. That’s really what it is.

    How are your handles made?

    So my handles are all extruded. I can pull handles. I prefer not to. For me, the reason I extrude my handles is because a hand pulled handle is great, but it’s not for me. It’s not the thing that makes my mug what it is. The ones that you are seeing that are stamped, I am taking that same handle and pressing it between two plates and then it squishes it. That’s why they look like that.

    How do you keep your heart enthusiastic and in love when there is the daily grind of making work?

    From a few different places. One is from the sort of cumulative memory of all the jobs in my life that I have not enjoyed and I am fifty years old and I have had quite a few. And then the other side of it is that I know the alternative, I know what else I could be doing and it’s not appealing to me. I don’t know, I suppose it’s a daily reminder that I could be doing other things. And even when it’s not going so great it’s better than X, Y, and Z and that is enough for me. It keeps me coming back. It really does. And my wife is really supportive an my family is supportive so if I am really having a dark day I can always call them and they can remind me where the light is.

    Book

    The Dog Stars by Peter Heller

    Contact

    sacreddayclay.com
    Instagram: @sacreddayclay


    Source link

  • Unlock the Magic of Printmaking: Affordable Printing Press Solutions

    Unlock the Magic of Printmaking: Affordable Printing Press Solutions


    Who says you need a printing press to teach printmaking? Whether you’re working with a fully equipped studio or a handful of rolling pins, it’s time to introduce the magic of printmaking to your studentsA printing press—whether it’s a professional model, a DIY solution, or a clever alternative—can transform your students’ artistic experience and your lesson-planning creativity.

    Hear why you should add a printing press to your art studio and discover creative options for every budget!

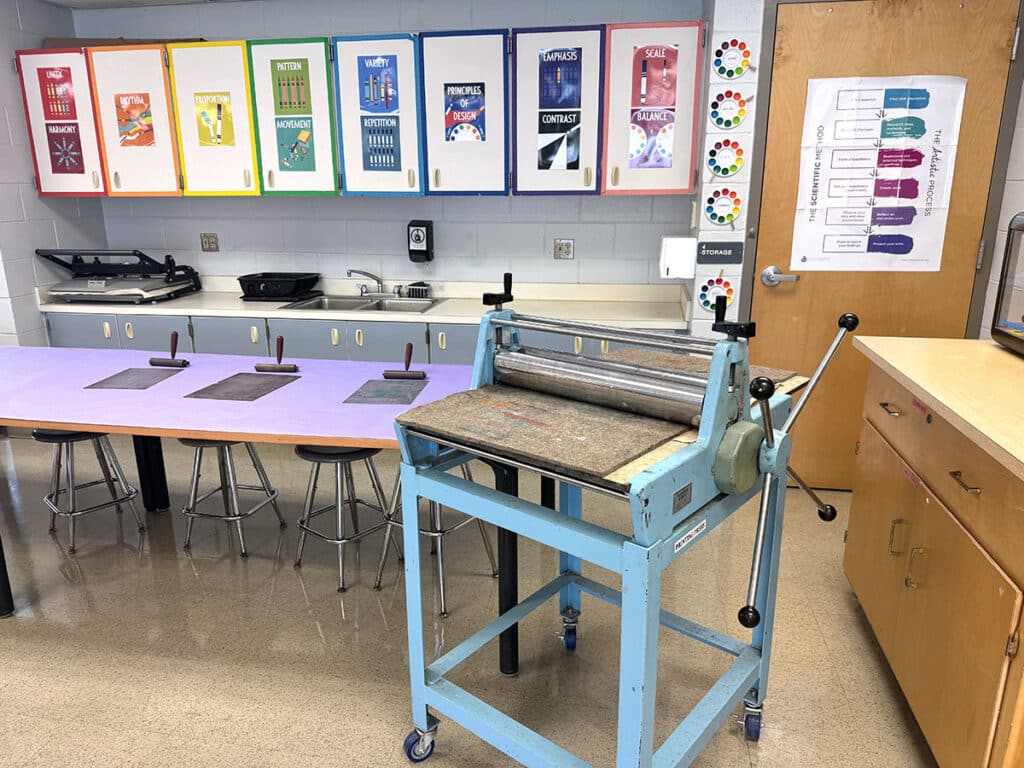
    printing press in elementary art classroom
    Image courtesy of Kristy Gaunt House

    Why should I add a printing press to my art classroom?

    While many art teachers can effectively teach printmaking without a professional printing press, there are many benefits to having one in any grade-level art studio. A printing press isn’t just a fancy tool—it’s a game-changer. Take a look at Kristy Gaunt House’s elementary art room and how her students are able to whip out prints in 20 minutes!

    https://www.youtube.com/watch?v=iEjWQdpxVRs

    Here are five other benefits of having a printing press in your art room:

    1. Professional-Level Results
      A printing press applies even, consistent pressure, ensuring your students’ prints come out clear and polished.
    2. Playful Experimentation
      Along the same lines, a printing press provides even pressure with layering, textures, and advanced inking methods.
    3. Increased Print Production
      Having the right tools and equipment will speed up any artmaking process! Your students will be able to produce more prints, which helps with large classes and short periods.
    4. Career Preparation
      Introduce students to tools and techniques they may encounter in a professional print production environment.
    5. Cross-Curricular Goldmine
      Printmaking and learning about printing presses are a bridge to other subjects. Dive into the history of the Gutenberg press, explore the science of pressure and mechanics, play with mathematical patterns and measurements, and create visual storytelling through sequential prints.

    printing plate, print, baren, and wood spoon

    What are my printing press options for the classroom?

    No matter what your budget or space constraints are, there’s a press option for you and your students! Consider how you can provide future printmaking opportunities for your students. Explore grants and harness stakeholder relationships to bring an upgraded press to your studio—without putting a line item in your budget.

    Let’s take a look at four alternative printing presses:

    1. Tabletop Etching Press
      Compact and portable, these presses are perfect for classrooms with limited space. They handle small-scale projects like linoprints, monoprints, and drypoint etching. They are best for high school students ready for advanced techniques.
    2. Relief Printing Press
      Explicitly designed for block printing, these presses make linoprints, woodcuts, and collagraphs a breeze. They’re easy to use and require minimal setup. They’re best for any grade level to explore bold and expressive prints.
    3. Hand Crank Press
      Try a DIY press kit or build your own. These options provide hands-on learning opportunities with mechanical processes. This option is best for classrooms on a tight budget or with students curious about engineering.
    4. Screen Printing Press
      Ideal for textile art, a screen printing press lets students design and create shirts, posters, and more. It’s an exciting way to introduce layering, color mixing, and design thinking. They are best for secondary students interested in commercial and graphic design.

    student making a relief print with a baren

    What are creative alternatives that don’t involve a traditional press?

    If a printing press is still not in the cards, no worries! There are several hacks using tools you already have that simulate the effect of a press. Many art teachers create phenomenal prints with their students—and without fancy equipment.

    Here are six hacks to replace a printing press:

    1. Rolling Pins
      Clean the clay mud off your rolling pins and pull them out for your next printmaking unit. Roll over the back of your print for consistent pressure.
    2. Wooden Spoons
      The next time you’re at the thrift store, grab a bunch of large wooden spoons. Rub the back of your paper firmly with the bottom of your spoon for small-scale prints.
    3. Heavy Books
      Put those dusty textbooks back to use. Stack them over your inked plate and paper overnight for simple yet effective results.
    4. Hands
      The best artmaking tool is an artist’s hands! Apply pressure by rubbing with the palm of your hands as evenly as possible.
    5. Clean Brayer
      Use a clean brayer to roll over the back of your paper to catch the ink. Just be sure to clearly mark which brayers are for inking and which are for transferring.
    6. Barens
      These are circular tools with a handle, specifically designed to apply even pressure to transfer ink from the block to the paper.

    rolling pin and spoons

    Adding a printing press—or a creative alternative—will take your art room to new heights. Whether students are carving linoleum, experimenting with layers, or rolling ink onto foam, they’ll walk away with a greater understanding of printmaking and a massive sense of accomplishment. Search and apply for grants to purchase a professional-grade printing press to provide your students with an incredible printmaking experience! Try a smaller-scale model like a tabletop press or a DIY option to take your processes to the next level. Bring everyday materials to the table for your students to discover the joy of printmaking. Roll up your sleeves, print on, and press forward!

    For more printmaking resources, dive into the following:

    How can access to printmaking tools like a printing press inspire students to explore potential careers in the arts, design, or engineering?

    To chat about printmaking with other art teachers, join us in The Art of Ed Community!

    Magazine articles and podcasts are opinions of professional education contributors and do not necessarily represent the position of the Art of Education University (AOEU) or its academic offerings. Contributors use terms in the way they are most often talked about in the scope of their educational experiences.


    Source link

  • 6 Reasons to use high-quality art printing services for your art collection – Veronica Winters Painting

    6 Reasons to use high-quality art printing services for your art collection – Veronica Winters Painting


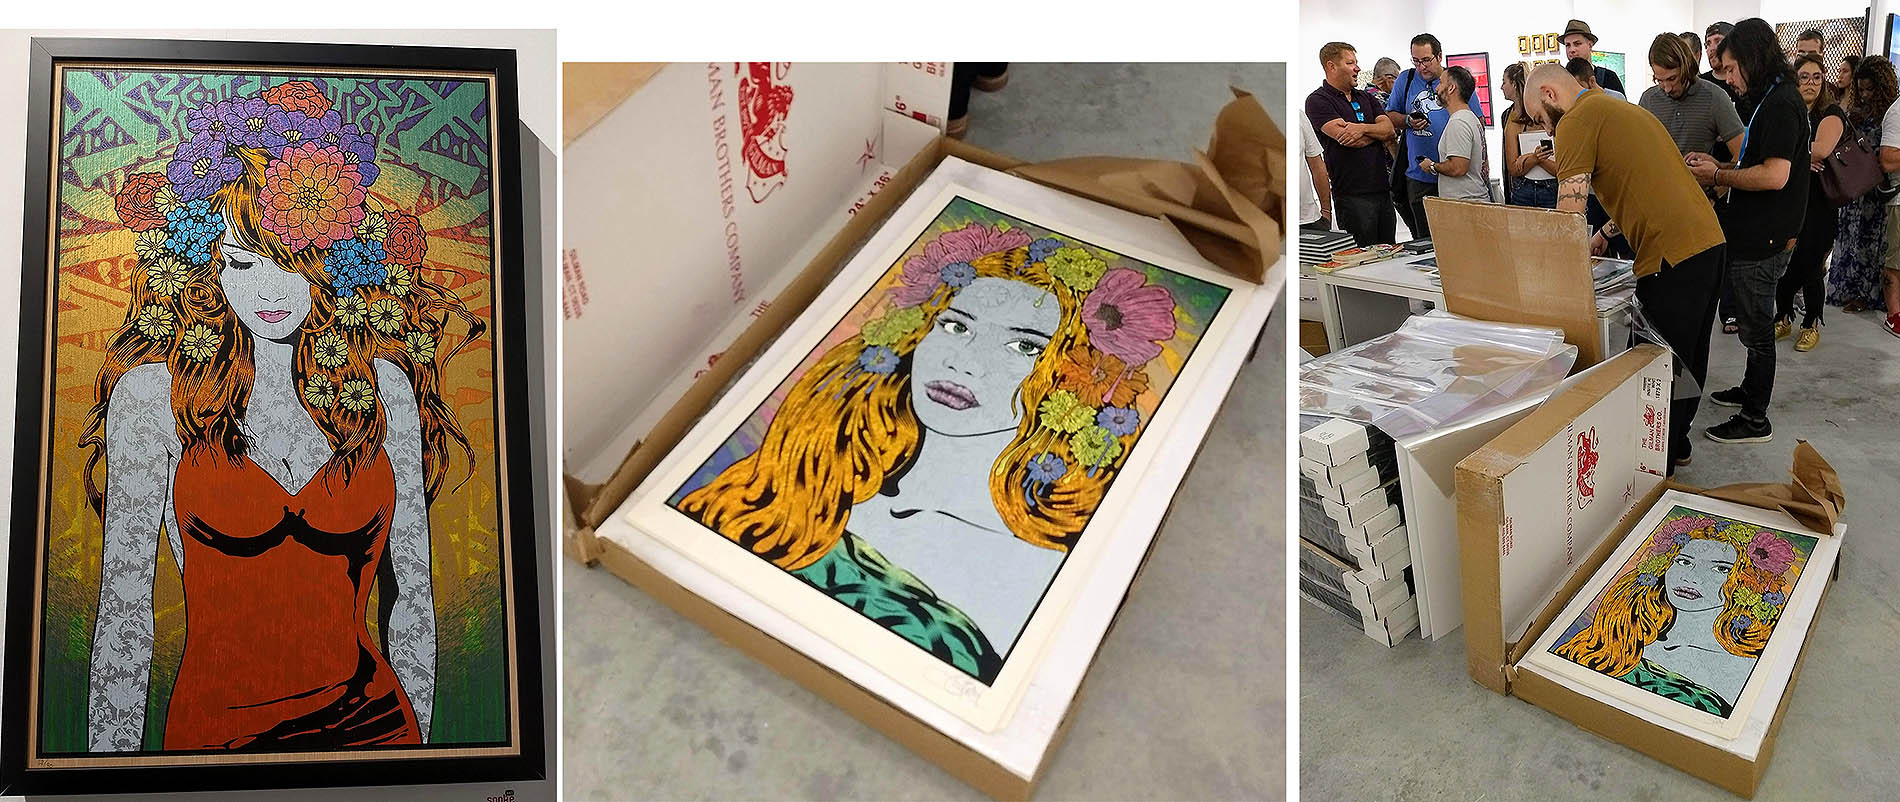
    art miami 2018, spoke art
    Spoke Art gallery, the art fair in Miami.

    Sometimes it’s unclear what the difference is between art print companies, especially if you compare them online. However, all of us can agree that high-quality printing can make or break the display of a piece. High-resolution, well-crafted prints bring art to life, capturing the vibrancy, details, and textures that a lower-quality print might miss. With advancements in printing technology, fine art printing has evolved into a specialized service. In this guide, we’ll explore the benefits of using high-quality art printing services and why it’s worth the investment for collectors and creators.

    #1 Maintaining Originality and Detail

    A major benefit of high-quality art printing services is the ability to reproduce broad and accurate color spectrum, contrast and details of the original, fine art. Standard printing processes may fail to capture super fine brushstrokes, texture, and shifts in tone that create a special feeling when we look at art. So art printing companies that use high-resolution giclée or specialized pigment-based inks can offer reasonable fidelity.

    If you plan on using the art printing service yourself, you must have a high-resolution, digital file to print from that’s at least 300 dpi and saved as a png or raw file. jpegs are compressed images and the file compression may show up printing large posters.

    Sir Frederic Leighton, La Nanna

    #2 Using Archival-Grade Materials

    Archival-grade materials are designed to last decades without fading, yellowing, or warping. This level of durability is essential for anyone looking to keep their art prints in pristine condition over the long term, especially when they are limited-edition or rare art prints. Companies like the Stackhouse printing use the highest-quality materials for colorful art reproductions that can last over 100 years without fading under museum conditions.

    Always keep your art and prints away from a direct sunlight, artificial light, high humidity and changing room temperature conditions. Art and prints fade, crack and warp if they're not custom-framed with archival, non-glare plexiglass and backing.

    Archival materials used for printing add an extra layer of protection, helping fine prints resist the effects of light and moisture, thereby preserving their beauty and market value. When you shop for a printer, ask what supplies they use because paper must be pH-neutral not to yellow over time.

    Moonlight, 22x30in, closeup, colored pencil on art board, Veronica Winters

    #3 Using Advanced Printing Techniques

    Companies that create high-quality art prints use advanced printing techniques. Some of these methods include:

    Giclée Printing: A technique known for its exceptional quality, giclée printing uses pigment-based inks and high-resolution printers. This method is popular among artists and art collectors due to its ability to render incredibly detailed reproductions that mimic the look and feel of the original piece.
    UV-Protective Coatings: UV coatings shield prints from sunlight, which can fade colors over time. This added layer of protection is necessary for prints displayed in well-lit spaces or under direct lighting. Printing companies like the Stackhouse use these advanced methods for high-end art reproductions.

    #4 Having Customization

    Customization is a big advantage of working with a high-quality art printing service. Standard printing services often have limited choices in sizes, framing, and finish. A specialized art print shop can print pictures in a requested size. It’s invaluable for art collectors aiming to match a print to their collection’s theme or display needs, as well as for artists wanting to maintain complete control over the presentation of their work for a show.

    If you plan to make a large order, ask for a test run of your pictures. I'm sure the shop could print a sample for you to appreciate their quality.

    #5 Enhancing the Viewer’s Experience

    Usually, we can distinguish between the art print and the original when we look at art in person. The emotional impact is lost in art reproductions. However, today advanced printing techniques are so good that high-quality prints can evoke similar emotions as the original piece. If you go to the Miami Art Context you can look at gigantic photographs that have beautiful detail, color, contrast, and sharpness. Sometimes art galleries display printed digital art that looks impressive because of high-definition in prints. The quality is so perfect that it looks like art, not a print.

    javier bellomo coria_face_art miami 2017
    Javier Bellomo Coria, Face, Miami Art Fait, 2017

    #6 Offering Long-Term Value and Investment Protection

    Both limited-edition prints and rare art prints could become a valuable investment when these art prints are signed by a famous artist. Such prints may appreciate in value over time because the artist gains recognition. Therefore, it’s important to know if they were printed with high-quality inks, paper, and UV coating to ensure longevity and peace of mind, knowing that art prints will continue to hold their value and appeal.

    Andy Warhol’s silkscreen print seen at the auction in Naples, FL
    You must understand the difference between a giclee print and a hand-pulled lithograph or silkscreen. Both types of prints can be signed by a famous artist, but the first one is a computer-generated print, while lithographs, silkscreens and intaglios are hand-made prints pulled through the press. Done in multiples, these prints should have a much higher price point as opposed to a giclee print.

    Next time you see a beautiful art print, ask its owner where it got printed. I keep a short list of businesses that offer different art services. For anyone serious about their collection or artistic portfolio, investing in a professional art printing service is a decision that pays off in the quality and satisfaction of each piece produced.

    Check out open-edition prints in my shop.

    To read more:


    Source link

  • Mushroom Block Printing with Styrofoam

    Mushroom Block Printing with Styrofoam


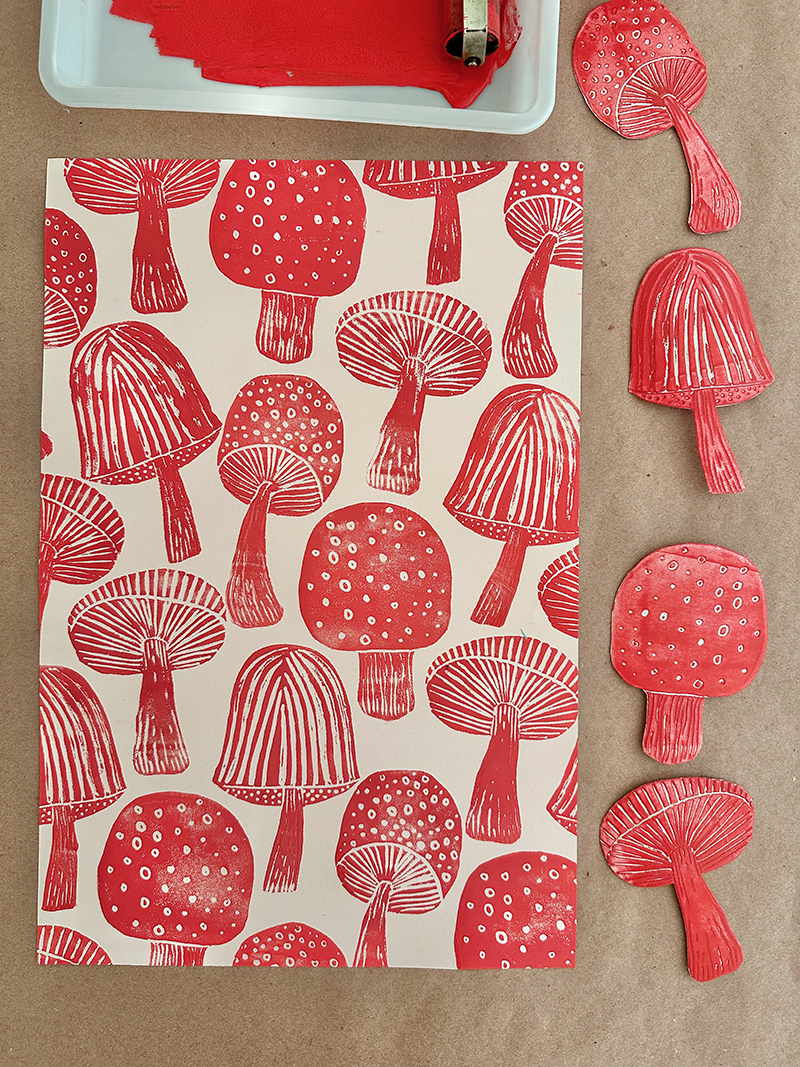
    Recently I was inspired by the last module in our Material Matters course which is all about printmaking! My partner Shannon and I spent this past year over on The Creativity Project exploring 12 different materials and art processes for our course, saving the best for last. Well, maybe not the best (for me it’s a tie with collage) but arguably the most rewarding.

    Mushroom print on a table made with styrofoam sheets and printing ink.

    Watch the Instagram Reel of this process

    As we were writing the playbook for this printmaking module, it forced us to define many of the different printmaking techniques that artists have used throughout history. There is silkscreening, monoprinting, collagraphy, etching, and block printing to name a few. There is also stamping which makes us think of rubber stamps, but can also include block printing and even some collagraphs. At first, we categorized styrofoam prints as etching, because it feels like you are etching into the foam when drawing and making indents. But then we came to understand that this is really more like carving, as in the process used for block printing, which is defined this way:

    Block printing involves carving a design into a block of material like wood, linoleum, rubber, or foam. When ink is rolled on top, it lays on the parts that haven’t been carved away, then is pressed onto paper or fabric to create a mirror image, much like a stamp.

    A tube of Blick printing ink being used to print styrofoam mushrooms.

    [ I am a participant in affiliate programs designed to provide a means for bloggers to earn small fees at no cost to you by linking to Amazon.com and affiliated sites. ]

    These styrofoam block prints are really easy to make. Let’s start with the supply list.

    Materials needed for Styrofoam Block Printing

    ~ Butcher paper or newspaper to cover table (100-ft roll for at-home use)

    ~ Styrofoam sheets (I really hate styrofoam but I had these 4×6 sheets left over. The most eco-friendly way to do this is to save and repurpose styrofoam packaged food trays)

    ~ Dull pencil or ballpoint pen

    ~ Printing ink (I used Blick but you can also purchase this Speedball starter set or individual colors)

    ~ Tray or non-porous surface like a cookie sheet or glass dish to roll out ink (or you can purchase this set of inking trays)

    ~ Brayers

    ~ A pile of newspaper sheets or scrap paper (so you can have a fresh sheet for each printing pass)

    ~ Nice paper, here I used 12 x 18 sulphite paper in light pink (from this color bundle, or just get white)

    ~ Hand wipes or damp paper towel

    Using a dull pencil to draw mushrooms onto styrofoam, then cutting them out to use as a printing plate.

    How to Print with Styrofoam

    1. It helps to have an idea of what you want to draw before starting. You can’t erase on the styrofoam because it’s not the pencil marks that matter, it’s the indents in the styrofoam that matter. For these mushrooms, I drew them out on paper first so I could understand the sizing and varying shapes and textures. If you are doing this with children, it’s still helpful to have a plan. With very young children, ages 3 and 4, they can just draw directly onto the styrofoam because it matters less what they are drawing and more about the process. Not that process doesn’t also matter at ages 5 and up, but I think that 5 is an appropriate age to suggest thinking about a plan. Some children may not want to plan and will just jump right in and make marks and doodles onto the styrofoam and that’s fine, too. It depends on the time that you have, the size of the group, and your available resources.

    2. Draw onto the styrofoam using a dull pencil or a ballpoint pen.

    3. Cutting out the shapes is optional. In fact, it’s not necessary at all with children. We usually don’t cut out shapes when doing this with a class or a group. But for this patterned print, I wanted to cut out the shapes so that they could fit around each other.

    Rolling out printing ink on a tray with a brayer, getting ready to print with styrofoam.

    4. Squeeze some printing ink at the top of your tray. I mixed a little white with the red to brighten the color and make it more opaque. Use the brayer to roll the ink in a small rectangle, going up and down and then sideways a few times until you hear the sticky sound and the roller is completely covered.

    5. Make sure to have your stack of cut-up newspaper ready to roll on top of, and some wipes or damp paper towel to keep your fingers clean. You would be amazed at how quickly the ink finds itself where it shouldn’t be. When doing this with children, have one end of the table be the ink rolling area. You can even tape the tray down. Try and keep a system like this: clean paper is laid down on a clean part of the table; the ink is rolled onto the styrofoam plate in the inking area; then it is carefully brought over to the clean paper. It might be hard to manage this with a larger group so be flexible and accept that nothing will be perfect and it’s more about the experience!

    Red printing ink is rolled onto a mushroom carved from styrofoam, then pressed down onto paper.

    6. Roll the ink onto the styrofoam, making sure to evenly cover the whole shape, then turn it over carefully onto the paper. I decided to start somewhere in the middle with the pattern. I had no real plan, but I knew with 4 different mushrooms there would be enough variation and I could make it work. I placed a clean piece of paper over the image and rubbed gently before pulling it off (see photo below).

    Red printing ink is rolled on top of one of 4 different mushrooms made from styrofoam to create a patterned print.

    7. You can see that the newspaper is different with each pass. I use a clean one each time so that the back of the styrofoam plate doesn’t get contaminated with ink. If you want to keep the paper clean of smudges and fingerprints, it’s really important to keep the back of the plate clean!

    Pressing down on a mushrrom printing plate made from styrofoam.

    8. Here you can see that I use a clean piece of scrap paper to lay on top of the styrofoam and then rub gently all over to transfer the ink evenly.

    Adding the last styrofoam mushroom to the printed pattern.

    9. The trick to creating a pattern is to give the illusion of repeating by printing images off the edge of the paper. When doing this, make sure you have scrap paper underneath on the sides so that the ink doesn’t print on the table paper. Again, this is not important when printing with children, but if you want to keep your print clean, it’s just another important step in making sure that ink doesn’t stray.

    10. When finished you can run the styrofoam plates under water and clean them, and then they are ready for another color if you choose! Printing ink is water soluble so it’s easy to clean, but just like acrylics once it’s dry it will not come out of clothes. So dress for mess or wear a smock.

    Printed mushrooms made with styrofoam hanging above a bar cart in an apartment.

    Here is the print framed in my daughter Ava’s college apartment down in Charleston. She basically loots my drawers of finished pieces when she is home and hangs everything in and around her living space. Luckily I can make more prints!

    Share your printing experiences with me on Instagram! And while you’re over there, watch the reel I made of this process.

    xx Bar

    – – – – – – – – – – – – – – – – – – – –

    Did you like this post? Here are more printmaking ideas:


    Source link