


Here is a how-to video with tips/tricks/instructions!
Are you looking for an easy way to do paper weaving with kids?
Are you not wanting to cut all those mats for your students?
In this tutorial, I will show you how to make a paper weaving the easy way – with a FREE template included. I thought I had posted about this template and technique but realized I never did. In a Facebook art teacher group, another member asked for a source to buy paper looms, which gave me the reminder that I wanted to have this template available for others to use. Then, I decided I needed to make a little tutorial to go along with it! This is a staple in my art curriculum and I do this with first graders every year in some form or another.

Want to turn this into a Valentine’s project? Go for reds, pinks, and plenty of hearts! Feeling wintery? Try cool blues, crisp whites, and snowflake designs. Or, you can leave the color scheme and designs completely up to the kids. There are many fun ways to make this project unique.
Another fun twist on this project is to use patterned scrapbook paper or painted papers for the strips.
Here is the FREE paper weaving template I am using in this video. (If you like what you see, be sure to follow me on TPT!) The template comes with written directions on how best to pick the settings on your printer. You will need to cut paper strips for your students to use. I usually cut strips around 1.5″ wide.
With this template, the kids are able to cut completely on their own with minimal help. I find that first grade and up works best for this project. Usually there is a child or two who may be confused and I try to encourage the peers who catch on quick to help out their neighbor.
Below is a list of some of the products I use in this video (as an Amazon Affiliate I receive a small amount of commission at no extra cost to you):
Astrobrights Cardstock– for the loom
Tru-Ray Construction Paper or Astrobrights Copy Paper for the paper strips
Crayola Construction Paper Crayons
Heart Shape Stickers: from Michaels craft store in the seasonal section

If you’ve enjoyed this post, please do me a favor and “pin” it to save for later or share with a friend! Your support means a lot. If you have any questions at all, watch the video to see the process in action. Then, download the template which has more detailed specs for printing and using the template. If you still have questions, feel free to comment below and I’ll do my best to help you out!
If you like what you see on this blog, please sign up for my newsletter! I created a FREE Sub Tub art guide, with 10 easy activities you can leave for sub. By filling out this form you will get the download. Never stress about a sick day again!

The post Easy Paper Weaving Tutorial with Free Template appeared first on Art is Basic | Elementary Art Ideas.
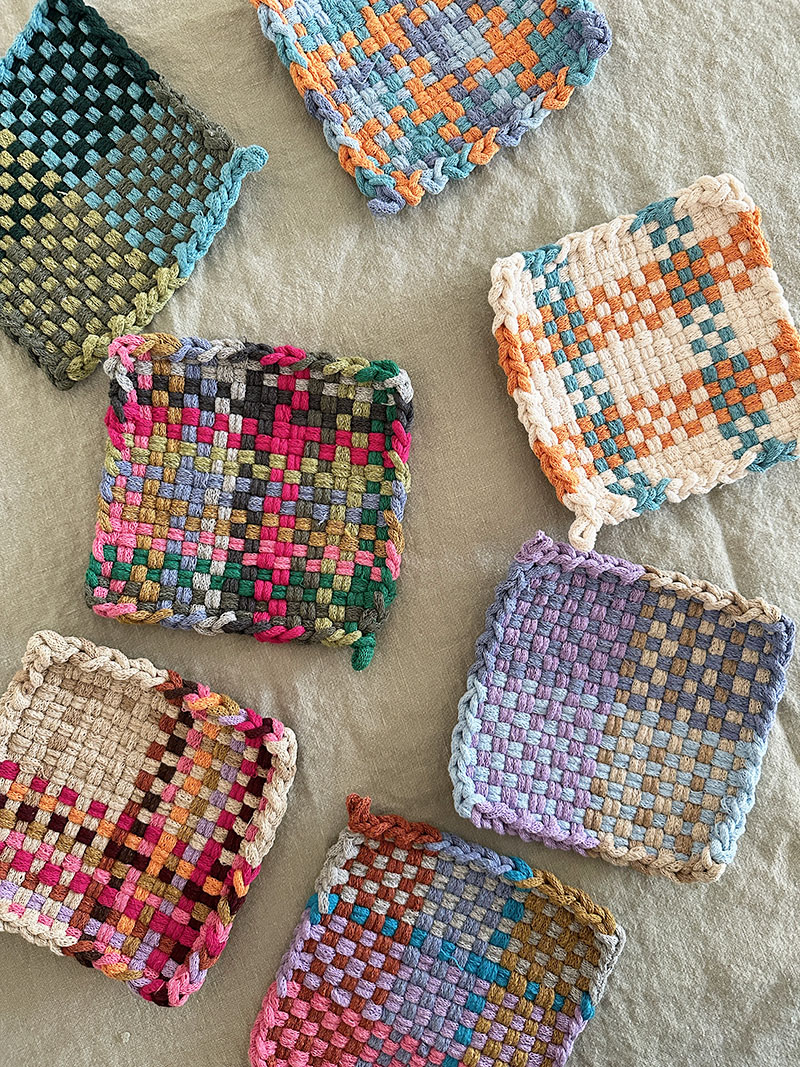
I recently discovered my old-school potholder looms when I was reorganizing all my art supplies and materials in the basement. (Well, my daughter did the organizing since she could “not live with the mess one more minute,” as spoken like a true Virgo.) The loops were old and in bad colors, like the ones that come with those potholder weaving from long ago. I searched online for where I could buy some new cotton loops, and oh my word… I found my happy place. Shall I just stop working and make potholders now and forever? (Kate Kilmurray has literally made a career of it, and so can I!)

The shop is called Friendly Loom and their cotton loops product is called Lotta Loops. They come in these incredible colors in either packs of mixed colors or in one single color. Let’s just say if I became a full-time potholder maker I don’t even think I would ever tire of finding color combinations. Ever.

~ Potholder loom kit (7″ traditional) from Friendly Loom
~ Cotton loops from Friendly Loom
~ Looms and curated hand-dyed loops from Kate Kilmurray

1. Begin by choosing your color story. There are so many options: warm colors, cool colors, complimentary, rainbow, earth tones, one color, two colors, ombré, or just random. Anything works!
2. Set up the loom by hooking the loops from top to bottom in a row all the way across. This will act as your “warp” where all horizontal “weft” loops will weave through.
3. Start weaving from the top (I use my fingers until the end when I use the weaving hook). Just hook the end onto the peg, then go over & under until you get to the other side and hook it to the corresponding peg on the other side.

4. The next loop will go under and over in the opposite way, so if you begin by going over the first “weft” then begin the 2nd row by going under.

TIP: It’s easier going through the middle where it’s looser and then pushing the loop up with your fingers after you hook it on the other side. (You will be adjusting loops continuously throughout to make sure they are straight.)

5. When you get to the bottom it’s trickier to weave because it gets too tight for fingers. This is where using the weaving hook makes sense. Weave the hook over and under all the way across, then slip a loop over the hook and pull it back through.

This is a little tricky to describe. It’s actually easy but becomes wordy when writing instructions. You can always look up videos on YouTube (I will make one soon, too).
6. Starting at one corner, reach through the first loop with the weaving hook then hook the second loop and pull it through the first. It helps to use your fingers to stretch the first loop as you pass the 2nd loop through.
7. Now do it again — hook the 3rd loop and pull it through the 2nd. Continue all the way around, using your fingers to stretch the loops as you go, keeping in mind that there will always be one loop on the weaving hook.

8. As you finish one side, it helps to loop one of the finished stitches from the middle back onto the loom temporarily. It took me a while to discover this trick but it helps keep the tension because as you get to finishing the last side, all the loops start popping off the loom. (When you are doing this in real time you will understand these helpful tips much more.)

9. When you get to the end and you have the last loop left on the weaving hook, leave it on as you pull on the sides to even them out. Then what I like to do is hook the last loop through itself just to double-secure it.


That’s it you’re finished! Once you make one you won’t be able to stop. And you will get better and faster with each new potholder.
I made all my potholders and used all the best colors before taking photos of the process, which is why the colors in this how-too are a bit strange. But it’s also good to show that if you get these gorgeous Lotta Loops from Friendly Loom, you can’t really go wrong with any combo!
Share your potholders with me on Instagram if you make some from this tutorial! I would love to see them.
xo Bar
– – – – – – – – – – – – – – – – – – – –


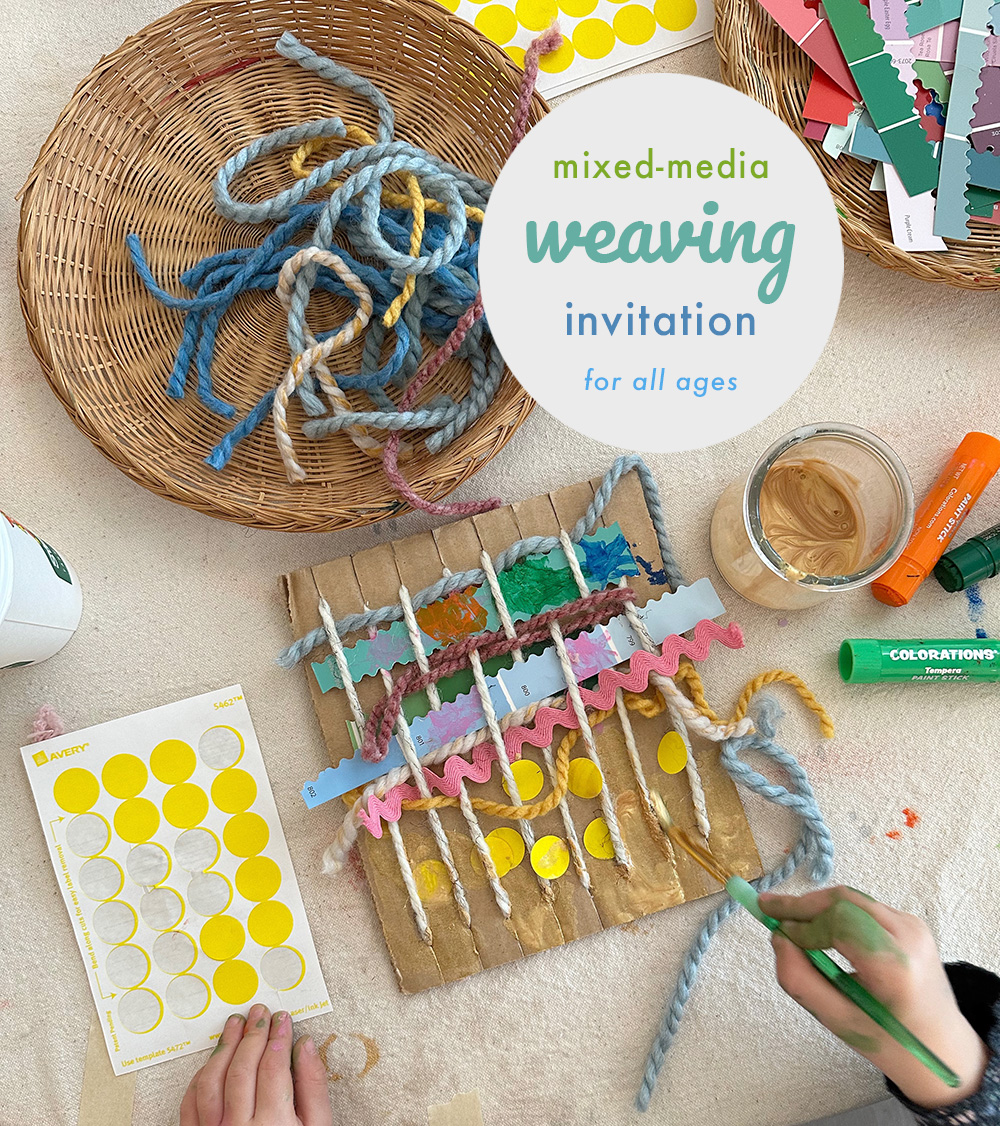
It’s been a while since I’ve written about my open-studio library events. This mixed-media process art weaving invitation that I set out for a multi-age group was more prep than I usually do, but it was worth it and as successful as I had hoped!

I will admit I was a little ambiguous about how this would go. I really needed to trust myself and trust that children would figure things out on their own. Since this was a process art experience, I didn’t set out an example or teach the weaving technique in any way. I hoped that the different textures and materials would spark interest, and I included some familiar materials like tempera paint sticks and dot labels for children to turn to if they didn’t feel quite ready to jump into something new.

[ I am a participant in affiliate programs designed to provide a means for bloggers to earn small fees at no cost to you by linking to Amazon.com and affiliated sites. ]
I can’t wait to share what happened, but first, here is a materials list. These are just what I used because I had everything in my basement, but use whatever you have!!
~ Cardboard (approx. 8×10 inch pieces but doesn’t have to be exact)
~ Fiskars Power-cut scissors or Zip-Snip to cut the cardboard
~ Good scissors for cutting up the materials
~ Soft textiles like yarn, chunky chenille yarn, ribbon, ricrac, felt, fabric strips
~ Recyclables to cut into strips like corrugated cardboard, thin foam, paint samples, honeycomb paper
~ I collected some twigs from outside, too. If it was fall or summer I would have collected leaves and/or flowers, too.
~ Dot labels, tempera sticks, gold tempera paint, thin masking tape

1. First I cut up the cardboard. They are not all the same size, I basically just cut down lots of boxes so whatever was easiest to make some rectangles from each box.
2. I used a ruler to make even marks on either end of the cardboard pieces and then snipped with scissors.

3. I didn’t make these looms in the typical way, like with a warp that could be removed. These are just quick-and-dirty, meant to give children a feel for the process but not actually take it off the loom. This also makes them much easier to put together. We just wrapped yarn around the cardboard and taped the ends on the backs. My superstar husband helped me. This was still a heavy prep project which I don’t normally do for these events. But I wanted to try it, even though it took some time.

I made about 60 looms. I typically have about 45 children coming through the space within a 2-hour timespan, so I wanted to make sure I had enough in case some kids wanted to make more than one.


4. I cut up all the different materials into strips that were a little longer than the width of the looms. I cut the felt into shapes, thinking that maybe they could be painted on or used later for something else.

5. I set out the materials in lots of different baskets and divided trays (many of these come from Ikea). I know it looks like a lot so when I say “Less is More” it feels like I’m joking, but what I mean is that the low baskets and trays make it so that I can’t put a lot out at once. Children don’t want to sift through a big bin of materials, it’s much easier to have just 20 pieces on a flat tray. I have extra nearby to replenish.

Process art is all about letting children guide their own experiences with materials, but sometimes we have to really practice taking ourselves out of the equation. At first, children wandered over to the weaving table and just walked around touching some materials and then moving away. Maybe they went to the liquid watercolor table, a familiar medium, or the maker table, also filled with familiar materials. Some parents came to the table very excited, exclaiming “Ohhhh, weaving!” They attempted to teach their child the technique. Some kids sat with their parents. But mostly, I noticed that it was the children who attempted weaving on their own, or who already had some knowledge about weaving and didn’t have a parent over their shoulder that stayed engaged the longest.

This didn’t surprise me. My partner, Shannon, and I have built our whole approach at The Creativity Project around the very idea that children bring their creativity, and the materials do the teaching. Adults just need to step back and be there as support if needed. Children who have the freedom to move on their own and choose how to use materials are the ones who get into flow and build that creative confidence.

I loved observing and documenting all the different ways that children made their weaving. Some were minimalist, some were maximalist. Some were orderly and repetitive, others were carefree and experimental. There was no right or wrong way to approach the materials, which is the beauty of open-ended tables like this.

I was really proud of parents for letting their children struggle and persevere. I heard a few, “I can’t do it” from children, and then “Try again” from their adult. I’ve been doing these open studios for a year and a half now, and parents have grown and learned along with their children. They have noticed how much more joy their child gets from a creative exploration when the adult doesn’t instruct or navigate the experience.


I’m including this last photo because this child took some of the soft textiles and brought them to the painting table to make a toy for his dog. This is always what I hope might happen – when children take materials along with them to build on an idea. This could only happen in a setting where children are allowed to take risks and where they know that can try anything. It’s not too hard to create an environment like this. The part that takes the longest to learn is our part – the stepping back and not making it about us and our vision. Once we can learn this though, we realize that children are a thousand times more creative than we can ever hope to be.
xo, Bar
– – – – – – – – – – – – – – – – – – – –


