برچسب: With

  • Mushroom Block Printing with Styrofoam

    Mushroom Block Printing with Styrofoam


    Recently I was inspired by the last module in our Material Matters course which is all about printmaking! My partner Shannon and I spent this past year over on The Creativity Project exploring 12 different materials and art processes for our course, saving the best for last. Well, maybe not the best (for me it’s a tie with collage) but arguably the most rewarding.

    Mushroom print on a table made with styrofoam sheets and printing ink.

    Watch the Instagram Reel of this process

    As we were writing the playbook for this printmaking module, it forced us to define many of the different printmaking techniques that artists have used throughout history. There is silkscreening, monoprinting, collagraphy, etching, and block printing to name a few. There is also stamping which makes us think of rubber stamps, but can also include block printing and even some collagraphs. At first, we categorized styrofoam prints as etching, because it feels like you are etching into the foam when drawing and making indents. But then we came to understand that this is really more like carving, as in the process used for block printing, which is defined this way:

    Block printing involves carving a design into a block of material like wood, linoleum, rubber, or foam. When ink is rolled on top, it lays on the parts that haven’t been carved away, then is pressed onto paper or fabric to create a mirror image, much like a stamp.

    A tube of Blick printing ink being used to print styrofoam mushrooms.

    [ I am a participant in affiliate programs designed to provide a means for bloggers to earn small fees at no cost to you by linking to Amazon.com and affiliated sites. ]

    These styrofoam block prints are really easy to make. Let’s start with the supply list.

    Materials needed for Styrofoam Block Printing

    ~ Butcher paper or newspaper to cover table (100-ft roll for at-home use)

    ~ Styrofoam sheets (I really hate styrofoam but I had these 4×6 sheets left over. The most eco-friendly way to do this is to save and repurpose styrofoam packaged food trays)

    ~ Dull pencil or ballpoint pen

    ~ Printing ink (I used Blick but you can also purchase this Speedball starter set or individual colors)

    ~ Tray or non-porous surface like a cookie sheet or glass dish to roll out ink (or you can purchase this set of inking trays)

    ~ Brayers

    ~ A pile of newspaper sheets or scrap paper (so you can have a fresh sheet for each printing pass)

    ~ Nice paper, here I used 12 x 18 sulphite paper in light pink (from this color bundle, or just get white)

    ~ Hand wipes or damp paper towel

    Using a dull pencil to draw mushrooms onto styrofoam, then cutting them out to use as a printing plate.

    How to Print with Styrofoam

    1. It helps to have an idea of what you want to draw before starting. You can’t erase on the styrofoam because it’s not the pencil marks that matter, it’s the indents in the styrofoam that matter. For these mushrooms, I drew them out on paper first so I could understand the sizing and varying shapes and textures. If you are doing this with children, it’s still helpful to have a plan. With very young children, ages 3 and 4, they can just draw directly onto the styrofoam because it matters less what they are drawing and more about the process. Not that process doesn’t also matter at ages 5 and up, but I think that 5 is an appropriate age to suggest thinking about a plan. Some children may not want to plan and will just jump right in and make marks and doodles onto the styrofoam and that’s fine, too. It depends on the time that you have, the size of the group, and your available resources.

    2. Draw onto the styrofoam using a dull pencil or a ballpoint pen.

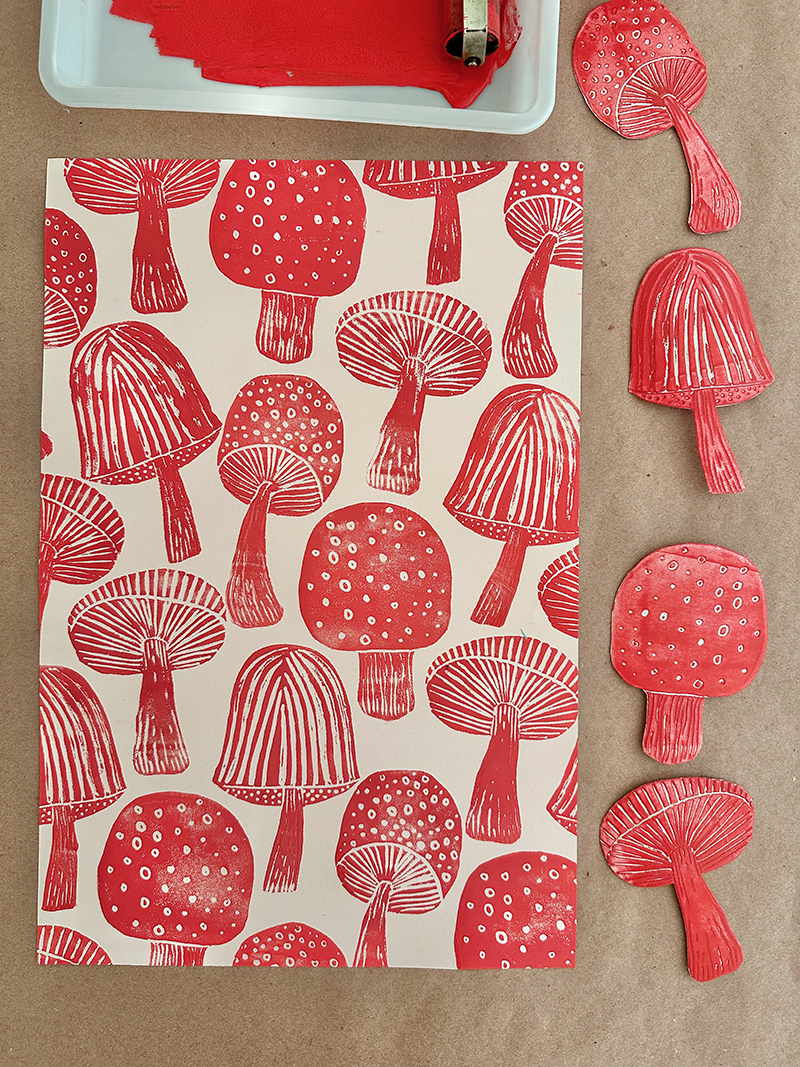
    3. Cutting out the shapes is optional. In fact, it’s not necessary at all with children. We usually don’t cut out shapes when doing this with a class or a group. But for this patterned print, I wanted to cut out the shapes so that they could fit around each other.

    Rolling out printing ink on a tray with a brayer, getting ready to print with styrofoam.

    4. Squeeze some printing ink at the top of your tray. I mixed a little white with the red to brighten the color and make it more opaque. Use the brayer to roll the ink in a small rectangle, going up and down and then sideways a few times until you hear the sticky sound and the roller is completely covered.

    5. Make sure to have your stack of cut-up newspaper ready to roll on top of, and some wipes or damp paper towel to keep your fingers clean. You would be amazed at how quickly the ink finds itself where it shouldn’t be. When doing this with children, have one end of the table be the ink rolling area. You can even tape the tray down. Try and keep a system like this: clean paper is laid down on a clean part of the table; the ink is rolled onto the styrofoam plate in the inking area; then it is carefully brought over to the clean paper. It might be hard to manage this with a larger group so be flexible and accept that nothing will be perfect and it’s more about the experience!

    Red printing ink is rolled onto a mushroom carved from styrofoam, then pressed down onto paper.

    6. Roll the ink onto the styrofoam, making sure to evenly cover the whole shape, then turn it over carefully onto the paper. I decided to start somewhere in the middle with the pattern. I had no real plan, but I knew with 4 different mushrooms there would be enough variation and I could make it work. I placed a clean piece of paper over the image and rubbed gently before pulling it off (see photo below).

    Red printing ink is rolled on top of one of 4 different mushrooms made from styrofoam to create a patterned print.

    7. You can see that the newspaper is different with each pass. I use a clean one each time so that the back of the styrofoam plate doesn’t get contaminated with ink. If you want to keep the paper clean of smudges and fingerprints, it’s really important to keep the back of the plate clean!

    Pressing down on a mushrrom printing plate made from styrofoam.

    8. Here you can see that I use a clean piece of scrap paper to lay on top of the styrofoam and then rub gently all over to transfer the ink evenly.

    Adding the last styrofoam mushroom to the printed pattern.

    9. The trick to creating a pattern is to give the illusion of repeating by printing images off the edge of the paper. When doing this, make sure you have scrap paper underneath on the sides so that the ink doesn’t print on the table paper. Again, this is not important when printing with children, but if you want to keep your print clean, it’s just another important step in making sure that ink doesn’t stray.

    10. When finished you can run the styrofoam plates under water and clean them, and then they are ready for another color if you choose! Printing ink is water soluble so it’s easy to clean, but just like acrylics once it’s dry it will not come out of clothes. So dress for mess or wear a smock.

    Printed mushrooms made with styrofoam hanging above a bar cart in an apartment.

    Here is the print framed in my daughter Ava’s college apartment down in Charleston. She basically loots my drawers of finished pieces when she is home and hangs everything in and around her living space. Luckily I can make more prints!

    Share your printing experiences with me on Instagram! And while you’re over there, watch the reel I made of this process.

    xx Bar

    – – – – – – – – – – – – – – – – – – – –

    Did you like this post? Here are more printmaking ideas:


    Source link

  • Art With Mr. E: Mural in Mexico


    This summer my family (all five of us) went to Mexico to work in an orphanage for a week.  My main “job” was to paint a mural. Having seen pictures of grounds/facilities, I knew it was mostly white & grey. I’m a huge believer in art being transformative visually & emotionally.   I had asked prior to going if that was something they would like.  They said yes, but wanted some sketches to select from.  One of which was done in the style of Mexican embroidery.  This is the one they wanted.  I was fine with it because the design was similar to Pennsylvania Dutch Hex Signs (my mom’s side is from a Pennsylvania Dutch background).  I brought in few teenagers each day to help me with painting of the mural.  

    Our first day I took about four hours to draw out the mural.  The wall is kind of stucco “ish”, and wasn’t the easiest to draw upon.  

    On the second day, I had three high school students from the Texas team helping me paint.  We focused on the blues & greens.  It was a real “learning” day for me.  The surface was so bumpy, and had to figure out what way of painting worked best.  

    On the third day three of the youth from our church helped me start adding in the other colors. I also started seeing some “holes” in the design that needed “MORE”.  I added more leaves, butterflies, hearts, and flowers to fill out the design more.  I worked on that and doing some larger blended flowers.  My amazing crew filled in with solid color.  

    On the last day, my daughter (blue shirt) & her best friend helped me out on the last day.  One of the wall texture “issues” was pitting in the paint. Little white “holes” that would appear after the paint started to dry.  So the girls helped me for about an hour, and then I spent the next 7 1/2 blending colors, adding details, adding highlights…and other assorted things.  


    Source link

  • Art With Mr. E: 2024-2025 School Year!


    Welcome to a new school year!  Not a lot has changed in my room. 

     I always tweak little things here and there. 

    I’ve been in this classroom for over 20 years, and feel very blessed to have this space.  


    Please feel free to ask any questions you might have as you look through

     my pictures (or any post on my blog).  

    I have a nice big reading area.  I start every kindergarten class with a story.  I love children’s books, and feel it is important for children to have people read to them.  I believe it truly helps to ignite creativity. 


    Source link

  • Easy Paper Weaving Tutorial with Free Template


    Are you looking for an easy way to do paper weaving with kids?

    Are you not wanting to cut all those mats for your students?

    In this tutorial, I will show you how to make a paper weaving the easy way – with a FREE template included. I thought I had posted about this template and technique but realized I never did. In a Facebook art teacher group, another member asked for a source to buy paper looms, which gave me the reminder that I wanted to have this template available for others to use. Then, I decided I needed to make a little tutorial to go along with it! This is a staple in my art curriculum and I do this with first graders every year in some form or another.

    Colorful patchwork art with pink, purple, and red squares decorated with hearts, stars, and spirals. Features vibrant feathers along the edges, resembling a paper weaving masterpiece.

    Choose a Paper Weaving Theme

    Want to turn this into a Valentine’s project? Go for reds, pinks, and plenty of hearts! Feeling wintery? Try cool blues, crisp whites, and snowflake designs. Or, you can leave the color scheme and designs completely up to the kids. There are many fun ways to make this project unique.

    Another fun twist on this project is to use patterned scrapbook paper or painted papers for the strips.

    Watch the Paper Weaving Video Tutorial Below!

    Paper Weaving Template

    Here is the FREE paper weaving template I am using in this video. (If you like what you see, be sure to follow me on TPT!) The template comes with written directions on how best to pick the settings on your printer. You will need to cut paper strips for your students to use. I usually cut strips around 1.5″ wide.

    With this template, the kids are able to cut completely on their own with minimal help. I find that first grade and up works best for this project. Usually there is a child or two who may be confused and I try to encourage the peers who catch on quick to help out their neighbor.

    Art Supplies Used:

    Below is a list of some of the products I use in this video (as an Amazon Affiliate I receive a small amount of commission at no extra cost to you):

    Astrobrights Cardstock– for the loom

    Tru-Ray Construction Paper or Astrobrights Copy Paper for the paper strips

    White Paint Markers

    Crayola Construction Paper Crayons

    Crayola Metallic Markers

    Foam Shape Stickers

    Heart Shape Stickers: from Michaels craft store in the seasonal section

    Colorful paper weaving craft with red, pink, and purple squares, decorated with various shapes and feathers. The text above reads "Easy Paper Weaving Tutorial." Includes a free template for you to start crafting effortlessly.

    If you’ve enjoyed this post, please do me a favor and “pin” it to save for later or share with a friend! Your support means a lot. If you have any questions at all, watch the video to see the process in action. Then, download the template which has more detailed specs for printing and using the template. If you still have questions, feel free to comment below and I’ll do my best to help you out!

    Get a Free Guide for Easy Art Sub Activities!

    If you like what you see on this blog, please sign up for my newsletter!  I created a FREE Sub Tub art guide, with 10 easy activities you can leave for sub.  By filling out this form you will get the download.  Never stress about a sick day again!

    Free Art Sub Plans for Elementary Image of a collection of pages from an Art Sub Guide for teachers, featuring substitute art lesson ideas and project examples, with a title banner stating "Totally Free Substitute Resource.

    The post Easy Paper Weaving Tutorial with Free Template appeared first on Art is Basic | Elementary Art Ideas.


    Source link

  • Rainbow Tube Knitting with TP Roll Looms

    Rainbow Tube Knitting with TP Roll Looms


    Happy 2025! My last post about printing my hopeful Kamala prints has been staring at me every time I come back here. I am going to have to create 7 new posts in order to not see it anymore on my homepage, so that’s what I will do! I still love the prints, I love her, I’m so sad we don’t have a woman president, but it is too heartbreaking to see that post right now. I am moving on to rainbows and yarn and soft and cozy and happy. I rediscovered tube knitting and made some looms (is that what we call them?) from toilet paper rolls. It is so zen and relaxing, I think I might keep going and wrap a tree or create an installation. Must. Make. Art.

    Rainbow tube knitted bracelents wrapped around two hands holding each other.

    When I first started making these tube-knitted pieces I didn’t know what to do with them. I made a necklace for my mom for her 85th birthday which she loves because it’s easy to pull over her head, and it keeps her neck warm! I kept making long knitted pieces, trying out different ombre yarns, and just putting them in a basket. Then I went on a trip to Davis, CA to see my youngest at school and went to their famous farmer’s market. I found a woman who made wool yarn from the sheep in her backyard! I bought a rainbow skein and knew exactly what I was going to make with it (scroll down to see all the yarns in this heavenly stall).

    Yarn, tp roll, popsicle sticks, buttons, and a glue gun are are on a table ready to made into a tube knitting loom.

    [ I am a participant in affiliate programs designed to provide a means for bloggers to earn small fees at no cost to you by linking to Amazon.com and affiliated sites. ]

    Materials needed for Tube Knitting with TP Roll Looms:

    ~ Toilet paper rolls or cut-down paper towel rolls

    ~ Popsicle sticks – 5

    ~ Beads or small buttons – 5

    ~ Glue gun

    ~ Wooden skewer

    ~ Yarns in any color, but for this post I mostly show the rainbow yarn (here is Fiber Confections FB page and Instagram, I’m not sure how else she sells her wool)

    Popsicle sticks and beads are used with a glue gun to attach to a top roll to make a tube knitting loom.

    How to make the Tube Knitting Loom:

    ~ Glue the beads or small buttons to the tops of each popsicle stick

    ~ Glue each popsicle stick on the inside of the TP roll, leaving about 3/4 inch showing

    Rainbow yarn that will be used for tube knitting, and a variety of other wool yarns.

    Here is a photo from the Davis CA farmer’s market stall with all the yarns from the owner’s own sheep! Fair warning: The way this skein is wound – not in a ball but in a big loop – created a huge tangled mess. I have never worked with yarn that was packaged in this way, so I’m not sure what to do to prevent the tangled mess in the future, but my guess is I should have hung the yarn up instead of laying it on a table and been more careful when pulling. If anyone has any tips let me know!

    Steps 1-4 on how to tube knit with a tp roll loom.

    How to Knit on a TP Roll Loom:

    1. To begin, hold the end of the yarn against the side of the TP roll and then bring the yarn around the back of the first popsicle stick.

    2. Wrap it around the front, then go over to the next stick and do the same thing, going behind the stick then wrap around the front.

    3. Continue until you get back to the first stick.

    4. When you get back to the beginning, now the yarn goes straight across the front of the first stick above the first loop.

    Steps 5-6 on how to tube knit with a tp roll loom.

    5. Use the skewer to lift the bottom loop over the top yarn. This is where the beads/buttons come in handy because it helps the top thread stay in place as you lift the bottom one over the top.

    6. After you lift the bottom yarn over the top, move the loose yarn over one and do the same: above the loop, lift the bottom over the top.

    Showing the inside of a tp roll during tube knitting.

    7. When you’ve made it all the way around once, push the start thread through the middle so it’s dangling down the inside of the tube and pull on it to tighten the knitting. You can pull it tight every time you go around in the beginning. Eventually when it’s coming out the end and long enough you don’t have to keep pulling to tighten.

    Rainbow colored tube knitting on a table with a tp roll loom.

    Continue knitting in this way until you get the length you want.

    Steps 8-11 on how to finish the end of a tube knitting made with a tp roll.

    8. To finish the piece, cut the yarn leaving about 8-10 inches.

    9. Thread the loose yarn underneath the next loop, then lift that loop off the popsicle stick.

    10. Then thread the loose yarn again underneath the next loop and lift it off, continuing until you have threaded and lifted off all 5 loops.

    11. Pull the piece out of the tube. I like to thread the loose yarn back through that last loop one more time and tie it off.

    A pile of finished rainbow tube knittings ready to make bracelets.

    Each piece is about 12 inches long.

    A pile of rainbow tube knitted bracelets.

    12. Tie the two ends together to make a circle. You may have to do some double knotting before trimming the ends.

    A display of napkins on a table using rainbow tube knitted napkin holders.

    I decided to use the bracelets as napkin rings for the Thanksgiving table.

    Making placecards using a paper punch and brown paper bag.

    I made some name labels with brown paper bags and this tag-shaped paper punch. The letter stamp set is really old, like from high school (30 years ago!) and I haven’t been able to find anything like this, but you can use any letter set, or just hand write if you have good handwriting.

    Using alphabet stamps to make placecards with brown paper bags.

    A table set with handmade paper luminaries and napkins with handmade rainbow tube knitting.

    Here is a tutorial on how to make the paper luminaries.

    Napkin on a table wrapped with a tube knitted rainbow holder.

    The many ways to use a rainbow tube knitted bracelet.

    Here are some outtakes from Thanksgiving! I taught some people how to tube knit, and everyone had a different way to wear their rainbow yarns. My sister-in-law sent me a photo of her cat, Octavia, wearing it as a collar. She said it’s Octavia’s favorite.

    xx, Bar

    – – – – – – – – – – – – – – – – – – –

    Did you like this post? Here are more posts using yarn:


    Source link

  • Timed Collage Prompts with Eric Scott –

    Timed Collage Prompts with Eric Scott –


    Four colorful abstract paper collages, crafted under a timed art prompt, grace the white surface. They feature dynamic shapes in blue, pink, black, green, yellow, and purple.

    Encouraging Creativity with Timed Collage!

    Are you trying to incorporate art into your daily routine? Are you looking for ways to encourage creativity in your students? A timed collage prompt might just be something for you to try!

    At the 2024 NAEA conference I went to a wonderful hands-on art workshop where we did timed collage prompts on index cards with art journaling artist Eric Scott!

    • This idea can be used to encourage experimentation and play in your students- by setting a time limit, the students have to work creatively within those constraints.

    • This idea can also be used to jump-start your own daily art practice, as it fits into a busy schedule.

    The workshop I am going to tell you about today was the “Collage Magic” workshop by Eric Scott. Who is Eric Scott? I first learned of his work when I read Journal Fodder Junkies and Journal Fodder 365 years ago. As you may know, I am a huge fan of collage and art journaling and it is my preferred method of art making. Eric is also an art educator who works with kids.

    Art journal page by Eric Scott

    If you go to his website, you can read more about his art, but also get some free downloads with things like cartoon drawing guides, monster drawings and journal prompts. You can stay up-to-date with what he’s doing by following his SubStack or Instagram.

    Timed Collages in the Collage Magic Workshop

    In this workshop, we did a series of collages on index cards using simple (not precious) materials like construction paper and glue.

    He set the timer for just a few minutes for each collage – any amount of time would work, but these were about 3-7 minutes each. We thought about using different techniques and cutting different shapes. Could you create interest by ripping or tearing? Another teacher near me created pop-ups, so we definitely got creative. With time constraints, it forces you to make quick decisions and not worry too much about the final results. It’s a way to let go of the critical voice in your head.

    Four colorful abstract paper collages, crafted under a timed art prompt, grace the white surface. They feature dynamic shapes in blue, pink, black, green, yellow, and purple.

    For this next set, we chose one color only to use and focused on creating interesting negative space. We had about 15 minutes to create all three cards.

    Three abstract cutouts on paper: purple on the left, red in the center, and blue on the right. Each art piece features curved shapes on a white background, reminiscent of timed collage prompts for creative expression.

    For the last exercise, we made a culminating collage on larger 6″x8″ paper with a slightly longer time frame to create our collage. What I love about this idea is that there are so many different directions these collages can go and I’m sure your students will come up with a huge array of different results.

    Timed Collage: A vibrant paper cut-out composition features overlapping yellow and blue rectangles against a backdrop of wavy, vertical strips in black, blue, teal, and magenta.

    Creating a Daily Practice with Small Collages

    One thing Eric talks about is creating a daily practice. This is SO hard to do when we are busy with so many other daily things on our to-do list. I have sadly fallen away from a consistent art journaling practice, but I know that I always feel better when I find the time to cut, paste and play. Now I am intentionally seeking out scheduled opportunities to make art, such as an art journaling meetup at a local art store. If it’s on my calendar and I paid for it, I’m more likely to go! Keep reading for more tips about creating a daily practice.

    • One of his tips is to keep it small when first starting, like using an index card for a collage. In the workshop, we made a series of collages in this size.

    • Another tip is to use the cheap stuff– working on an index card doesn’t feel as precious as your expensive canvas.

    Make a routine for your art practice. If you can find a specific time of day to work on your art, it can help you be consistent.

    • And lastly, leave it set up. If you have room for a dedicated workspace for your art, that helps because you already have your materials set up and ready to go.

    Eric has committed to a daily practice of making a collage a day, with remarkable results! Just look at this stack of collages!

    Here are a few of the striking collages Eric has made!

    Three colorful paper collages featuring abstract patterns and a cartoonish monster rest on a speckled table, surrounded by glue sticks. This vibrant scene is a testament to the creativity inspired by collage prompts during an engaging art session.
    Three abstract art collages on a speckled surface, each featuring geometric shapes in vibrant colors: purple with circles, grayscale with a blue eye, and pink with green and orange lines. Perfect for timed collage prompts or sparking creative inspiration.

    A few more thoughts… NAEA Workshops

    Are you going to be attending the upcoming National Art Education Association Conference?

    First of all, if you are an art teacher and have never attended an NAEA conference, you should try to do so at some point. You will be blown away with all of the amazing sessions and ideas shared. In addition, you get to try out and get samples of all the latest art supplies!

    Second, if you are going, you should try out a “ticketed” workshop. The regular (included) sessions will give you loads of new ideas and things to think about, but the “ticketed” workshops are the place to have hands-on artmaking experiences in a smaller setting led by qualified art educators. I have gone to many ticketed workshops at past NAEA conference- such as a Lynda Barry drawing comics workshop and workshops about tooling foil, encaustics and mosaics. I try to pick 2 or 3 at every conference as it is fun to try new things that I haven’t experienced yet. Remember, you need to sign up for these ahead of time, as they do fill up!

    Unfortunately I’m not going to be able to attend this year’s conference, but I’m planning ahead to Chicago next year, and since that is much closer and doesn’t require a plane ride, I will most likely be at the 2026 conference.

    Final Thoughts

    • Another great resource for daily creative inspiration is Daisy Yellow Art and her ICAD challenge. I participated in this challenge years ago and it was really fun.

    Artist Trading Cards are a twist on the index card idea, with an even smaller space to make art. I used to collect and trade these and have a huge binder full of them. (Idea for future blog post!)

    Have you ever tried timed art prompts? What was your experience like? Let me know if you have any other good resources to share with this idea!


    Discover more from Art is Basic | Elementary Art Ideas

    Subscribe to get the latest posts sent to your email.


    Source link

  • Art With Mr. E: Crayola #2 Pencils: RIP


     I have been a HUGE fan of Crayola’s # 2 pencils since I first came across them at Dollar Tree several years ago.  They last longer than the former best pencil out there (which has really become one of my least favorite pencils because of the quality & price!).  I looked at ordering more after running out at the end of last year, but did not see them.  After looking at several places, I decided to write Crayola and see what was going on.  They said they actually discontinued them fall of 2023!  AHHH!!!!!!  Heart broken! 


    Source link

  • Matching Mittens Art Project with Free Templates –

    Matching Mittens Art Project with Free Templates –


    Two colorful, decorated mittens featuring hearts, stars, and swirls rest against a blue background speckled with snowflakes. This matching mittens art project brings warmth and creativity to wintry days.

    This is a fun winter art project that allows students to use their creativity to make matching mittens, exploring symmetry and balance! I have been doing this art project for years and years and I keep returning to it every year because I think it’s great for fine motor skills and spatial awareness. It also strengthens their attention to detail as they work to make both mittens match perfectly.

    I’m not sure where I originally learned about this art project, but it had to have been about 15-20 years ago. So many of these ideas floating around social media and the internet have been around forever! This is a good one and maybe you haven’t seen it yet. I like to do this with Kindergarten, but I think Pre-K could do a simpler version and older kids could make more detailed mittens.

    Why do a Matching Mittens art project?

    Objectives:

    ● Students will develop observational skills by carefully replicating patterns and lines in reverse.

    ● Students will explore symmetry and balance in art by creating matching mittens.

    ● Students will practice fine motor skills through tracing, drawing, and pattern-making.

    ● Students will explore creativity by making unique patterns and designs.

    In this art project,  students will make a pair of mittens that match.  First, the students will design one mitten with patterns and lines. Then, they will copy that design onto the second mitten, but in reverse—like a mirror.

    “If you draw a heart on the left side of one mitten, you will need to draw the same heart on the opposite side of the other mitten.”

    “If you put a wavy line in the top of one mitten, the wavy line needs to go in the same spot on the other mitten.”

    Teacher Prep for the Matching Mittens Art Project

    ● Print the mitten template onto card stock (thicker paper).  (Amazon Affiliate links have been used for art supply links at no extra cost to you. The small commission earned goes towards maintaining this website.) You can use this as the drawing surface, or you can make them into reusable templates for your students to trace.  I have one set of templates and reuse them every year.  To do this, trace your mitten on to thicker poster board (I use “railroad board.”). Trace as many templates as you will need and cut them out.  Students will then use these to trace on to their larger paper.  They will trace it once, flip over the template and trace the other mitten.  I do this step, because it is a good skill for practicing fine motor skills.  But if you want to save time, you can just have the copies printed out.  

    Step One:

    ● Trace the mitten on to construction paper (I like Tru-Ray Construction Paper– 12” x18” paper). Flip the mitten over and trace the other mitten.

    Outlined shapes of two simplified, cartoon-style oven mitts facing each other, perfect for your next art project.

    Step Two:

    ● Draw designs on one mitten, using markers or crayons.  Emphasize coloring neatly and carefully.

    Step Three:

    ● Then, copy the designs and patterns on to the other mitten, but in reverse, like a mirror.  Some students may want to do one shape at a time, going back and forth between each mitten, which is totally fine!  Others might like to finish one whole mitten first.  

    ● Some kids might get stuck on the fact that it is very difficult to make an exact mirror image.  Explain that they should try the best they can, but it’s okay if it’s not perfect!   We are aiming for doing our best and it’s still going to look beautiful even if it’s not perfect.

    A vibrant art project featuring a colorful drawing of two mittens adorned with geometric and abstract patterns. Swirls, stars, hearts, and zigzags dance across each mitten in bright hues, set against a crisp white background that's perfect for creativity.

    Step Four:

    ● Cut out the mittens and glue to a piece of colored construction paper.

    (Optional) Steps:

    ● Unroll a cotton ball and spread out on the bottom of the mitten to look like fur.

    ● Add snowflake punch shapes (I like these and this one) to the background or draw on designs with construction paper crayons or metallic markers.

    A delightful matching mittens art project features two colorful, decorated paper mittens on a blue background, surrounded by delicate white snowflakes.

    To download the mitten templates, they are right here.

    Two mitten templates are beautifully showcased against a blue backdrop, with inviting text above: "Click here for the FREE Art Project Templates!.
    Explore our colorful mitten art project, featuring intricate decorative patterns on a soothing blue background. Dive into the "Matching Mittens Art Project" with our free templates for a creative adventure!.

    If you have any questions, feel free to leave a comment! Also, does anyone have any good book suggestions (besides the book The Mitten) that can go along with this project?


    Discover more from Art is Basic | Elementary Art Ideas

    Subscribe to get the latest posts sent to your email.


    Source link

  • Potholder Weaving with Cotton Loops

    Potholder Weaving with Cotton Loops


    I recently discovered my old-school potholder looms when I was reorganizing all my art supplies and materials in the basement. (Well, my daughter did the organizing since she could “not live with the mess one more minute,” as spoken like a true Virgo.) The loops were old and in bad colors, like the ones that come with those potholder weaving from long ago. I searched online for where I could buy some new cotton loops, and oh my word… I found my happy place. Shall I just stop working and make potholders now and forever? (Kate Kilmurray has literally made a career of it, and so can I!)

    A collection of potholders made with Lotta Loops gorgeous colored cotton loops.

    The shop is called Friendly Loom and their cotton loops product is called Lotta Loops. They come in these incredible colors in either packs of mixed colors or in one single color. Let’s just say if I became a full-time potholder maker I don’t even think I would ever tire of finding color combinations. Ever.

    A collection of potholders made with Lotta Loops gorgeous colored loops and one potholder still on the loom.

    Materials needed to make potholders:

    ~ Potholder loom kit (7″ traditional) from Friendly Loom

    ~ Cotton loops from Friendly Loom

    ~ Looms and curated hand-dyed loops from Kate Kilmurray

    The first steps in weaving a potholder is looping the "weft" then starting your over and under from the top or bottom.

    Weaving a potholder on a loom:

    1. Begin by choosing your color story. There are so many options: warm colors, cool colors, complimentary, rainbow, earth tones, one color, two colors, ombré, or just random. Anything works!

    2. Set up the loom by hooking the loops from top to bottom in a row all the way across. This will act as your “warp” where all horizontal “weft” loops will weave through.

    3. Start weaving from the top (I use my fingers until the end when I use the weaving hook). Just hook the end onto the peg, then go over & under until you get to the other side and hook it to the corresponding peg on the other side. 

    When weaving a potholder on a loom, start with and over/under technique, then alternate with each new loop.

    4. The next loop will go under and over in the opposite way, so if you begin by going over the first “weft” then begin the 2nd row by going under.

    When weaving a potholder, it’s easier going through the middle where it’s looser and then pushing the loops up with your fingers after you hook it on the other side.

    TIP: It’s easier going through the middle where it’s looser and then pushing the loop up with your fingers after you hook it on the other side. (You will be adjusting loops continuously throughout to make sure they are straight.)

    The last loop in a potholder weaving gets tricky and where using the weaving hook makes sense.

    5. When you get to the bottom it’s trickier to weave because it gets too tight for fingers. This is where using the weaving hook makes sense. Weave the hook over and under all the way across, then slip a loop over the hook and pull it back through. 

    Finishing the edges of a potholder so you can take it off the loom.

    Finishing the potholder:

    This is a little tricky to describe. It’s actually easy but becomes wordy when writing instructions. You can always look up videos on YouTube (I will make one soon, too). 

    6. Starting at one corner, reach through the first loop with the weaving hook then hook the second loop and pull it through the first. It helps to use your fingers to stretch the first loop as you pass the 2nd loop through.

    7. Now do it again — hook the 3rd loop and pull it through the 2nd. Continue all the way around, using your fingers to stretch the loops as you go, keeping in mind that there will always be one loop on the weaving hook. 

    As you finish one side of your potholder edge, it helps to loop one of the finished stitches from the middle back onto the loom temporarily to keep the tension so it doesn't fall off the loom.

    8. As you finish one side, it helps to loop one of the finished stitches from the middle back onto the loom temporarily. It took me a while to discover this trick but it helps keep the tension because as you get to finishing the last side, all the loops start popping off the loom. (When you are doing this in real time you will understand these helpful tips much more.)

    When you get to the end and you have the last loop left on the weaving hook, leave it on as you pull on the sides to even them out.

    9. When you get to the end and you have the last loop left on the weaving hook, leave it on as you pull on the sides to even them out. Then what I like to do is hook the last loop through itself just to double-secure it. 

    Finished potholder weaving in complimentary colors orange and blue.
    Finished potholder weaving in earthy and purple tones.
    Finished potholder weaving in a multi-color muted bright palette.

    That’s it you’re finished! Once you make one you won’t be able to stop. And you will get better and faster with each new potholder.

    I made all my potholders and used all the best colors before taking photos of the process, which is why the colors in this how-too are a bit strange. But it’s also good to show that if you get these gorgeous Lotta Loops from Friendly Loom, you can’t really go wrong with any combo!

    Share your potholders with me on Instagram if you make some from this tutorial! I would love to see them. 

    xo Bar

    – – – – – – – – – – – – – – – – – – – –

    Did you like this post? Here are more weaving ideas:

    Doodle weaving on a cardboard loom
    Doodle weaving with a cardboard loom
    6-Point God's Eyes in bright and muted tones using sticks and yarn.
    6-Point God’s Eyes with Sticks
    Rainbow tube knitting with a TP roll loom
    Rainbow Tube Knitting with a TP Roll Loom


    Source link

  • Organised artistic rebellion with Habib Hajallie

    Organised artistic rebellion with Habib Hajallie


    Through his intricate ballpoint pen drawings and use of antique texts, Habib Hajallie explores the powerful connection between art and music, creating multi-sensory experiences that challenge the way we perceive history and identity. In this article, we discuss the “sound of form” in his work, the echoes of cultural narratives, and the embodied, almost musical act of composition.

    By Sophie Heatley | 17 Mar 2025

    “I can never draw in silence,” Habib Hajallie tells me. “It allows me to get into the flow state. Songs carry me through when I’m in a lull.” If I listen to music while writing, I’ll start typing the song lyrics, I half-joke. Hajallie’s music does find its way into his work, though; you can feel it in the rhythm and the pace of his mark-making. A maestro with a ballpoint pen, he orchestrates his portraits with the precision of a master conductor. A practice that takes so much patience, time and concentration, being able to lose himself in the music and moments of detail are a relief and a necessary part of Hajallie’s creative process. That’s not to say he’s not present with the process; the music is a way in, to embody each stroke of what can be a very unforgiving medium. “If I don’t understand the pressure of my pen, I won’t get the outcome I want, and there’s no escaping mistakes.”  

    Music allows Hajallie to connect more deeply with both the time periods he references and the figures he brings to life. For example, when depicting West African figures, he immerses himself in Afro-beats or classical African music. “There’s a real vibrancy to these sounds. They give me energy and help me capture their essence.” Different genres accompany different subjects, scales, and scopes. The Grime Series, featured in The Sound of Form exhibition, overlays prominent grime artists onto London tube maps – London being the birthplace of Grime. “When I drew JME, I was listening to a lot of his music.”

    Organised artistic rebellion with Habib Hajalli
    JME by Habib Hajallie (Limited Edition Giclée Print on Hahnemühle Photo Rag 308gsm, 2022, 30 x 21 cm) Edition of 50

    The life-like resemblance to Hajallie’s subjects is breathtaking and envy-inducing, and yet their exquisite detail is the least interesting thing about them. Drawing is so much more than figurative representation for the artist; the creative act is one of reawakening dormant histories, elevating underrepresented voices, his pen a quiet instrument of rebellion and reclamation. 

    Armed with pragmatism and an “unromantic” level of organisation, Hajallie begins his process by collecting antique texts, largely from vintage shops, charity stops, and eBay. “I have stacks of philosophical books. I’ll go through them one by one and highlight certain sections that resonate.” 

    From his vast collection of saved quotes, prints, and book covers, Hajallie embarks on the next step: recontextualisation and subversion. With a focus on challenging ethnocentric views and fostering cross-cultural understanding and empathy, he superimposes both prominent contemporary figures and those from antiquity — many of whom were erased from history or overlooked — on the pages of problematic 18th and 19th century literature steeped in colonial ideologies.

    Organised artistic rebellion with Habib Hajallie
    The Pursuit of Music: Flowdan by Habib Hajallie (ballpoint pen on antique texts, 2024, 23 x 39 x 1 cm)

    By juxtaposing these outdated, harmful ideas of eugenics, race, and misogyny with modern themes, Hajallie subverts the narratives of the past. Drawing inspiration from artists like Godfried Donkor, known for using archival material to challenge stereotypes associated with Black figures, and Barbara Walker, who famously used found materials to raise awareness of racial profiling, Hajallie’s work becomes a dialogue between eras. This conversation reclaims historical texts and repositions marginalised figures on the front covers, “reincarnating” them and giving them a renewed, empowered presence — deepening the discourse surrounding minority voices.

    Organised artistic rebellion with Habib Hajallie
    Dame Jocelyn Barrow by Habib Hajallie (2021, Edition of 25)

    This intersection is further enriched by Hajallie’s use of crosshatching and Renaissance-era techniques, all executed with his humble biro. In doing so, he bridges the simplicity of domestic, note-taking tools with classical artistic methods, creating a striking fusion of the old and the new, complex and yet accessible.

    “I started drawing with pens. We had loads of Barclays pens and Argos pens when I was kind. I’ve always loved the immediacy of it; you don’t need to sharpen it, you don’t need to dip it in water. I guess it started as just a convenience, but now the accessibility of it has become so tied up in my practice. It’s important and nostalgic to me.” 

    In a world that is constantly shifting towards technology and a “more-is-more” mentality, analogue mediums seem to be gradually fading into obsolescence. However, the specialist remains resolutely uninterested in changing his medium, believing that there is still so much to discover and explore. “I like drawing because it’s an analogue medium. There’s something truly special about using your hands to create something—it becomes a part of yourself,” he explains.

    Organised artistic rebellion with Habib Hajallie
    Habib Hajallie in front of a self-portrait at Mall Galleries, London | Image courtesy of the artist

    This sentiment is particularly evident in Hajallie’s “quasi-surrealist” self-portraits, which caricature himself to spark conversations around his dual heritage—Sierra Leonean and Lebanese. In these imagined scenarios and narratives, he explores the complexities of his background, and by extension, wider discussions around culture and identity. “I’ve since realised that my personal experience is enough to use myself as a sitter and convey what I want to share,” he reflects.

    Hajallie’s cross-genre, cross-era works are rich with historical and personal resonance. Their painstaking conceptualisation and execution invite viewers to delve into multi-layered, literary-sonic spaces, urging them to listen to the stories long neglected or actively removed from the various canons. Ultimately, these portraits serve as a mirror to our biases and a poignant reminder to read the small print: What is this truly about? And what am I choosing to ignore, even advocating for, by not looking further?


    Source link