نویسنده: post bot

  • Through a Love of Note-Taking, José Naranja Documents His Travels One Tiny Detail at a Time — Colossal

    Through a Love of Note-Taking, José Naranja Documents His Travels One Tiny Detail at a Time — Colossal


    From postage stamps to jetliner specifications to items he packed for the journey, José Naranja’s sketchbooks (previously) capture minute details of numerous international trips. “I’m lost in the intricate details, as always,” he tells Colossal. Everything from currency to noodle varieties to film references make their way into small books brimming with travel ephemera and observations.

    Naranja is currently working on a thicker book than he has in the past, which is taking more time to fill, along with an illustrated card project called 2050, which merges science, tech events, and his signature “beauty of note-taking” aesthetic. The artist has also reproduced some of his sketches in The Nautilus Manuscript, a small batch-printed, hand-bound edition available for sale in his shop. Follow updates on the artist’s Instagram.

    a small sketchbook with elaborately designed travel notes and drawings, on a table with artmaking tools like pens and ink
    a small sketchbook with elaborately designed travel notes and drawings, on a table with artmaking tools like pens and ink
    a small sketchbook with elaborately designed travel notes and drawings
    a small sketchbook with elaborately designed travel notes and drawings, on a table with artmaking tools like a stencil and stamps
    a small sketchbook with elaborately designed travel notes and drawings, on a table with artmaking tools like pens and ink
    a series of small sketchbooks with elaborately designed travel notes and drawings
    a small sketchbook with elaborately designed travel notes and drawings
    a small sketchbook with elaborately designed travel notes and drawings, on a table with artmaking tools like pens and ink
    a small sketchbook with elaborately designed travel notes and drawings, on a table with artmaking tools like pens and ink
    the tops of a series of closed, small sketchbooks showing how full they have become, with color and details on the edges


    Source link

  • Youth Art Month (YAM) Trivia: Ignite Curiosity and Celebrate Creativity!

    Youth Art Month (YAM) Trivia: Ignite Curiosity and Celebrate Creativity!


    When you encounter an intriguing trivia question, you may notice you sit up taller and tenser, lean in closer to the screen, or even raise your eyebrows. That’s the power of trivia! A good fun fact is gripping and sparks a curiosity that makes us want to learn more. Trivia activates our sense of wonder and invites us to explore the world in new ways, which is exactly what art education and Youth Art Month are all about. 

    Turn Youth Art Month into a schoolwide celebration with a trivia competition to get everyone buzzing about the arts!

    holding the golden paintbrush in an art room

    Work with your administration to set the stage for success.

    The first step to launching a schoolwide trivia game is to engage your administrators. Share how trivia can foster teamwork and critical thinking while energizing the school community. Connect the benefits for the school to the mission behind Youth Art Month (YAM) to make your case. YAM shines a spotlight on the importance of art in schools. Its mission is to promote observation, problem-solving, creativity, and communication—all of which art trivia supports as well!

    Introduce trivia to teachers early to get them involved.

    Once your administration is on board, share the idea with your colleagues. Present Youth Art Month Trivia at a staff meeting through a sample game to garner excitement! Explain the format and don’t forget to mention any agreed-upon incentives!

    Select a week or month for the school to participate. If you’re doing one week, students will begin each day or first-period class with a trivia question. If you’re doing a month, spread it out to one day each week. Provide pre-populated slides to all staff members with the question of the day. Allow students to discuss and decide on an answer together as a class before the teacher submits the class’s final answer. This setup keeps the activity quick and organized!

    vincent van gogh trivia on the board

    No buy-in? No problem!

    If getting full-school participation in Youth Art Month Trivia feels like a challenge, don’t worry! You can still make art trivia a success. Run the trivia game in your art room with your students. Start class with a quick trivia question and let your students work together to find the answer. This approach keeps the activity contained while still building excitement.

    You can also take the game online to involve families and the wider community. Post weekly trivia questions on your school’s or art program’s social media pages. Encourage students and parents to work together to answer the questions and leave their responses in the comments.

    Make schoolwide implementation simple with a link.

    Teachers are busy, so simplify the trivia process for all. Create a link to a slideshow with art trivia questions. Participating teachers can copy and paste the questions into their weekly slides or use yours, eliminating extra prep work. Include a link to an online form for teachers to submit their class’ responses. This keeps everything in one place and ensures answers stay organized for you!

    girl pointing at trivia on a smartboard

    Keep trivia fresh and exciting with a variety of question types.

    Offer different kinds of questions to ignite interest in new ways. From visual challenges to inquiry-based prompts, a mix of questions will ensure trivia feels fun and dynamic every time.

    Get inspired with these three creative approaches to trivia:

    1. Reveal a Painting
      Build close observation skills and encourage students to think critically about how small details fit into a bigger picture. Choose a famous artwork and cover it with several squares or rectangles to mask the painting. Each minute, reveal a new section of the painting by deleting a square. As you reveal the painting, students will guess what it is.
    2. Standards-Based Questions
      Reinforce learning by reviewing key concepts from your curriculum. Ask questions about color theory, perspective drawing terminology, or printmaking tools.
    3. Inquiry-Based Questions
      Encourage research and critical thinking with questions that prompt students to explore art history. For example, Which Mexican artist turned a traumatic bus accident into inspiration for vivid, emotional self-portraits that explored her pain and identity? (Answer: Frida Kahlo.)

    reveal a painting

    Expand your trivia repertoire with these additional resources:

    Build excitement with rewards and a final celebration.

    Celebrate the winning class each week with an administration-approved award! Include the participating teacher in the award or give them a small gift to show your appreciation for their support of Youth Art Month and the arts. 

    Here are some fun award ideas:

    • Present a “Golden Paintbrush” award. Display it prominently to encourage friendly competition.
    • Host an Art pARTy with an open studio for students to explore special materials.
    • Allow students to have a “Dress Down Day.” This is particularly incentivizing if you are at a school that requires uniforms.
    • Distribute school-appropriate art-themed vinyl stickers.
    • Invite students to eat lunch in your art room and share a few art-themed treats.

    golden paintbrush and paint supplies

    Trivia is much more than entertainment! It can spark curiosity, build teamwork, and bring energy to learning about the arts. This Youth Art Month, make trivia the centerpiece of your celebration and art the talk of your school. Get administrator support, make it easy for all teachers to participate, and provide incentives for colleagues and students to set your initiative up for ultimate success. If you want to elevate your art program in just a few minutes each day, grab your golden paintbrush and let the games begin!

    What words of wisdom can you share about hosting a schoolwide initiative? 

    Tell us your favorite types of art trivia questions!

    To chat about Youth Art Month with other art teachers, join us in The Art of Ed Community!

    Magazine articles and podcasts are opinions of professional education contributors and do not necessarily represent the position of the Art of Education University (AOEU) or its academic offerings. Contributors use terms in the way they are most often talked about in the scope of their educational experiences.


    Source link

  • ‘Of Salt and Spirit’ Celebrates the Legacy of Black Southern Quilters — Colossal

    ‘Of Salt and Spirit’ Celebrates the Legacy of Black Southern Quilters — Colossal


    You may have heard of the remarkable quilters of Gee’s Bend, but do you know about the Crossroads Quilters, like Gustina Atlas? Or Hystercine Rankin? Mary Mayfair Matthews? You’re in luck if you have a chance to visit Of Salt and Spirit: Black Quilters in the American South at the Mississippi Museum of Art, which shines a light on dozens of incredible Black Southern quilters and takes a celebratory approach to showcasing their myriad styles and techniques.

    MMA is home to one of the South’s largest collections of quilts, from which more than 50 handmade and machine-stitched examples were drawn for this expansive exhibition. Merging research, interpretation, and community engagement, curator Dr. Sharbreon Plummer aimed for “a cohesive, experiential study of American art through a Black feminist lens.” The show parses cultural narratives around the art form, spotlighting the impact of the craft across generations and geography.

    Emma Russell, “Star Quilt” (1978), cotton blend; hand-pieced, appliquéd, and hand-quilted, 81 x 77 inches

    A wide range of contemporary and historic pieces converge in Of Salt and Spirit, including figurative and narrative works alongside vibrant geometric compositions. Many of the works were acquired by the museum from Roland L. Freeman (1936-2023), a photographer who documented African-American craftspeople and guilds in his work as a stringer for Time magazine and Magnum Photos.

    Freeman collected more than 100 quilts, made several of his own, and published a couple of books on the subject. “Quilts have the power to create a virtual web of connections—individual, generational, professional, physical, spiritual, cultural, and historical,” he says in his second book, A Communion of the Spirits (1996).

    In conjunction with the exhibition, the museum also highlights the large-scale, ongoing AIDS Memorial Quilt project, which was initiated in 1985 at the height of the epidemic. Paralleling Of Salt and Spirit’s focus on creative expression, identity, and strength, the AIDS quilt—which will be on display at MMA for a two-week period beginning May 5—honors quilting for its role in resistance and remembrance.

    Of Salt and Spirit continues through May 18 in Jackson. Plan your visit on the museum’s website. You may also enjoy a look back at Souls Grown Deep Like the Rivers, a monumental survey recognizing the artistic traditions of Black artists.

    Mary Mayfair Matthews, “Folk Scenes Quilt” (1992), rayon, cotton polyester blend, lace, lamé, and buttons; hand-pieced and appliquéd, 86 1/4 x 74 inches
    Annie Dennis (designed by Roland L. Freeman), “Voodoo Quilt” (1987), fabric; hand-pieced, appliquéd, hand-embroidered, and hand-quilted, 83 1/2 x 64 inches
    Detail of “Voodoo Quilt”
    Gustina Atlas, “Variation on Dresden Plate Quilt” (1998), cotton; machine- pieced and hand-quilted, 81 1/2 x 80 inches
    Clancy McGrew, quilted and appliquéd by Jeraline Nicholas, “Storytime at the Library” (2004), fabric; machine-pieced, appliquéd, embroidered, and hand-quilted, 41 3/4 x 83 1/8 inches
    Mabel Williams, “Improvisational Strip Quilt” (1968), cotton, polyester, wool, twill; hand-pieced and hand- quilted with appliquéd and embroidered backing, 85 x 65 inches
    Clancy McGrew, quilted by Tammy McGrew, “Clancy’s Beauty Salon” (2004), fabric; machine-pieced, appliquéd, and hand-quilted, 67 5/8 x 49 1/2 inches
    Roland Freeman, “Maya Angelou, Author, Educator, and Quilter (top left and bottom right); Dolly McPherson, Maya Angelou, and Beverly Guy-Sheftall (top right and bottom left), Winston-Salem, North Carolina, November 1992” (1992), Chromogenic print with quilted mat (1996) by Anita Knox, 36 x 36 inches
    Roland Freeman, “Catherine Gill with Sunburst Quilt (left) Made by Her Mother, Classy Blaylock, from
    Decatur, Mississippi, Flagstaff, Arizona, April 1993″ (1993), Chromogenic print, 27 x 38 inches


    Source link

  • ‘Blems’ – Available Only at Our Anthe Storefront

    ‘Blems’ – Available Only at Our Anthe Storefront


    Our new storefront is fully up and running these days – and one of the benefits of visiting us in Covington is the opportunity to shop our Seconds Shelf (which is the Boarded Bookcase from “The Anarchist‘s Design Book“).

    On it go all of the books and tools that aren’t quite perfect – items we can’t sell at full price. Maybe we spilled coffee on the pages. Maybe a cover was put on upside down at the bindery, or a few pages got folded incorrectly at assembly. Or the post service damaged the book in shipping. Or we dinged a hammer head while seating the wedge. This is all good stuff – readable and usable…just a wee bit blemished.

    As a result of this less-than-perfection, these books, tools and accouterments are priced well below their usual retail price…and you have to visit us to get them. We can’t ship them. We’d lose money if we did…and not only because of the packing and shipping cost, but the human cost in keeping on top of online listings and the like. There is usually no more than one or two of any given title/item, and it would be prohibitively person expensive/time consuming to deal with listing them online.

    So I’m afraid you’ll have to come to 407 Madison Ave., Covington, Ky., 41011 to partake. Bonus: You get to see us, and hang out for a while in our beautiful river city!

    Store hours are currently Monday-Wednesday-Friday from 10 a.m.-2 p.m.

    – Fitz

    p.s. About those store hours: I regularly receive emails with special requests to come in early/late or on an unscheduled day. I beg you to please stop sending those. While we might change the hours in the future, for now, these are the hours. In our other hours, we are writing/editing books, building something in the shop, making tools, spending time with friends and family, communing with our cats….


    Source link

  • 3 Ways to Cultivate Successful Relationships with Paraprofessionals in the Art Room

    3 Ways to Cultivate Successful Relationships with Paraprofessionals in the Art Room


    If you have students with special needs in your art room, they may come to class with a paraprofessional, teacher assistant, or a “one-on-one.” Sometimes, it can be a little vague on what their role is and how to work together. However, when you welcome instructional assistants into your art room and cultivate a great working relationship with them, there are many benefits. Students with special needs will blossom, you’ll spark a love for art in the paraprofessional, and you will be more efficient at your job.

    Foster positive relationships with paraprofessionals in the art room with these three ideas and then, dive into some frequently asked questions.

    1. Make paraprofessionals feel important—because they are important!

    Paraprofessionals are often the experts on our students in special education. They are with these students for most of the day and can answer questions about their skill level, interests, or even behavioral triggers. Ask for input for both the “in the moment” problem solving and the long-term “getting to know” the student. They can have the missing puzzle piece if you’ve tried everything and nothing’s working… or, you want to take a shortcut and go straight to what’s worked before!

    Another way to make them feel valued and respected is to collaborate on the “fun art stuff” too. Talk to them about the neat things they or their student are doing. Be cognizant that you balance bringing up problems and commands with positivity and encouragement. One way to do this is a simple “thank you” at the end of each period. Acknowledge their effort with specific tasks (no matter how small!) to let them know you appreciate them showing up and being an active participant. Another way to show you are grateful is to provide coffee, water, or treats.

    coffee cup

    2. Help yourself by helping them.

    A lot of people are uncomfortable with art because they feel like they’re “bad at art.” This is evident in the familiar response, “I can’t even draw a stick figure!” Also, many paraprofessionals don’t want to “mess up” a student’s project. Remember these sentiments when building relationships with your paraprofessionals. Although they are adults there to provide support to students, they can also be an extra art student. When you equip them to be more comfortable in the art room, they will be a positive catalyst for your students.

    One simple way to mitigate anxiety is to communicate clear expectations for the whole year and for each class period. Tell them what the students will be doing for the day and what the paraprofessional’s expectations are during this time. Just as you would for a student, provide specific instructions in more than one format, and don’t assume they already know what to do.

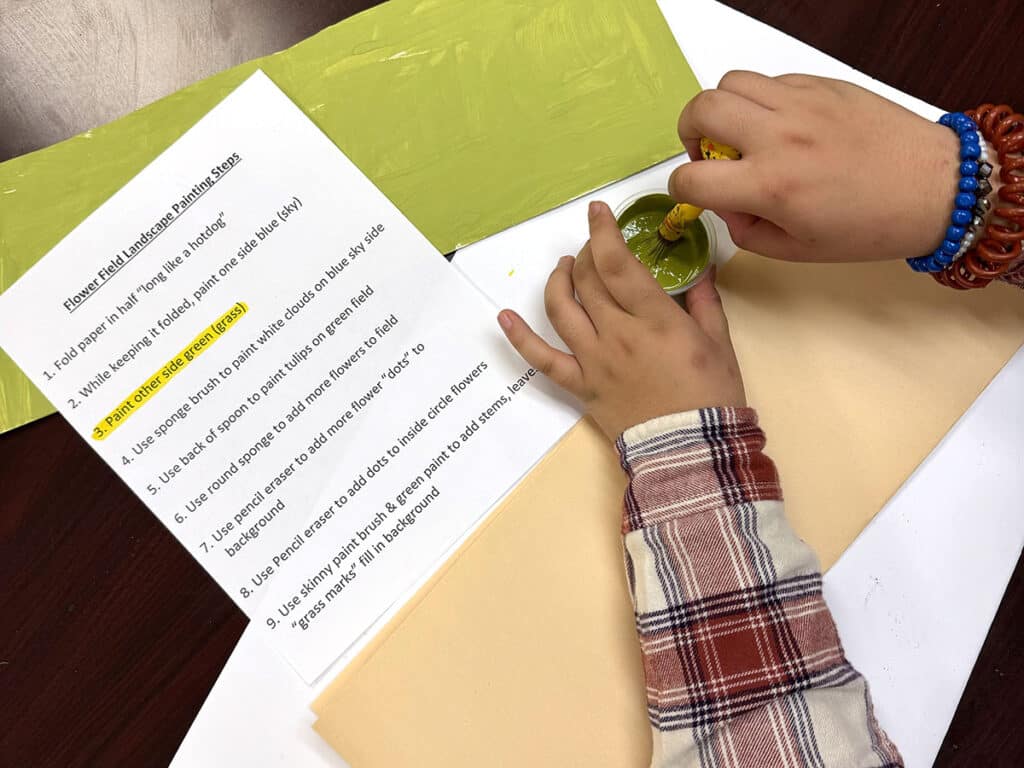
    A quick way to provide expectations is to print out a simplified, bulleted, step-by-step list of each action item for the lesson. You can also print the whole lesson and highlight what the students need to accomplish on that particular day. It’s very helpful to have photos showing each step because sometimes a finished art project can be visually overwhelming. If you don’t have the time to compile step-by-step instructions with photos, check out FLEX Curriculum. FLEX is a standards-aligned curriculum that includes detailed step-by-step project instructions with photos and student-facing videos and resources.

    step-by-step photos

    3. Give paraprofessionals their own art project.

    It can be wonderful when you have an eager and artistically-minded paraprofessional working with your students in the art room. However, sometimes they can be too eager to make art for the student. They are focused on having the project look “perfect” instead of indicative of the student’s true performance.

    One way to mitigate this is to preemptively leave out extra supplies and give the paraprofessionals permission to create their own piece of art next to their students. As long as the students are getting the attention and assistance they need, many paraprofessionals will appreciate the thought. They usually enjoy the opportunity to sneak in a little creative outlet during their day!

    If you’re short on supplies and worried about not having enough, many paraprofessionals can be invaluable support in helping you garner donations and recycled materials. Give them a list of what you’re looking for and chances are, they’ll work hard to collect boxes and bottles from other classrooms throughout the day. This creates many opportunities for them to feel like a contributing member of your classroom community!

    art supplies

    Let’s answer your most frequently asked questions about paraprofessionals!

    What if a paraprofessional doesn’t show up?

    It can be frustrating when a designated instructional aid doesn’t show up for your art class with their students. If you have a good relationship with them, ask them about it the next time you see them. They may have had an emergency or didn’t think it was a big deal. It’s a great time to remind them of their importance in the art room and how vital they are to maintaining a smoothly run classroom.

    However, what if this happened multiple times already? Email the lead special education teacher to gather thoughts and ask for guidance. The lead teacher often has a solid relationship with them since they work closely all day. The email will also create a paper trail documenting their absences.

    What if the paraprofessional does too much or too little of their student’s art project?

    If the paraprofessional is doing too much of a student’s project, provide enough supplies so they can make their own. If they’re not helping enough, pull them aside before class to reset expectations. Show them examples of what you need them to do and give them a quick list of written instructions. An example of a reminder expectation can sound like, “I really value your extra set of hands and eyes. Please sit at the same table with students, phone-free so you can be readily available to assist.

    What if the paraprofessional frequently leaves or disappears?

    As aforementioned, pull the paraprofessional aside to reset expectations. Remind them that they are an integral and important member of your class and it can be disruptive for students if they don’t have a steady source of support. Your chat can sound like, “I noticed you stepped out the other day. I’d really appreciate it if you remained here during class. I really rely on the support you bring because you know [insert student’s name] the best.” If the behavior persists, email the lead special education teacher for advice and follow their guidance.

    Bonus Tip

    If you’ve already had a friendly chat to reset expectations and tried emailing the lead special education teacher, you can also seek out the guidelines used in the paraprofessional’s training. This can reiterate that you, the art teacher, aren’t the one “coming up with” the rules and that they are a part of the job requirements.

    Building positive relationships with paraprofessionals in the art room is essential for fostering a collaborative and supportive learning environment. Not only does it model these skills for your students but it streamlines instructional tasks, strengthens classroom management, and bolsters individualized student support. Plus, when teachers and assistants work harmoniously together, they boost each other’s morale. Make your art room a welcoming and appreciative spot for paraprofessionals with the tips above so they’ll look forward to your class and spread a vigor for art to your students!

    What’s one thing you do to make paraprofessionals feel welcome and included in your classroom?

    How do you navigate challenging situations with paraprofessionals in the art room?

    To continue the conversation, join us in The Art of Ed Community!

    Magazine articles and podcasts are opinions of professional education contributors and do not necessarily represent the position of the Art of Education University (AOEU) or its academic offerings. Contributors use terms in the way they are most often talked about in the scope of their educational experiences.


    Source link

  • What you don’t know about Ancient Delphi, God Apollo, Oracle, Myths, History, Architecture & Art – Veronica Winters Painting

    What you don’t know about Ancient Delphi, God Apollo, Oracle, Myths, History, Architecture & Art – Veronica Winters Painting


    What you don’t know about Ancient Delphi, God Apollo, Oracle, Myths, History, Architecture & Art


    You can take a deep dive into ancient Greek history by virtually visiting Delphi, the cult center with its gods, oracles, art, architecture, and myths.

    To see art, articles, and references for this episode, visit: https://veronicasart.com/cult-center-of-delphi-its-history-oracles-greek-myths-architecture-and-art/

    Video on YouTube: https://youtu.be/qogqH1kKzHM

    https://www.youtube.com/watch?v=qogqH1kKzHM

    Subscribe & rate this podcast on Spotify and Apple | Show your support for the podcast: here | Host: Veronica Winters, MFA | veronicasart.com


    Source link

  • “Between Dreamscapes” by Illustrator Leyla Cui

    “Between Dreamscapes” by Illustrator Leyla Cui


    A selection of work by New York City-based illustrator and artist Leyla Cui. Exploring the fluidity of female identity, Cui’s work weaves memory, intimacy, and self-perception into surreal narratives. Through fragmented figures and shifting forms, she examines the body as a vessel of desire, trauma, and transformation. Hair, skin, and touch become symbols of memory, evoking tensions between visibility and erasure. Cui moves beyond traditional representation, challenging fixed perceptions and expanding the emotional depth of storytelling. By giving form to the unspoken, she creates a space where femininity is both intimate and infinite, resonating with the silent yet persistent voices of history and self-discovery.


    Source link

  • The Top 5 FAQs About Printmaking in the Art Room

    The Top 5 FAQs About Printmaking in the Art Room


    Printmaking is a powerful process in the art room. It offers students hands-on, engaging artmaking experiences and teaches creative problem-solving and experimentation. The many methods of printmaking make it accessible for all students, classrooms, and budgets. However, this is also what can make printmaking so intimidating! Art teachers just like you in The Art of Ed Community asked their burning printmaking questions and we’re here to deliver practical solutions.

    Let’s answer your top five most frequently asked questions about printmaking in the K-12 art room!

    spread of prints

    1. “I’m not comfortable teaching printmaking. Where do I start?”

    Printmaking can be an overwhelming medium—there are so many forms, lots of tools and equipment, and several stages in the printmaking process. It can feel like a lot to teach on top of classroom management, ideation, assessment, and more. The great news about printmaking is that there is a process for everyone at every comfort and skill level!

    Start with simple techniques and processes like foam tray printing or stamping. These two methods are great entry points and are a good segue into block printing. They do not require any fancy printmaking tools and you probably already have the supplies you need in your closet. Boost your confidence by incorporating mediums you love! For example, if you love drawing, painting, or mixed media, try monoprinting or collagraphy.

    Another tip is to experiment first. Try exploring foam tray printing or stamping on your own for fun. Then, host a laidback Art Night event at your home with friends or at school with colleagues to practice teaching a mini-lesson. This can help you troubleshoot any considerations before you bring it to your students.

    Embrace imperfection! Printmaking is all about trial and error and the process. Don’t think you need to know everything about printmaking before diving in! Invite students into the creative process and show them how to learn from mistakes and discoveries.

    linocut plate and carving tool

    2. “I studied printmaking, but I still avoid teaching it. Why?”

    Even if you are comfortable with printmaking in your own artmaking, bringing it to students can be a whole different ball game. Printmaking can seem messy and intimidating if you have large classes and limited studio space. With a little intentional planning, printmaking can be a smooth process that is engaging for all of your students.

    Just like you’d scaffold a difficult skill with your students, scaffold the lesson and process for your instruction. Break down the printmaking process into small steps. Teach each step as an individual lesson and move on when the class as a whole is ready. For example, spend one class sketching ideas and then the next carving. When you get to “Printing Day,” set up student-led stations with clear roles to reduce chaos. Let the first round of printmaking be an experiment to see how everything works before diving in again to make more fully realized and final prints.

    Perhaps you love printmaking so much that you don’t know where to start because you want to bring every form to your students! This is a wonderful “problem” to have. Instead of overloading your students with every possibility, pick one very simple process and let your passion trickle down to your students. Once they’re hooked, you will be unstoppable together!

    pink ink on paper and brayer

    3. “How do I teach printmaking on a tight (or nonexistent) budget?”

    Certain types of printmaking can be on the pricier side and take up the bulk of your valuable art budget. For instance, lithography traditionally uses heavy blocks of limestone and requires a heavy-duty printing press with lots of studio space. Etching can also use expensive and toxic chemicals that aren’t school-friendly. However, there are many hacks and alternatives to make printmaking accessible to your students!

    Here are some budget-friendly printmaking ideas perfect for the K-12 art room:

    carved plate with black ink

    4. “I want to try block printing, but I’m worried about students cutting themselves!”

    Prioritizing student safety is a part of having excellent classroom management in the art room. Many items used for carving or incising designs, like linoleum cutters or etching tools, are very sharp. Paired with the force and pressure required for carving and many students’ poor hand strength and coordination, you may have cause for concern. With proper instruction, supervision, and limits, you can execute a printmaking lesson with zero injuries!

    Start by teaching students about the tools and equipment they will be using. Assume nothing and explain and show everything to ensure everyone is on the same page. Explain what each item is for and how to properly use it. Verbalize and demonstrate safe-cutting techniques, such as carrying sharps pointed toward the ground, cutting away from the body and helper hand, and using a bench hook or scrap board to stabilize the block. Do several exercise drills to get students in the habit of how to behave with, hold, and use these exciting tools!

    Another tip is to start with soft-cut materials, such as rubber blocks or foam, instead of traditional linoleum. These require less pressure to carve and often, duller tools. You can also practice the motions of carving with plastic tools and clay slabs before graduating to printmaking materials. These are all great alternatives for younger printmakers.

    two types of printing plates

    5. “How do I keep printmaking from becoming a total mess in my art room?”

    Art teachers spend hours and hours maintaining the art room. There are tons of materials, tools, and projects before adding printmaking to the mix. Plus, printing ink seems to multiply on hands, tables, clothes, and sometimes even the floor! In the chaos of a “Printing Day,” students may not follow cleanup instructions and leave the sink full of inky brayers. Avoid the mess and take a few simple steps to prepare for cleanup before class even starts.

    Take a look at these quick steps to avoid the mess:

    • Set up printmaking zones.
      Designate separate areas for drawing, carving, inking and printing, and drying to keep messes contained.
    • Use minimal ink.
      Show students how much they need and how to roll it out into a thin, even layer. You can even pre-portion ink into small cups so they don’t overuse and waste it.
    • Assign cleanup roles.
      Build ownership in the studio by putting students in charge of wiping tables, cleaning brayers, and organizing prints. This will free you up to supervise the class and the classroom as a whole.
    • Provide wipes and scrap paper.
      Baby wipes—store-bought or DIY—will be your best friend during printing to minimize the spread of ink! Use large scrap paper as “trays” or small scraps as “tweezers” to transport paper and prints without tiny fingerprints.
    • Grab a lot of newsprint.
      Order a bulk pack of newsprint or ask your local newspaper for scrap newsprint. Use this to blot prints to absorb excess ink. This reduces smudging and dry time.

    pink ink on paper and brayer

    Whether you’re new to printmaking or a seasoned expert, you can absolutely teach printmaking to your students! Printmaking may feel overwhelming, but it’s one of the most rewarding processes to teach. The key is to start simple so you will gain confidence and hook your students! From there, try some of the hacks and tips above to keep it budget-friendly and mess-free. Turn your most frequently asked questions about printmaking into your most frequently asked for art lesson!

    What’s your biggest classroom printmaking challenge that we can help with? 

    To chat about printmaking with other art teachers, join us in The Art of Ed Community!

    Magazine articles and podcasts are opinions of professional education contributors and do not necessarily represent the position of the Art of Education University (AOEU) or its academic offerings. Contributors use terms in the way they are most often talked about in the scope of their educational experiences.


    Source link

  • Think Outside of the School: 9 Unique Art Show Locations

    Think Outside of the School: 9 Unique Art Show Locations


    Choosing a unique art show venue outside of your school creates a novel and exciting experience for your young artists. It also expands the audience for your students’ work and exposes your program to a wider segment of the community, including potential supporters and stakeholders. Partnering with community organizations and having your art show outside of your school makes the culmination of all of their hard work special and makes your students feel like professional artists. 

    art show display

    Reap the benefits of hosting your art show at a fresh location in the community!

    Hosting your art show in the halls of your school is usually the easier option. However, stepping outside of your school campus bubble can truly benefit your students and your art program. Aside from the positives listed above, hosting your art show at a community venue brings other people to help hang and take down your show. The business or organization will likely also promote your show. For families and students, it connects the visual arts with tangible careers in the community. Let’s take a look at nine unique locations to consider for your next art show!

    1. District Administration Building

    Place student artwork directly in the path of district decision-makers. Those with the power to influence budgets and approve new courses will experience the impact of your art program firsthand. This daily exposure to the creativity and skills fostered in your classroom can powerfully advocate for the value of art education.

    2. City Hall

    Showcase your students’ artwork in your local government building so the broader community will see the importance of your art program. Students will take pride in having their work displayed in a prestigious location. A gallery night will allow families and students to personally meet their city’s officials.

    3. Local Park

    Hold your art show amidst nature’s beauty in a local park. The Impressionists loved creating en plein air but outdoor spaces can be wonderful for viewing art as well. Take advantage of natural light to enhance the artwork. Families will enjoy the relaxed, outdoor setting, and the open space allows for larger crowds.

    conservatory

    4. Community Art League

    Many art leagues have a dedicated gallery space. Your students will benefit from professional hanging systems and lighting. This collaboration connects your school and students with experienced artists. Nothing motivates students to up their game like telling them accomplished artists will be examining their work!

    5. Community College

    Hosting your art show at the community college exposes them to a post-secondary environment. Many community college art departments have a small gallery space but there are usually plenty of other larger lobby spaces available too. Nearby classrooms or studio spaces work perfectly for workshops, demonstrations, or blacklight galleriesAs students see their best work hanging prominently in an institution of higher learning, they will naturally envision themselves continuing their education and thriving in college.

    6. Library

    Literacy isn’t just for Language Arts! Visual arts is all about visual literacy and a partnership with your local library is a natural connection. After all, every great art room has a library, and your local library should have a space for student art. The library offers a quiet, studious environment that encourages close examination of artwork. This public space attracts a diverse crowd with lots of community events, ensuring a steady flow of visitors. Libraries also do a really good job of advertising their events, guaranteeing built-in publicity for your students.

    7. Historic Buildings

    Choose a historic building or site for a truly unique backdrop. This adds a sense of grandeur and importance to the student artwork. Many buildings rent out their space and property on weekends for events such as weddings. However, they are often available during the week. 

    8. Local Museum

    Partnering with a local museum elevates your art show to a professional level. This venue provides top-notch display facilities and climate control to protect the artwork. This location lends credibility and prestige to your students’ work. Think outside of the box and reach out to any type of museum—not just an art museum! The type of museum you partner with can also dictate your art show theme.

    9. Feeder Schools

    Vertical alignment and partnerships across grade levels can be tremendously beneficial for everyone. When older students show their work in an elementary or middle school, the younger students see quality work that they will want to make one day. The older students will feel a surge of pride as they showcase their work in their old stomping grounds. When you display elementary artwork at the high school, it lightens the mood and can help older students remember the earnest joy of creating. This builds a stronger art program across the district and shows students that art is a lifelong journey. 

    art show display

    Stay focused on practical art show considerations.

    Choosing an unconventional venue for your art show is exciting, but demands careful planning. Fortunately, there are many people, often who work at the location you are partnering with, who are more than willing to help you plan and execute!

    Here are some things to consider as you choose and plan your venue:

    • Is the location accessible to all of your guests?
    • For outdoor locations, do you have an inclement weather plan?
    • Do you have access to restrooms and ample parking?
    • Do you have clear signage to find the event?
    • Are you allowed to offer refreshments in the space?
    • What are the associated costs, including furniture rentals, refreshments, prizes, and transportation?
    • How far in advance can you set up, and how much time do you have for takedown?
    • How will you safely transport, display, and light the artwork?

    art show brainstorming

    Let your community help you with your art show.

    Putting together an epic art show seems overwhelming. It is okay to ask for help and advice from colleagues. The Art of Ed Community is a tremendous resource with immeasurable collective wisdom. Delegate as many tasks as possible to your Art Club, students, colleagues, and friends. Get a peek behind the scenes of how Sarah Krajewski and Jenn Russell put on their art shows. Gain their best Art Show Secrets to help you put on your best art show yet! 

    https://www.youtube.com/watch?v=NPHW2zteeSQ

    Turning your unconventional art show vision into reality requires a bit more consideration and planning. However, the benefits are always worth it! Hosting your art show off-campus increases the visibility of your students’ artwork, your art program, and the value of art education as a whole. Look into partnering with a historic site, your city hall, the local library, or a feeder school to curate a truly memorable and impactful art show experience for families, students, administrators, and other community members.

    Tell us! Have you ever hosted an art show outside of your school?

    What is your dream location for your art show?

    To chat about art shows with other art teachers, join us in The Art of Ed Community!

    Magazine articles and podcasts are opinions of professional education contributors and do not necessarily represent the position of the Art of Education University (AOEU) or its academic offerings. Contributors use terms in the way they are most often talked about in the scope of their educational experiences.


    Source link

  • In Luminous Portraits, Florence Solis Invokes Feminine Power Amid Constraint — Colossal

    In Luminous Portraits, Florence Solis Invokes Feminine Power Amid Constraint — Colossal


    When touched, the hypersensitive makahiya plant folds its minuscule leaflets inward, protecting itself from any potential threat.

    Florence Solis draws on this defensive response in an ethereal collection of portraits. Beginning with digital collages that meld figures and delicate, organic ornaments, the Filipino-Canadian artist translates the imagined forms to the canvas. Shrouded in dainty, beaded veils or entwined with botanicals, each protagonist appears bound and concealed, their bodies and faces obscured by hair or grass.

    a blue portrait of a woman with a beaded veil and long flowing hair
    “Sirena” (2025), acrylic on canvas, 30 x 24 inches

    As Solis sees it, the figures may be restricted, but they’re also able to find strength and transformation. “Filipino women, much like the makahiya, have been taught to yield, to soften, to take up less space,” she says. “And yet, beneath this quietness lies an undeniable force—one that persists, adapts, and reclaims space in its own way.”

    Working in saturated, often single-color palettes, Solis renders figures who appear to harness magical powers. She references Filipino folklore and the belief in the power of the everyday to lead to the divine, painting women rooted in tradition and myth, yet determined to see their transformation through.

    The vivid portraits shown here will be on view at EXPO CHICAGO this week with The Mission Projects. Find more from Solis on Instagram.

    a blue and pink portrait of a woman with horns and flowers around her face
    “Sa Lupa (On Ground)” (2025), acrylic on canvas, 30 x 24 inches
    a purple portrait of a woman with a beaded veil and leaves
    “Totem” (2025), acrylic on canvas, 30 x 24 inches
    a blue and pink portrait of a woman peering through foliage
    “Makahiya VIII” (2025), acrylic on canvas, 20 x 16 inches
    a blue and pink portrait of a woman with hair that wraps around her body and entwines with flowers
    “Makahiya VII” (2025), acrylic on canvas, 48 x 36 inches
    “Alay (Offering)” (2025), acrylic on canvas, 48 x 36 inches


    Source link