It’s been a while since I’ve written about my open-studio library events. This mixed-media process art weaving invitation that I set out for a multi-age group was more prep than I usually do, but it was worth it and as successful as I had hoped!

I will admit I was a little ambiguous about how this would go. I really needed to trust myself and trust that children would figure things out on their own. Since this was a process art experience, I didn’t set out an example or teach the weaving technique in any way. I hoped that the different textures and materials would spark interest, and I included some familiar materials like tempera paint sticks and dot labels for children to turn to if they didn’t feel quite ready to jump into something new.

[ I am a participant in affiliate programs designed to provide a means for bloggers to earn small fees at no cost to you by linking to Amazon.com and affiliated sites. ]
I can’t wait to share what happened, but first, here is a materials list. These are just what I used because I had everything in my basement, but use whatever you have!!
Materials for process art weaving invitation:
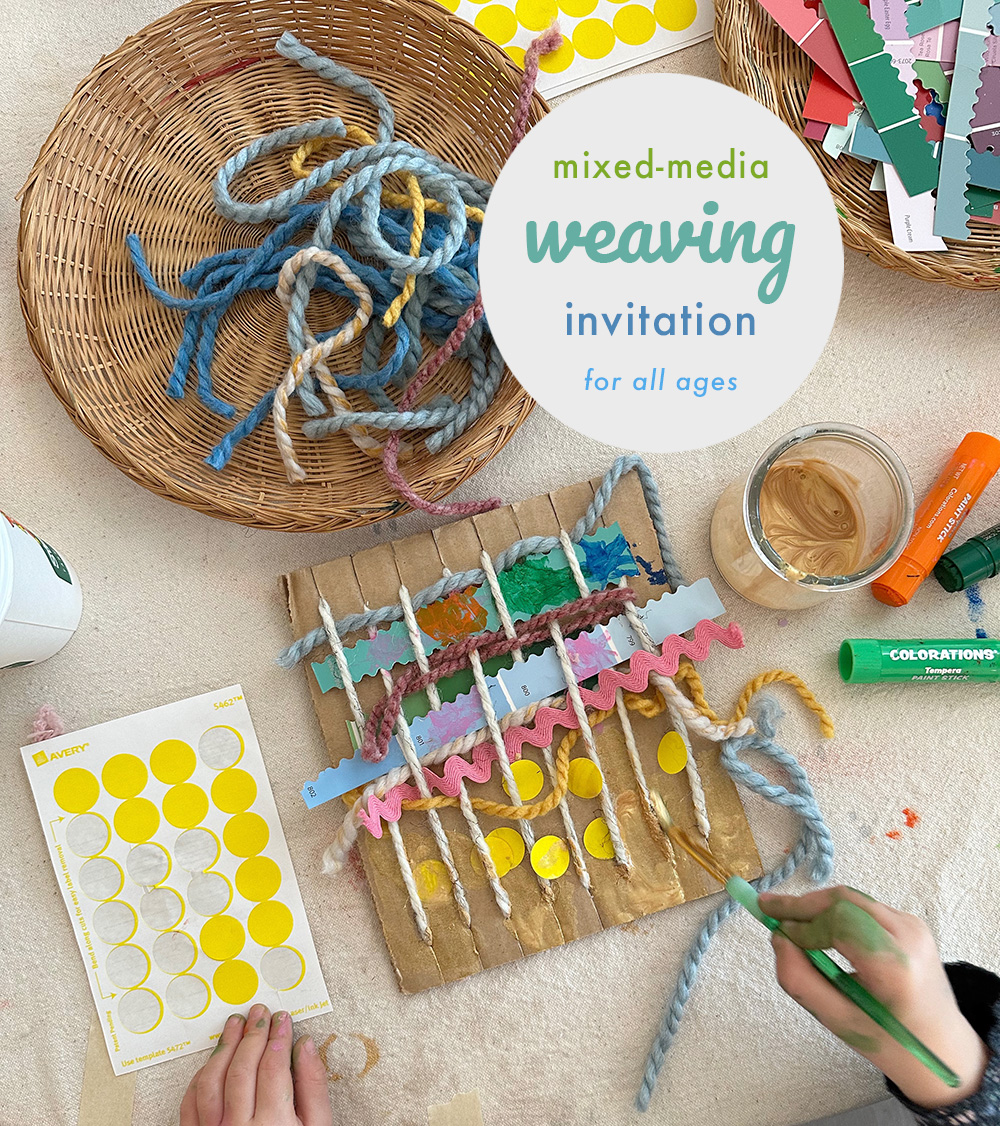
~ Cardboard (approx. 8×10 inch pieces but doesn’t have to be exact)
~ Fiskars Power-cut scissors or Zip-Snip to cut the cardboard
~ Good scissors for cutting up the materials
~ Soft textiles like yarn, chunky chenille yarn, ribbon, ricrac, felt, fabric strips
~ Recyclables to cut into strips like corrugated cardboard, thin foam, paint samples, honeycomb paper
~ I collected some twigs from outside, too. If it was fall or summer I would have collected leaves and/or flowers, too.
~ Dot labels, tempera sticks, gold tempera paint, thin masking tape

My prep and set-up process:
1. First I cut up the cardboard. They are not all the same size, I basically just cut down lots of boxes so whatever was easiest to make some rectangles from each box.
2. I used a ruler to make even marks on either end of the cardboard pieces and then snipped with scissors.

3. I didn’t make these looms in the typical way, like with a warp that could be removed. These are just quick-and-dirty, meant to give children a feel for the process but not actually take it off the loom. This also makes them much easier to put together. We just wrapped yarn around the cardboard and taped the ends on the backs. My superstar husband helped me. This was still a heavy prep project which I don’t normally do for these events. But I wanted to try it, even though it took some time.

I made about 60 looms. I typically have about 45 children coming through the space within a 2-hour timespan, so I wanted to make sure I had enough in case some kids wanted to make more than one.


4. I cut up all the different materials into strips that were a little longer than the width of the looms. I cut the felt into shapes, thinking that maybe they could be painted on or used later for something else.

5. I set out the materials in lots of different baskets and divided trays (many of these come from Ikea). I know it looks like a lot so when I say “Less is More” it feels like I’m joking, but what I mean is that the low baskets and trays make it so that I can’t put a lot out at once. Children don’t want to sift through a big bin of materials, it’s much easier to have just 20 pieces on a flat tray. I have extra nearby to replenish.

Notes on how children approached the weaving table:
Process art is all about letting children guide their own experiences with materials, but sometimes we have to really practice taking ourselves out of the equation. At first, children wandered over to the weaving table and just walked around touching some materials and then moving away. Maybe they went to the liquid watercolor table, a familiar medium, or the maker table, also filled with familiar materials. Some parents came to the table very excited, exclaiming “Ohhhh, weaving!” They attempted to teach their child the technique. Some kids sat with their parents. But mostly, I noticed that it was the children who attempted weaving on their own, or who already had some knowledge about weaving and didn’t have a parent over their shoulder that stayed engaged the longest.

This didn’t surprise me. My partner, Shannon, and I have built our whole approach at The Creativity Project around the very idea that children bring their creativity, and the materials do the teaching. Adults just need to step back and be there as support if needed. Children who have the freedom to move on their own and choose how to use materials are the ones who get into flow and build that creative confidence.

I loved observing and documenting all the different ways that children made their weaving. Some were minimalist, some were maximalist. Some were orderly and repetitive, others were carefree and experimental. There was no right or wrong way to approach the materials, which is the beauty of open-ended tables like this.

I was really proud of parents for letting their children struggle and persevere. I heard a few, “I can’t do it” from children, and then “Try again” from their adult. I’ve been doing these open studios for a year and a half now, and parents have grown and learned along with their children. They have noticed how much more joy their child gets from a creative exploration when the adult doesn’t instruct or navigate the experience.


I’m including this last photo because this child took some of the soft textiles and brought them to the painting table to make a toy for his dog. This is always what I hope might happen – when children take materials along with them to build on an idea. This could only happen in a setting where children are allowed to take risks and where they know that can try anything. It’s not too hard to create an environment like this. The part that takes the longest to learn is our part – the stepping back and not making it about us and our vision. Once we can learn this though, we realize that children are a thousand times more creative than we can ever hope to be.
xo, Bar
– – – – – – – – – – – – – – – – – – – –
Did you like this post? Here are some more weaving ideas:


