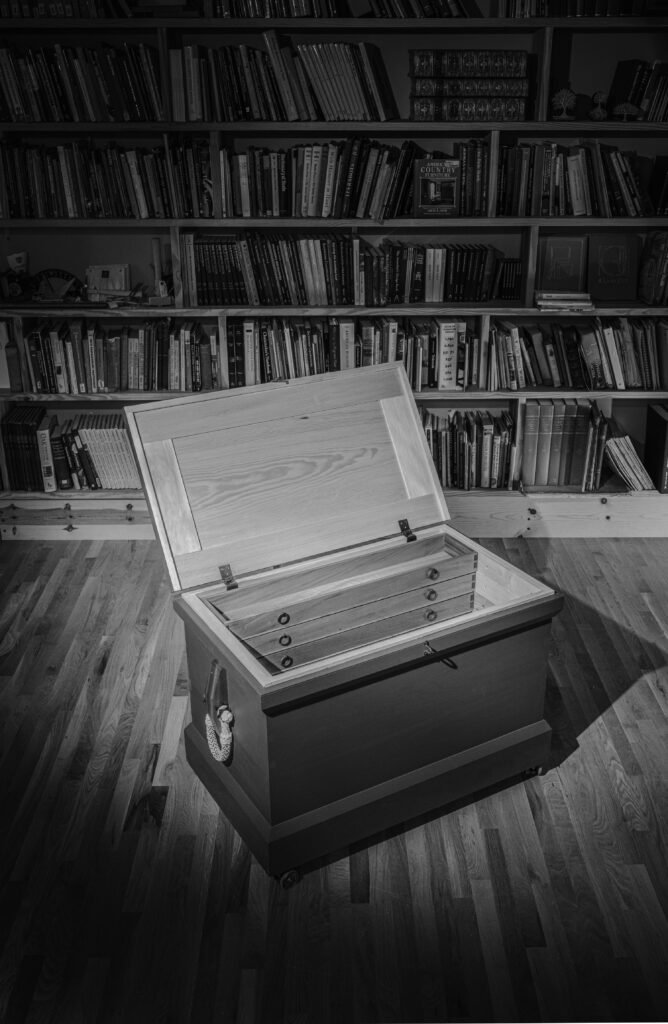
The 2025 chest in Eastern white pine and some mahogany scraps – ready for work.
Last week, we sent the revised edition of “The Anarchist’s Tool Chest” to the printer. It will be released in late June. The book has been updated throughout, including the section on building the chest. The new chest holds more tools and takes about half the time to build (sacrificing nothing in the process).
If you’ve ever thought about building one of these chests, I have good news. Alexander Brothers now offers a kit of wood for the chest in gorgeous and perfect Eastern white pine. Check out the details here, but everything is milled so you can get started. Price: $575. (Alternatively, they will sell you a bundle of rough lumber if you want to save money and do that work yourself.)
This pine is fantastic. I bought the pine for the new chest from Alexander Brothers (at full price – this boy doesn’t take discounts). They have access to clear and wide stock that we simply do not.
Eastern white pine is – hands down – the best wood for this chest. It is lightweight, strong and a joy to saw and plane. Highly recommended.
And because the internet sucks, I have to mention this: We don’t get any royalty, kickback or affiliate money from Alexander Brothers, a family-run business in Virginia. Like Alexander Brothers, all we care about is getting good material in the hands of people so they can build stuff.
One of the gratifying things about teaching others to build stick chairs are the woodworkers who embrace the craft and grow to work at the same level (or even higher) than the teacher.
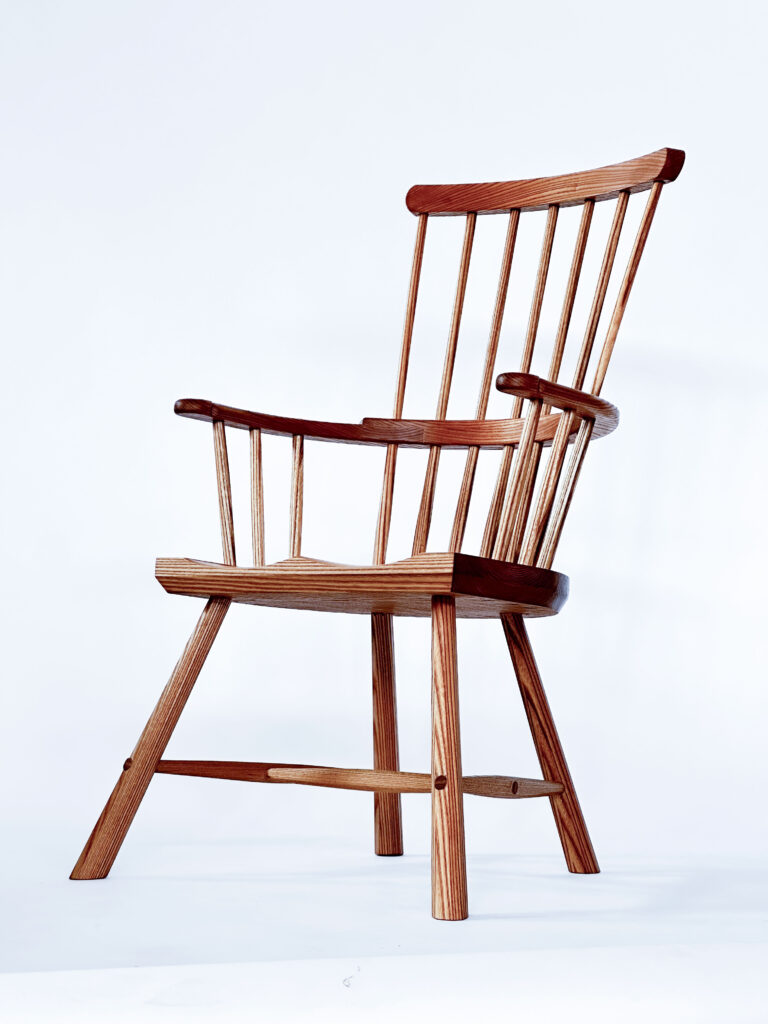
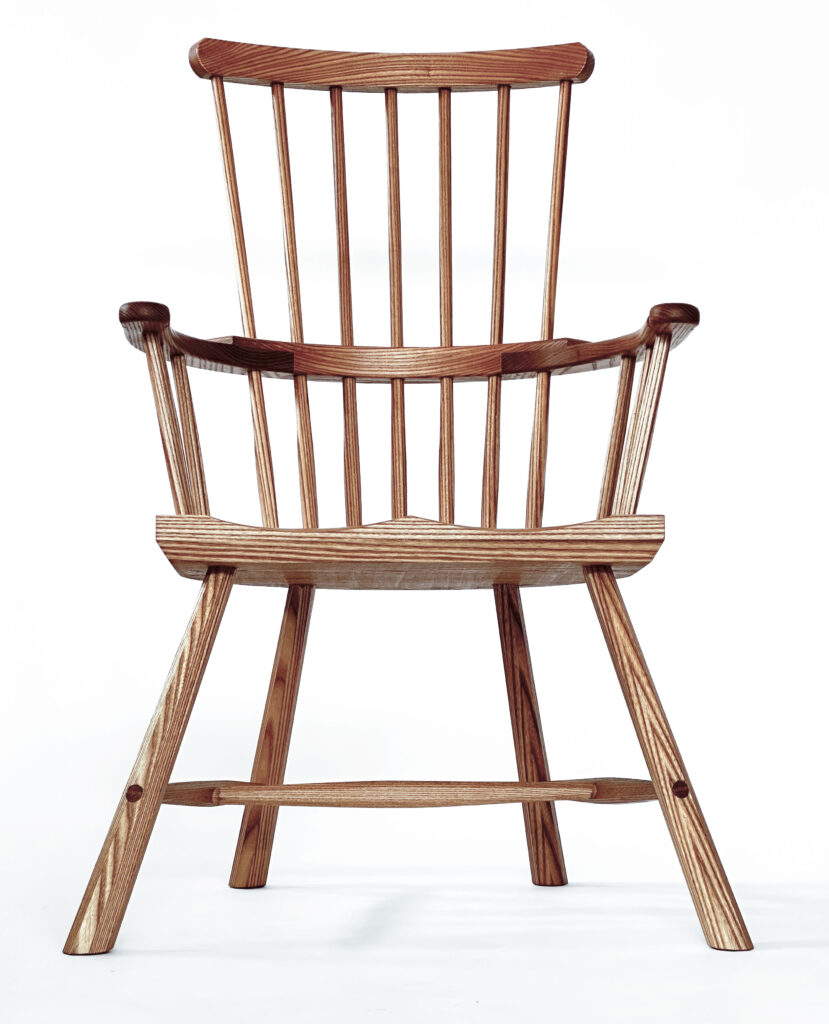
One of those woodworkers is Claire Butler, who lives outside Seattle, Wash. Claire has assisted me in teaching two chair classes during the last year and is now making stuff for sale while working a day job.
Earlier this year, Claire built this chair using some gorgeous red elm while assisting me with a class. The chair came out beautifully, it’s as good as my work. And so I offered to sell it on her behalf to help nudge her into the world of full-time furniture making.
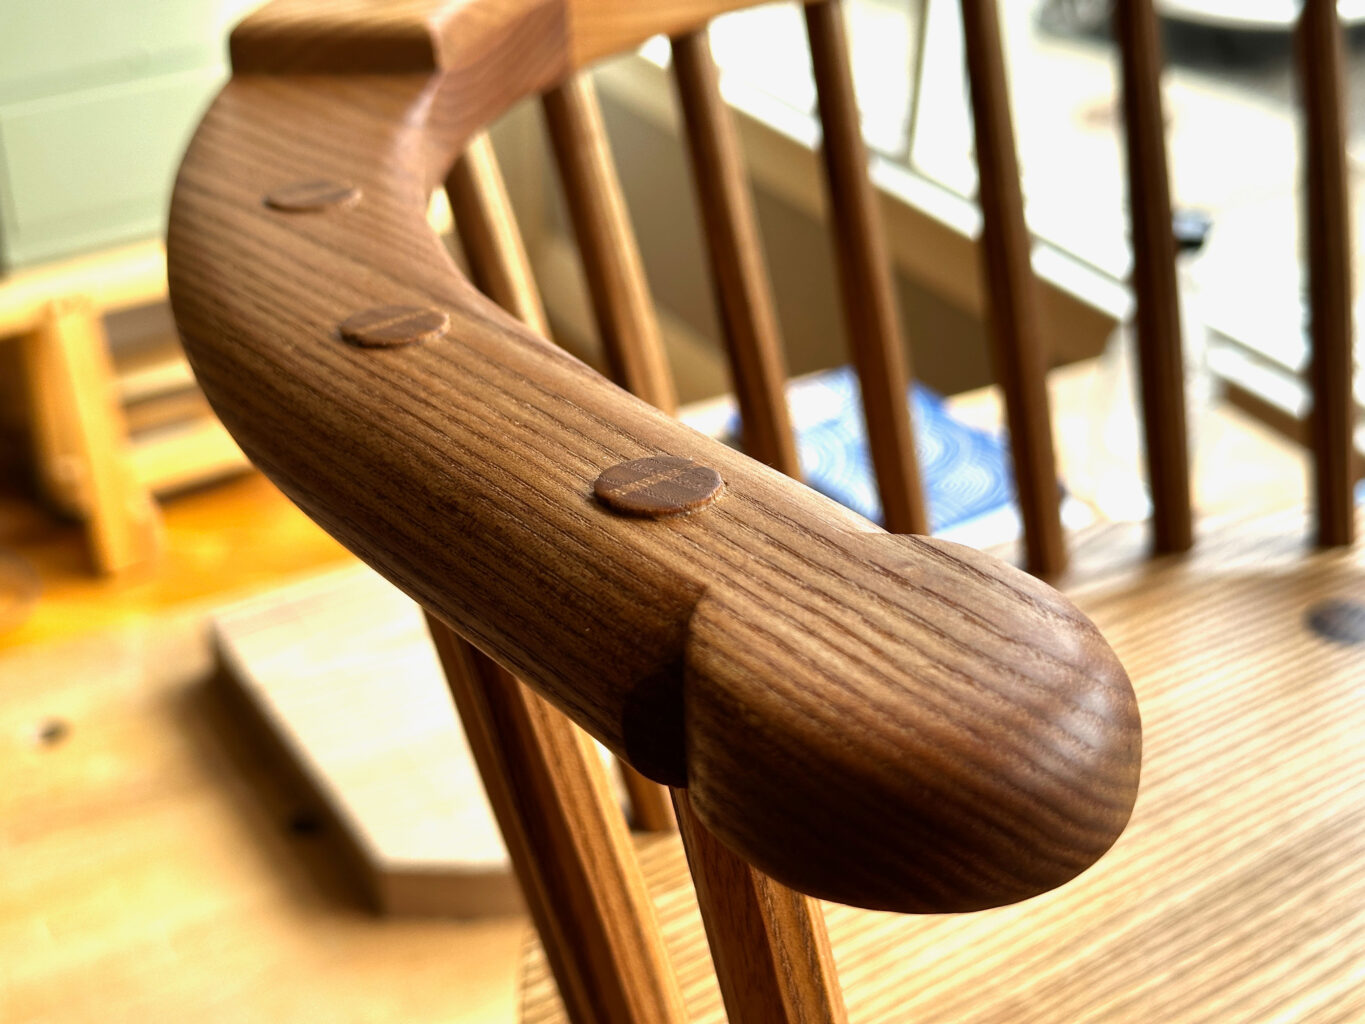
Detail of the hand.
The chair is gently raked back 14° for lounging, reading or sitting by the fire. The chair features heavily shaped arms, tapered octagonal stretchers and slightly proud and burnished tenons throughout.
The chair is made from red elm with hickory wedges, a perfect combination for chairmaking. The wood is strong, lightweight and has a difficult interlocked grain that prevents the parts from splitting. The chair’s sticks are shaved and left octagonal. All the tenons are cut slightly proud and burnished. All the chair’s joints are assembled with animal glue, which is reversible, and wedged.
The seat is tilted 5.8°. The seat is 16-3/4” off the floor, making it comfortable for most sitters. The chair is 37-3/4” tall overall.
The chair is finished with a soft wax. It offers a low lustre and looks better the more you use the chair. The finish isn’t terribly durable, but it is easily repaired (just add more soft wax).
How to Buy the Chair
The chair is $1,300. That price includes shipping and crating to anywhere in the lower 48. If you wish to buy the chair, send an email to lapdrawing@lostartpress.com before 3 p.m. (Eastern) on Thursday, May 8. Please use the subject line: “Claire’s Chair.” In the email please include your:
U.S. shipping address
Daytime phone number (this is for the trucking quote only)
If you are the “winner,” the chair will be shipped to your door in a crate built by me and Kale. The price includes the crate and all shipping charges. Alternatively, the chair can be picked up at our storefront. (I’m sorry but the chair cannot be shipped outside the U.S.)
This is an excellent chance to buy a beautiful and comfortable chair made by an up-and-coming woodworker you are going to hear more from, I’m sure.
In this episode I list 4 different surfaces for colored pencil drawing I use the most often. There are many more drawing papers of course. Share your ideas in the comments on YouTube or in messages on Instagram
Chris Burden’s Metropolis II is an intense kinetic sculpture, modeled…
Perhaps the most dominant art form of the last 100 years, film has an important…
Tuesday Matinees
Enjoy concerts featuring leading international and local ensembles in programs o…
Art & Music,Jazz at LACMA,Latin Sounds
LACMA offers in-person art classes for kids, teens, and adults, offering the cha…
Random International’s Rain Room (2012) is an immersive environment of…
Rain Room
Artist Robert Irwin’s work in the last five decades has investigated perception…
Barbara Kruger’s Untitled (Shafted) features her distinctive use of advertising…
Band (2006) may qualify as Richard Serra’s magnum opus, representing the fullest…
LACMA’s Modern Art collection features primarily European and American art from…
LACMA’s Acquisitions Group and Art Council members share a deep affinity for the…
Art Councils,Acquisition Groups,Art of the Middle East: CONTEMPORARY,Asian Art Council,Costume Council,Decorative Arts and Design Council,LENS: Photography Council,Modern and Contemporary Art Council,Prints and Drawings Council
Welcome to the employment page of the Los Angeles County Museum of Art. To see a…
Jobs,Careers,Internships,Volunteer
Join museum educators, artists, curators, and experts for artist talks, virtual…
Create+Collaborate
In Golden Hour, over 70 artists and three photography collectives offer an aesth…
Established in 1967, the Conservation Center at LACMA supports the museum’s comm…
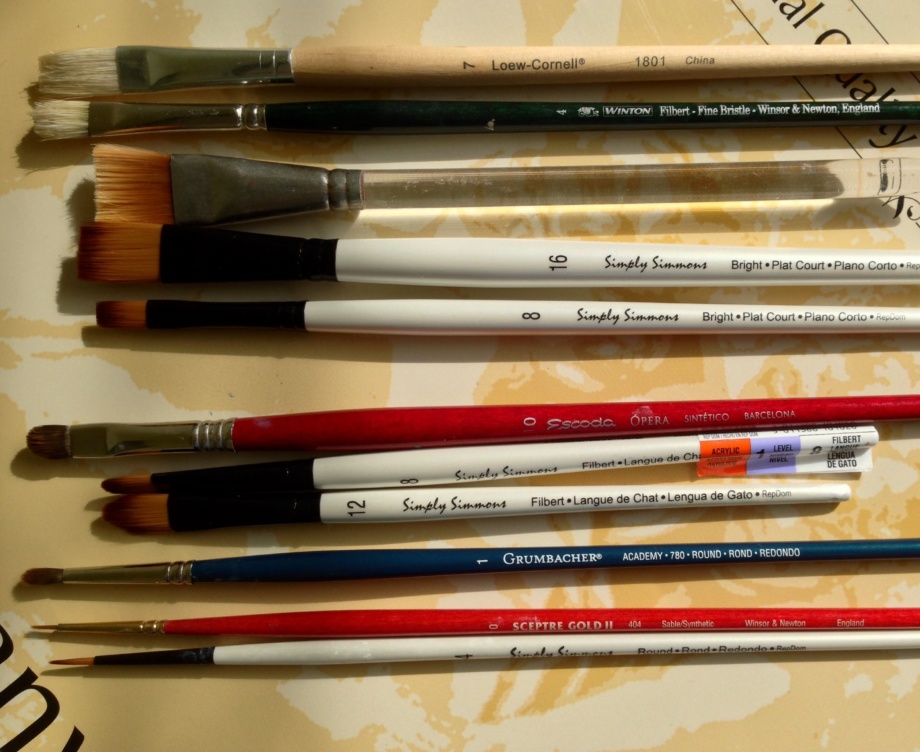
If you’ve tried painting, you know how hard it is to find a good set of brushes. Many of them are flimsy or too soft to spread the oil paint around. Cheap brushes can shed hairs like a cat. They don’t keep the fine point necessary to paint the details in oil painting. I went through many artist brushes trying to find something that works in my oil painting process. Here you’ll find information on how to pick a good brush for oil and acrylic painting, how to clean the brushes, and what brands you can try to purchase the brushes from for your art studio practice.
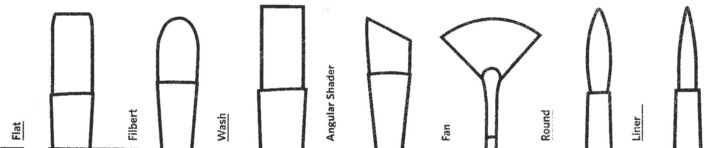
Painting brushes differ in size, shape, and type of bristles
Size
The higher the number written on a brush, the larger the brush you get. For example, #0000-0 brushes are for super fine detail, # 2-4 brushes are for small work, # 6-10+ are designed for a general application of paint.
Shape
There are rounds, flats, liners, chisel tips, filberts, and fans. The shape of a brush determines the stroke you can make with it. The rounds have a fine point and are good for small, detailed application of paint, flats are for a large coverage of paint or to make a wide stroke; fans are good for gentle blending of the edges and for creation of some textures like tree foliage. My favorites are the filberts because they give me a variety of strokes. Depending on the rotation of my brush, it can give me either a flat stroke or a thin, fine line that’s great for defining and maintaining straight edges.
How to pick a perfect brush for oil & acrylic painting
Types of brushes
In general, watercolor brushes are very soft and are not suitable for oil painting. They are too soft to maintain a point filled with oil paint. However, small, round Kolinsky brushes are very good for painting details, and watercolor 1″ flats are great for blending large areas of paint right after a painting session to soften the entire picture.
There are three kinds of oil/acrylic brushes: the bristle ones, the synthetic ones, and a blend of synthetic and sable hairs. Both the bristle and the synthetic ones are necessary for oil or acrylic painting.
First layer of painting: the bristle brushes
Use stiffer, synthetic brushes for your underpainting because the first layer doesn’t brush over smoothly. Many artists help the oil paint flow by using some solvent ( Gamsol) mixed into the paint. Both the solvent and the canvas surface wear out fine brushes when using them at this step!
The bristle brushes are used in a first, rough layer of painting to put the paint on canvas and to mass out shapes. It’s difficult to paint the first layer with the synthetic ones on canvas, because they are too soft for this step and don’t spread the paint around easily. I find that major manufacturers produce similar bristle brushes that don’t differ much in quality. I would avoid the cheapest ones because they shed hair a lot, which gets embedded into the wet paint if you don’t take them out of your artwork during painting. However, if you paint on panels and not canvas, the bristle brushes may be too hard to paint with.
When you paint with oils over the underpainting, it glides over the first layer much better, but often needs just a little bit of medium to have the flow. This is the stage when you switch from stiffer brushes to the synthetic ones. I find that “Simply Simmons” brushes are cheap, over-the-counter brushes sold at Michael’s that are quite durable and have a nice point when painting. Craft, unbranded brushes are a waste of money because they don’t hold the paint and have no stiffness necessary to move the paint around or to make clean edges and details.
With each layer, your painting becomes more refined in color and detail, and so do the brushes. I use Robert Simmons oil brushes that are cheap, durable, and hold the point well. I paint with #2 round and #2-4 filbert for most work. I also have #6-8 to paint larger areas. The Robert Simmons brushes’ quality is OK for its price. They don’t last for a year, but they perform quite well in comparison to other, more expensive brushes I’ve tried so far. I also buy them separately, if I need a particular size or a tip. Another brand I recommend is Rosemary and Cofor the majority of oil painting.
To complete big chunks of painting I like using a variety of filberts. The W&N Galeria set of brushes are great. They are quite soft but work well with oil paint.
Third layer of painting: synthetic and sable brushes
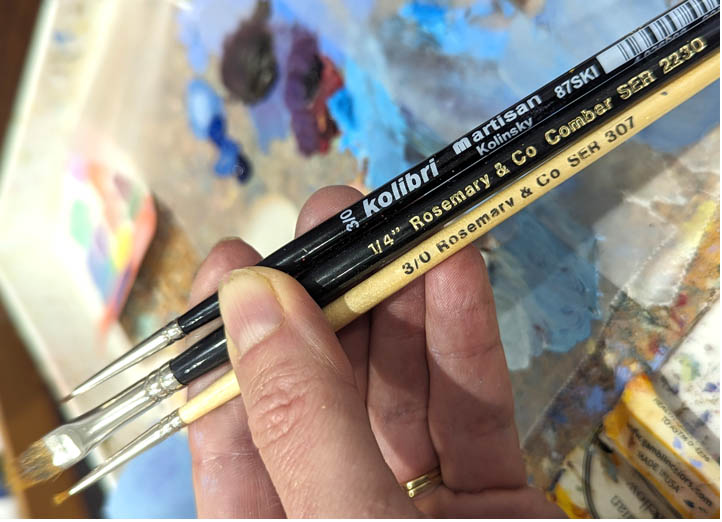
For a super detailed work, I love to use: 1. the Kolibri, artisan Kolinsky 3/0 sold at Natural Pigments 2. A variety of 3/0 or 5/0 Rosemary & Co oil painting brushes sold on their site, which I prefer using the most. 3. I also use a #0 liner “scepter gold II”, a sable/synthetic blend by Windsor & Newton, to paint fine details. 4. Recently, I found the Princeton, round, 18/0 to paint the tiny details as well but it didn’t last as long as the Kolibri one.
What about the brush handle?
I find that the brush handle length makes no difference in painting. If you do realistic painting with lots of detailed work, you want to minimize your hand movements to remain precise. I don’t see how long handles help artists do that.
I keep a wide, super soft watercolor brush (3/4 or 1″) for blending large areas to soften everything before I quit painting for a day. It doesn’t matter what brand it is as long as it’s a super soft brush like the watercolor brushes are.
If you want your brushes to keep their shape, it’s not only the quality of the hairs to pay attention to, but also how you wash them.
Thomas Gainsborough The Honourable Mrs Graham (1757 – 1792) 1775 , painting detail
How to clean the oil painting brushes
If you want your brushes to last, take good care of them. Squeeze all the unused paint out of your brush, using a paper towel. I Usually, I deep them in linseed oil first and then take the paint out with a paper towel.
Then you can use a solvent like Gamsol to swish them around in a glass jar, and then wash them out with a bar soap and warm water. I skip the solvent step most of the time because of the two reasons. One reason is a plain health precaution and another one is care for my brush hairs. The solvent dilutes the paint and damages the hairs. I find that cleaning with linseed oil and a bar soap works great and makes the brushes last longer.
To sum up, I take the paint off the brush with a paper towel and use the oil to take most of the paint off. I use a soap bar to clean them after every painting session. I wipe the water off of every brush, and rest them flat on a paper towel, so the excess water doesn’t run underneath the ferrules, damaging them.
One more thing. Brushes wear out a lot faster working on textured canvases. Use lightly textured panels or linen canvases to keep your brushes like new.
Presto!
Check out art, tutorials, & gifts by clicking on this image.
Clay projects are magical! However, managing clay is one of the more labor-intensive tasks in the art room. You have to prepare the clay and slip, shift projects around as they dry, load the kiln, bump the temperature, cool it down, unload the kiln—and repeat. The process is beautiful but it demands time and effort. If you only have one day and a classroom full of energetic students, try single-fire pottery! This time-saving technique skips the bisque stage and lets you build and glaze in one class period. Bring the joy of clay to your students without sacrificing creativity or quality.
Let’s explore how single-fire pottery can turn your art room into a hub of stress-free creativity!
What is single-fire pottery and how does it work?
Single-fire pottery lets students build and glaze clay pieces on the same day. This saves time and uses the glaze’s adhesive properties to your advantage. Normally, you probably warn students not to glaze the bottoms of their pieces to prevent sticking to the kiln. While you still want to do this, with single-fire pottery, use that stickiness to your strategic advantage and streamline the process! Glazing wet clay ensures pieces stay securely attached during firing.
Important Tip:
It’s crucial to match the cone of the clay with the cone of the glaze to ensure a successful single-fire process. If you’re using a low-fire (05) clay, pair it with a low-fire (05) glaze. Mismatched clay and glaze cones can lead to underfiring, glaze defects, or incomplete bonding. Always double-check your clay and glaze compatibility to prevent issues and achieve optimal results!
Why try single-fire pottery?
Single-fire pottery isn’t just about saving time. It can transform how you and your students experience clay and how you steward your budget and resources.
Here are four reasons to embrace this innovative approach:
Conserve Energy Firing once per project uses less energy, making this method more sustainable and environmentally friendly.
Reduce Material Loss Because you handle pieces less often, single-firing minimizes the risk of breakage.
Encourage Experimentation The wet glazing process introduces students to new techniques they can’t achieve with bisque-fired pieces.
Simplify Planning With fewer steps, you can focus more on the creative process and less on logistics.
How do I tell when it’s ready to fire?
Drying single-fire pottery can be tricky without the color changes in the clay to guide you. For a reliable method, try the temperature test. Simply feel the clay with the back of your hand. If it feels cooler than your skin, it still contains moisture and isn’t ready for the kiln. When the clay matches your skin temperature, it’s ready to fire! When in doubt, it’s always better to give it more time. Waiting four weeks, even in humid conditions, is usually enough to ensure your clay is thoroughly dry and ready for the kiln!
Are you ready to jump on the bandwagon? Here are four one-day projects to get you started!
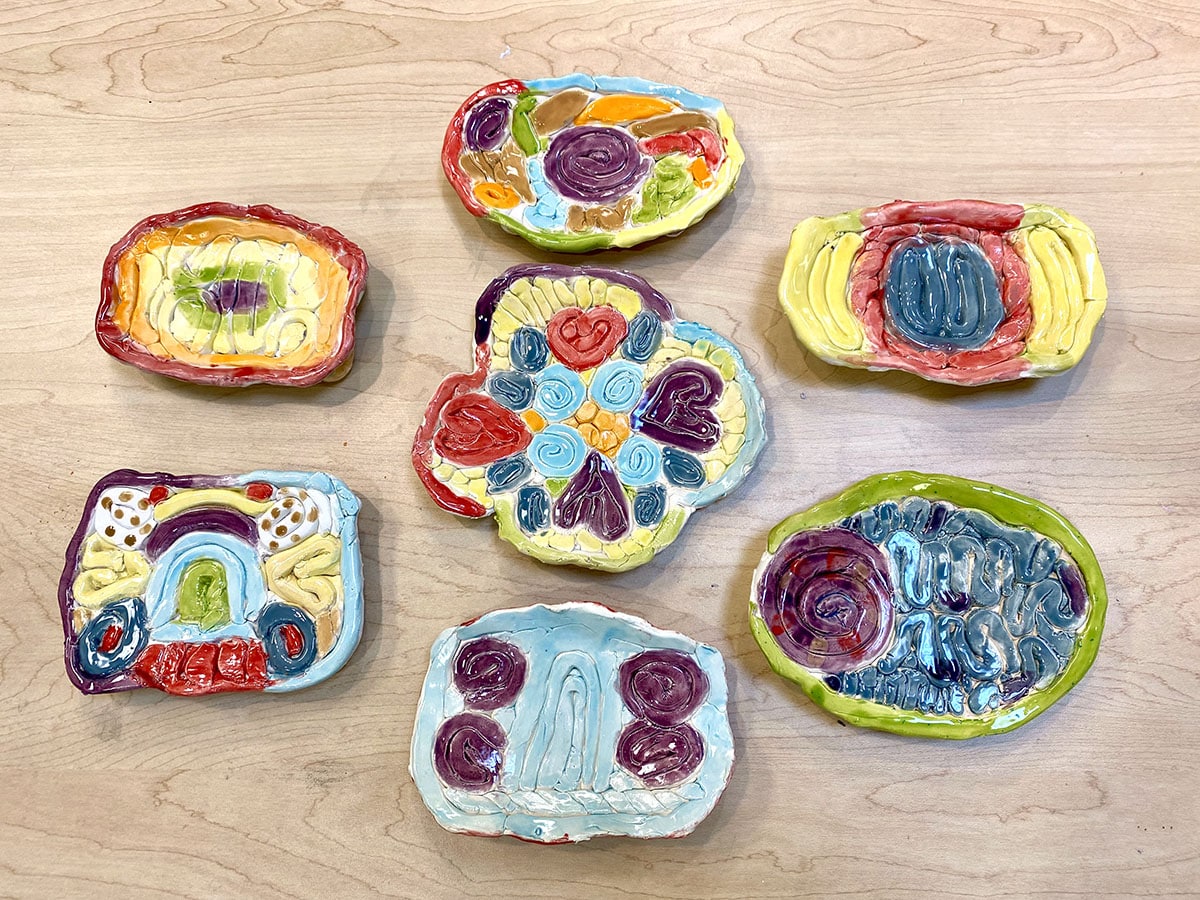
1. Textured Landscape Tiles
Create clay landscape tiles that combine texture, layering, and glaze in one project. Start with a clay slab, trace a frame, sketch a landscape, and add texture. Glaze before adding elements like clouds, trees, and other small features. The glaze acts as the adhesive, eliminating the need for scoring and slipping. Glaze all the details and you’re done! Allow the tile to dry completely before firing for a vibrant, single-fired ceramic masterpiece.
For a breakdown of this lesson, including a planning guide and process photos, check out the Ceramic Landscape Lesson in FLEX Curriculum.
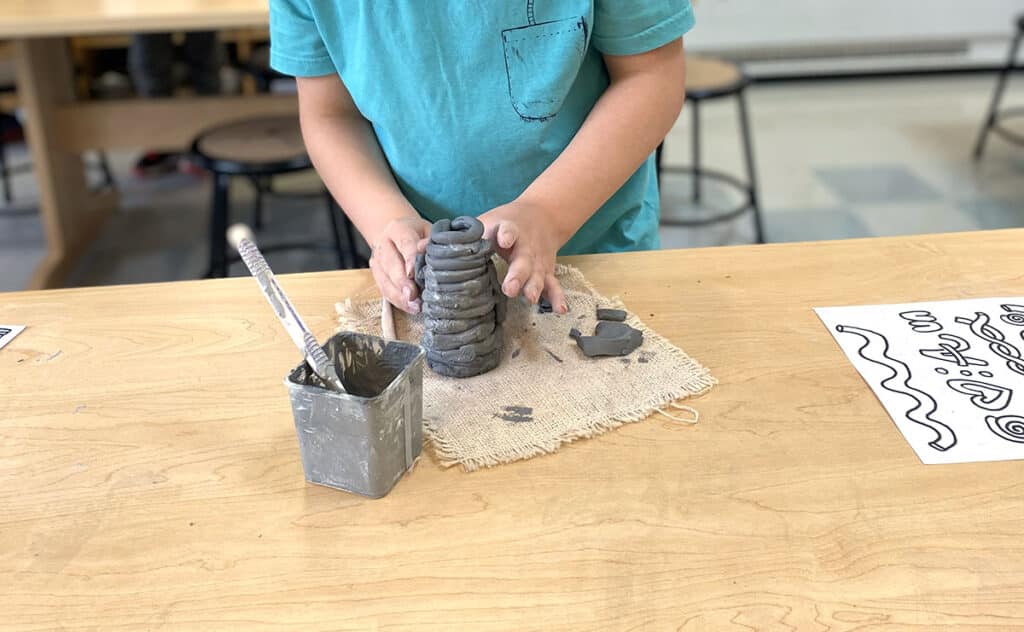
2. Coil Pots
How many times have you pulled coil pots from the kiln only to find separated coils? Avoid this heartbreak by having students build their coil vessels and apply glaze immediately. Follow your basic coil lesson. Scoring and slipping between coils is optional but recommended for added security. Once students construct their pots, glaze immediately. The glaze acts as an adhesive, helping the coils stick together and stay intact through the firing process. No more half-ruined pots lingering in your kiln!
If you don’t have a go-to coil pot lesson, no problem! FLEX Curriulum’sCoil Pottery Lesson is jam-packed with student-facing resources to ensure coil success.
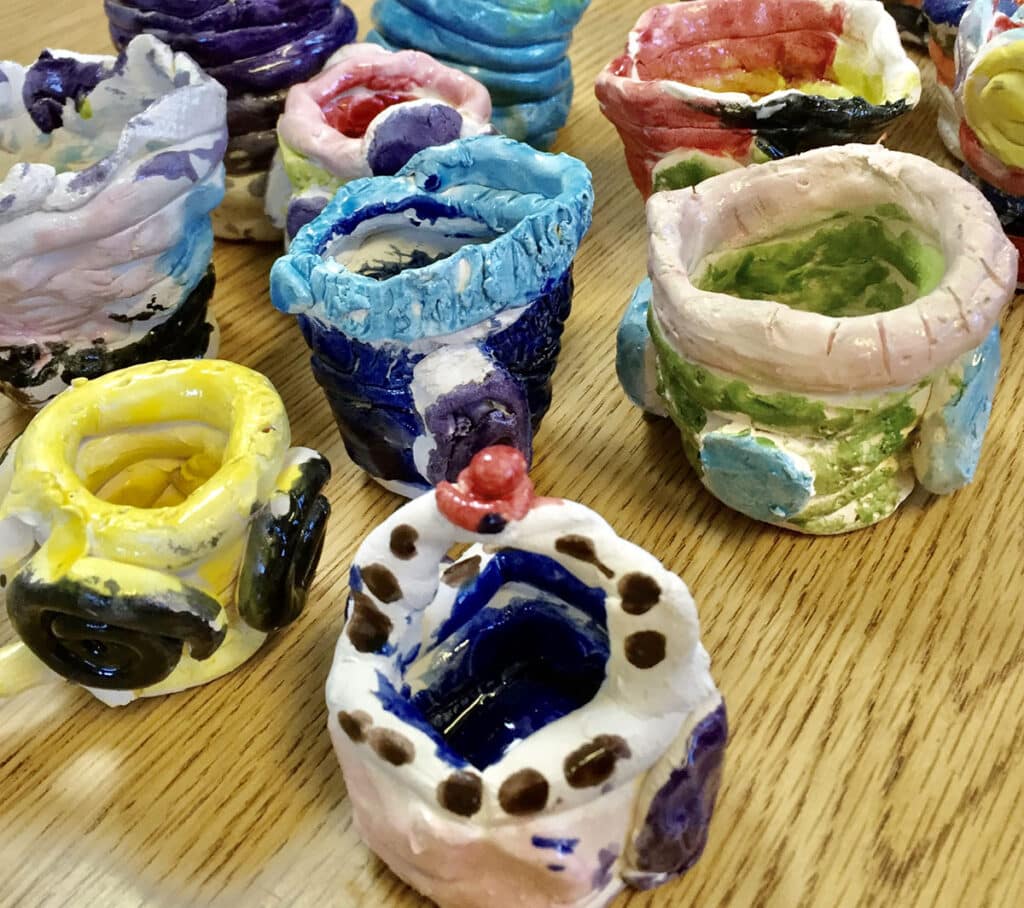
3. Trinket Dishes
Put a creative spin on your coil lesson by building out instead of up! Students start by outlining a dish shape on paper and then build outward from the center with coils, shaping and curling as they go. Roll one long coil and wrap it around the perimeter to keep everything contained. Smooth the bottom side of the dish, flip it over, and immediately apply glaze to the top. Glazing immediately prevents smaller coils from shifting during firing.
Start with a basic pinch pot. Let students’ creativity transform it into a unique animal! Add features like legs, heads, tails, fins, or eyes to bring their animals to life. Glaze immediately. Scoring and slipping between pieces is optional since the glaze acts as the adhesive.
Single-fire pottery is more than just a time-saver—it’s a creative shift that can redefine how you and your students experience clay. It simplifies the clay process, freeing up time, energy, supplies, and kiln usage. Single-fire pottery also creates stronger, more durable projects since the glaze acts as an additional adhesive. With fewer steps and more opportunities for innovation, take just one day to explore the magic of single-fire pottery.
What are your student-favorite single-fire projects?
Magazine articles and podcasts are opinions of professional education contributors and do not necessarily represent the position of the Art of Education University (AOEU) or its academic offerings. Contributors use terms in the way they are most often talked about in the scope of their educational experiences.
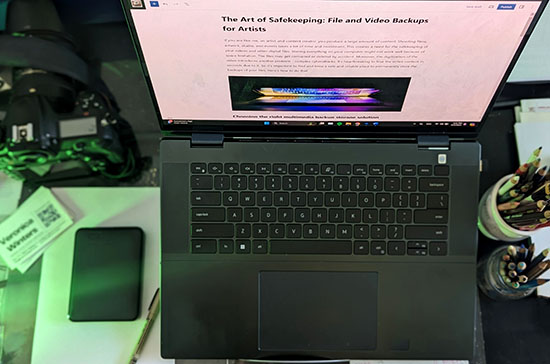
If you are like me, an artist and content creator, you produce a large amount of content. Shooting films, artwork, studio, and events takes a lot of time and investment. This creates a need for the safekeeping of your videos and other digital files. Storing everything on your computer might not work well because of space limitation. The files may get corrupted or deleted by accident. Moreover, the digitization of the video introduces another problem – complex cyberattacks. It’s heartbreaking to lose the entire content in seconds due to it. So it’s important to find and keep a safe and reliable place to permanently store the backups of your files. Here’s how to do that.
Choosing the right multimedia backup storage solution
Multimedia data takes lots of space and the storage tools may differ. First, consider the initial platform you’re using. For example, if you are a MacBook user, you can connect your Mac to iCloud for automated backups. Here are several options to do this:
you may sync the computer to another Mac to transfer data to it.
you may transfer the videos to an external hard disk that you can connect to your computer to transfer the files manually.
you can also buy storage space from other cloud-based solutions and do automatic backups.
Other strategies about how to backup Mac include saving your files in email.
If you’re a PC user like me, you can back up your files to a cloud platform like Google drive or Dropbox. You have to buy storage space there to keep large files on their cloud.
Backups & security
Both high-resolution digital files of art and video take a lot of space. If you produce your video content daily and want to keep it safe, you have to use a backup platform that offers reliable storage space and strong security defenses against the cyberattacks. The chosen platform should allow you to add your own layer of security and optional upgrades. Choose a strategy based on the following.
● Technology available. Choose a program that runs on the latest technology to benefit from the latest security features and upgrade plans.
● Location of the solution. Is it in the cloud, data lakes, remote servers, or local disks?
● Backup types. Some solutions allow full, differential or incremental storage backups.
● Encryption and recovery needs. Encryption boosts your data safety. Pick a platform that lets you recover your data easily.
Organizing your videos for backups
Due to the increasing volume of digital files produced, you must set up and maintain an organized file system. This saves you time whenever you need to locate, share, or edit your files. Have separate file folders with names and dates for easy access. For example, I have a big ‘art’ folder that’s subdivided into many smaller folders like ‘Art 2018.’ Or you may want to organize the folders with the names based on location, like ‘Greece 2018,’ etc. I also delete my so-so files and keep the best ones only for better organization and future use.
Creating automated backups
An automated backup relies on a program to run the processes that allows a fast recovery of files. Automation saves you time, cuts on stress and minimizes errors. It ensures consistent protection and progress of your videography work.
Choosing the right backup systems
The backup platforms have different pricing, storage space, and support. Here are examples of video backup systems that you may choose for your art studio or office.
Hardware
This storage relies on hardware located locally or remotely. You may buy an external hard disk that looks like a black box to use it at home. For that, you can buy a Desktop external hard drive with a different capacity levels that’s between 8-24 TB (terabytes of memory space). Price varies depending on size anywhere between $145-600+ You plug it in to your computer with a USB cable and transfer the files for backup or storage. The Desktop Hub and Expansion External Hard Drive work in similar fashion. You can keep these hard disks in your studio for easy access.
You may also connect your computer with either a local or remote desktop server as a backup system that you can buy and set up at home or studio. You can set it up to make automated backup of either all files or specific folders from your main computer.
You can also use a large 128GB-512GB Extreme PRO SDXC Memory Card that you normally use for your digital camera. It holds quite a lot of video and digital images. However, these cards can become unreadable in a few years or a specific file can get corrupted because of various reasons.
The problem with all hardware is that it fails at times. Solar flares or other problems can cause permanent file corruption. I had a folder with my files shot in Nicaragua. A vast majority of them became unreadable because something happened to the hard disk on my computer and affected that particular folder in ten years after my trip. That’s why it’s best to store the most important files using a cloud-based service.
SaaS
Application-based, SaaS (software as a service) models let you use storage space based on demand. It allows you access art and video editing apps online. You don’t need to download anything or configure complex software. SaaS is a good option for people who work collaboratively because of a quick and easy access and system integration.
Conclusion
Your choice of storage should be based on the amount of data you produce and want to keep safe. Backups enhance data security for video artists. Consider the number of videos you produce monthly. Consolidate your visual files and segment them for easy data storage. Choose the backup platform that’s secure, scalable, and affordable.
Paper overflows in every art room—giant sheets, colorful scraps, old artwork, specialty textures, drawing paper, and more. It multiplies overnight where it doesn’t belong and vanishes when you need it for a lesson. Organize paper and get ahead of the clutter with simple systems that empower students, run themselves, and reduce waste.
Let’s take a peek at easy systems to organize paper in your art room!
Add specific and detailed labels.
Paper storage doesn’t need to be elaborate or expensive—it just needs to be clear. The most effective systems are so intuitive that students don’t have to ask what goes where. This starts with bold, direct labeling. Instead of writing “Drawing Paper,” try specific labels like “Scraps: Use Me First!” or “9×12 Black Construction Paper.”
Here are three small shifts that make a big difference:
Keep common paper accessible with open shelving and open bins.
Pair scrap bins with fresh paper to encourage reuse.
Add images to your labels to assist younger artists and multilingual learners.
Create an intentional scrap bin.
Scrap paper is both a blessing and a burden. When left unmanaged, it turns into a mess of torn bits, weird sizes, and frustration. But with the right setup, scraps can become creative gold.
Make a “Use Me First!” scrap bin right next to the fresh paper station. This subtle placement reminds students to check it out before grabbing new materials. If you have space, sort scraps by color scheme or material type using clear plastic drawers, a spread of baskets, or a hanging over-the-door pocket organizer.
Here’s how to encourage your students to use the scrap bin:
Reward creativity that comes from reuse.
Challenge students to use a certain number of scraps in an artwork.
Create a “Scrap Challenge Day” where everyone transforms scraps into masterpieces.
Introduce a collage unit.
Try envelopes for small “next time” scraps.
Speaking of scraps, what about those scraps students claimed for their art project but didn’t have a chance to use yet? At the beginning of the year, give students an envelope with a metal clasp to glue into the inside cover of their sketchbooks. This is the perfect spot to store paper scraps like small collage pieces they want to save for next time! Plus, the clasp allows students to close it securely so items don’t fall out.
Use vertical space for large paper.
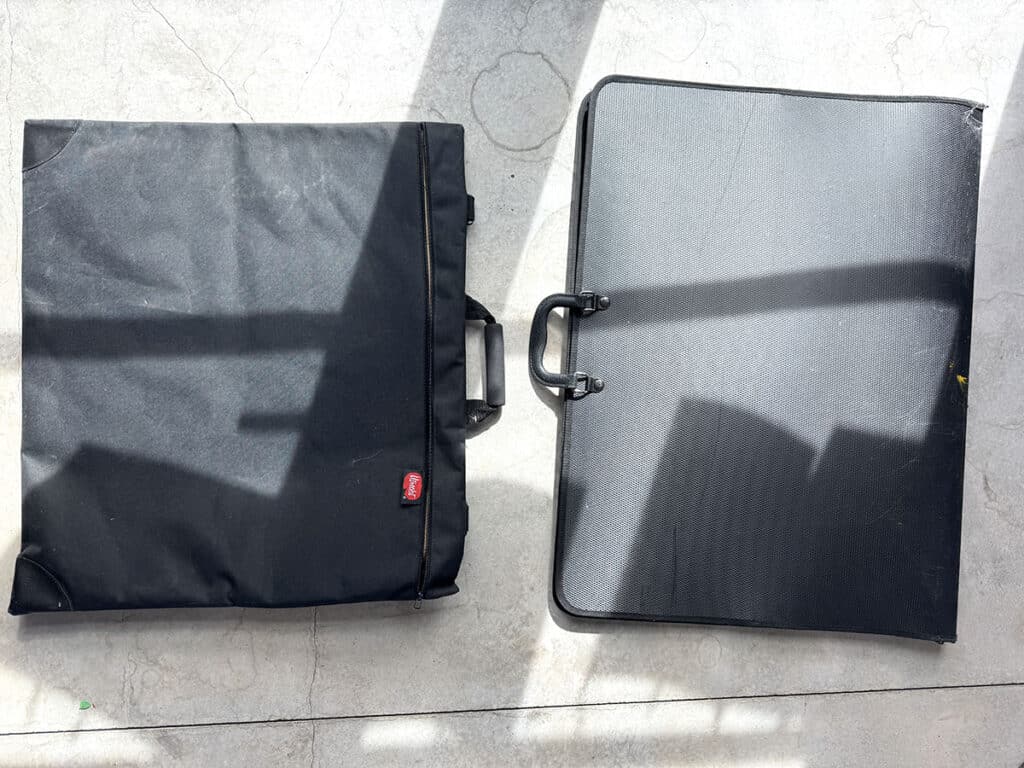
Large paper is especially tricky if you don’t have flat files. It’s often too floppy to stack, too wide to fit in regular drawers, and too precious to crumple. If you’re comfortable rolling paper, store rolls in tall laundry hampers or gift wrap bins. Many of these items also have wheels, which is handy because paper can get quite heavy!
For specialty paper you don’t use often, keep it in the cardboard packaging it came in. Label the edge of the box and slide it into a vertical space, such as between cabinets. If you have a variety of specialty papers, keep them neatly stacked with binder clips or paper clips on each side. Put them into a large portfolio, label the portfolio, and slide it into a vertical space.
Sort flat files with trays and bright labels.
Flat files are a dream if you have one, and a black hole when they get clogged. Assign a weekly “Paper Captain” to organize the papers. Giving students this responsibility encourages studio ownership and waste reduction.
If you are storing smaller papers in a large flat file, use drawer organizers such as expandable dividers or paper trays to keep everything sorted and contained. If you’re storing larger papers, use binder clips or paper clips on multiple edges with large, bright labels. The labels can be as simple as a piece of fluorescent construction paper folded in half around a stack of watercolor paper that says in marker, “9×12 120 lb Watercolor Paper.” This way, when large stacks slide around, you can easily find the label and what you need!
Repurpose kitchen items for your art on a cart.
If you’re teaching in multiple rooms or need flexibility, rolling carts can be a lifesaver—but only if they’re well-organized. Try expandable racks to keep wet papers separated and baking trays for pre-cut papers, just like in the video below!
Here are some other kitchen hacks to organize paper:
Use a metal bakeware organizer to stack fresh paper or completed projects.
Organize papers in hanging file folders in a plastic file box.
Keep small papers in accordion folders.
Grab cardboard or plastic magazine file holders to contain paper.
Glue labeled samples of each kind of paper to a clipboard for students to reference, so they don’t dig through your cart.
Throw small scraps in clear gallon storage bags and clip or hook them onto your cart.
Implement the “One Sheet Rule.”
One of the fastest ways to run out of paper is letting students take as much as they want and start over as many times as they want. Give each student one sheet of paper and put away the rest. If they “mess up,” encourage them to embrace imperfection and figure out a way to incorporate the “mistake” into the final art. Introduce this policy at the beginning of the year to build a culture of creative problem solving!
To support sustainability and creative thinking, keep an “Oops Box” nearby. This is where slightly damaged paper can live another life as collage material, texture sheets, or sketchbook covers.
When your paper system works, you feel it. The art room flows better, students know where things go, and everyone respects paper instead of wasting or forgetting it. Best of all, you’re no longer spending precious prep time digging and sorting through paper instead of planning the next exciting project. Let’s spend more time making with paper and less time managing it!
What’s the best paper organization system you use in your art room?
Share a hack for keeping paper scraps tidy!
To chat about how to organize paper with other art teachers, join us in The Art of Ed Community!
Magazine articles and podcasts are opinions of professional education contributors and do not necessarily represent the position of the Art of Education University (AOEU) or its academic offerings. Contributors use terms in the way they are most often talked about in the scope of their educational experiences.
Peggy Quinn specializes in the creation of exquisite, one-of-a-kind, and limited quantity production craft pottery. Peggy’s unique pieces blend functionality with elegance, enhancing both living spaces, and everyday living. Each creation is meticulously handcrafted, showcasing Peggy’s expertise as a skilled potter and her unwavering passion for the art of pottery making.
The preferred printing supplier for potters everywhere! SmallDogPrints.com
There’s a saying, Know your audience. Do you know the audience that is going to be at this upcoming show?
Yes, I do for the most part. It’s going to be college educated women and that is my market.
How does that inform your actual making then?
You know, it really doesn’t inform my making, per se because I make what I want to make. I have accepted some commission things but they are only for really good friends, because it’s not what I want to do. So what I make is what I want to make and what I found is that’s my market.
Does photography come into play for doing sales in person? For advertising and getting the word out? Is it important for you to take photos?
I take a picture of my booth. Some shows want a booth shot. But all my photography is done in my studio. I just have a cheapy little background fade with dark on the top and light on the bottom. I use a little device that when I am photographing I take it out and when I am not photographing I put it away and it is my work table.
Do you plan your booth so it has good presentation?
I have four folding shelving and they look good and professional. And then I put up a table and a little stand on the table but mostly I use the edge of the table for my workspace because I need a place for my bags and I need a place for my cash box and to wrap stuff in bubble wrap. I have to have it be practical and presentable.
How do you spread the word for the show?
A good show like this is going to send you out a package , a media package. And they will give you logos and things to fill in your information and send that out to your people. I will put it on Facebook and on Instagram and I am starting to work on an email list.
Do you take time after a show to evaluate how it went? What went well and didn’t go well?
Well I try to add up what did best in sales. And I may make some notes but I wish I was better about that. (laughter) I kind of have it in my mind what works. It really would be best to write it down.