دسته: معماری مدرن

  • Harris Walz Collagraph Prints – ARTBAR

    Harris Walz Collagraph Prints – ARTBAR


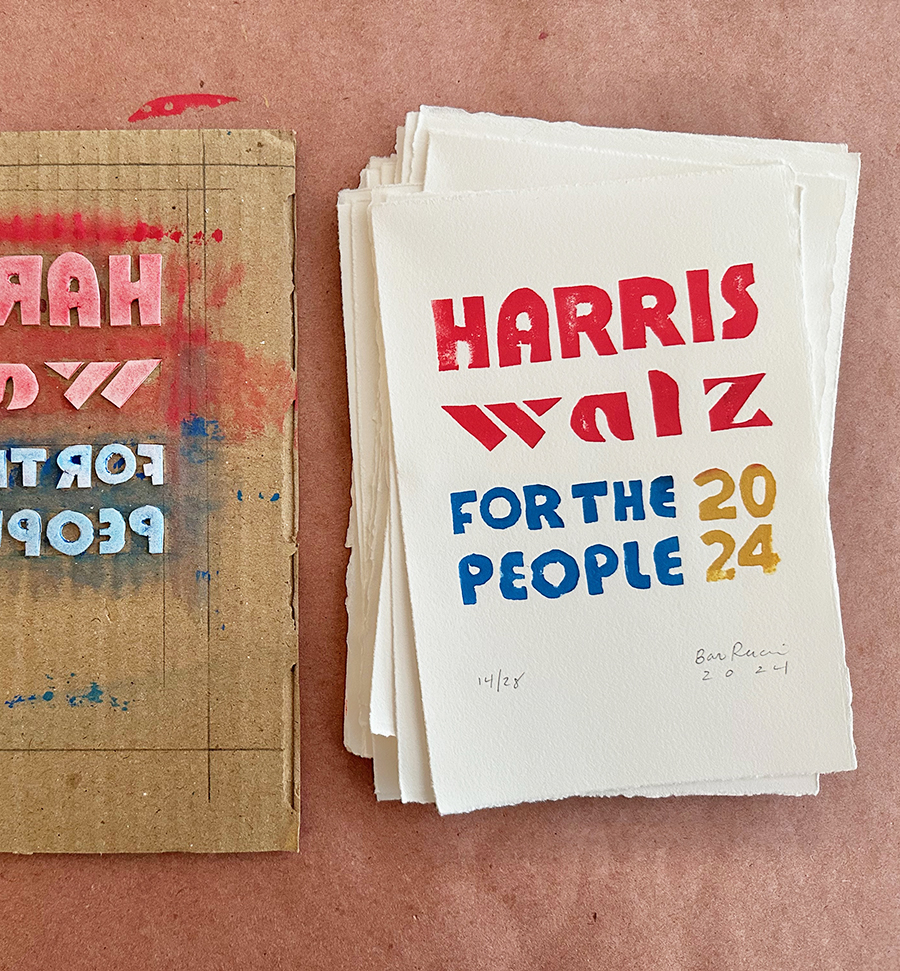
    If you know me at all or follow me anywhere, you know that I have strong guiding principles which I live by. None stronger than leading with love. Radical love is my north star, not that I am perfect, but I try and frame everything and respond to everything with that lens. This makes it easy for me to choose where my vote goes. As Jen Hatmaker writes, “We head into the voting booth with one of two mindsets: fear or love.” There is no perfect candidate, but I choose the ones who will fight for all the people and not just their own self-interest; who will protect women’s rights, marriage equality, voting rights, our earth. I hate politics, but it can’t be ignored. Art is my way of expressing hope for the future. If you are like-minded and inspired by these handmade prints, I am selling them in my Etsy shop. All proceeds will be donated to support these and other Democratic candidates.

    Harris Walz handmade prints in a stack next to a printing plate

    [ I am a participant in affiliate programs designed to provide a means for bloggers to earn small fees at no cost to you by linking to Amazon.com and affiliated sites. ]

    Supplies used to make collagraph prints:

    ~ Sticky back foam sheets

    ~ Good scissors

    ~ X-acto knife

    ~ Piece of flat cardboard

    ~ Printmaking paper

    ~ Printmaking ink (I used Blick but Speedball also good)

    ~ Brayers

    ~ Non-porous trays/surface for inking

    Transferring type from paper to foam sheet for collagraph printing.

    How to my typography-based collagraph prints:

    1. First rule of typographical prints: you are creating a mirror image. This means, all letters and words are backwards. So check your spelling! (*I’ve made this mistake too many times, including this time.*)

    2. I designed the typography on my computer. However you design yours, the next step is to use a pencil to make a thick, heavy outline of each letter.

    3. Turn the paper over and trace the letters onto the foam, hopefully leaving a clear enough outline for cutting.

    Cutting out foam letters to glue onto cardboard to make a collagraph printing plate.

    4. Cut your letters using good, sharp scissors. If they are really small, you might have to use an X-acto knife. You will definitely need one to cut out the inside of the letters.

    Gluing foam letters down to cardboard to make a collagraph printing plate.

    5. I measured and use pencil marks on the cardboard before sticking down the letters. The sticky-back foam makes it easy to peel-and-stick.

    Tearing Reeves BFK printing paper with a metal ruler.

    6. Cut down your paper. I tore mine using a heavy ruler. You can use cardstock that is already the correct size and skip this step. Just make sure your paper is bigger than your “printing plate.”

    Rolling out primary colored printing inks on trays with a brayer.

    7. Roll out the ink with the brayers. I added a little white just to brighten the color. I added a dash of purple and a dash of orange to the bright yellow just to both mute and warm the hue. You want a sticky sound when rolling. Not too much ink. In fact this was too much ink when I first started. I had to wipe some off. You don’t need much, just cover the roller completely and evenly.

    Rolling out primary colored printing inks onto cardboard collagraph plates.

    8. Roll the ink onto the foam. This part is tricky since I used three colors. Using one color is much easier. You might want to protect the cardboard around the raised foam that you are inking with a piece of flat paper. The roller can/probably will roll some ink onto the cardboard and that can/probably will transfer to the paper. In my opinion, it’s ok because that is the nature of printmaking, especially in this very rudimentary way. But if you are selling them or just don’t want those smudges, take the extra step in protecting the cardboard.

    Pressing printing paper down onto a printing plate, then pulling a print with Harris Walz typography.

    9. Lay your paper on top. I drew pencil marks to outline where the paper should go, which is kind of a must. Press down for a while, gently rubbing the back of the paper and feeling the letters underneath. Then slowly pull your print. The first few prints were bad, and usually are. The ink was too goopy. I started getting good prints around the 3rd or 4th run. I had to cut the ink way down.

    Rows of handmade Harris Walz prints lined up on a counter.

    10. After I finished all the good paper, I used cut-up old maps to print on. I love the way these look. Unfortunately, if you look closely, I messed up this entire first batch. I did not follow my rule of double/triple checking the backwards spelling, and I transposed two letters in PEOPLE. The bad news is that I used all the map paper and couldn’t use any for my second run after I fixed the letters. The good news is now we have another inside family joke. Not a day goes by that we don’t say “For the Poeple” to each other (we pronounce that like Edgar Allen Poe-ple).

    4 Harris Walz handmade collagraph prints in bright, primary colors.

    Hand holding one handmade Harris Walz collagraph print in primary colors.

    Here is a short reel on Instagram on the making of these prints. I only have 18 available in my Etsy shop!

    xo Bar

    – – – – – – – – – – – – – – – – – – – –

    Do you like collagraph printmaking? Here are some more ideas:

    Mushroom print on a table made with styrofoam sheets and printing ink.

    Block printing with styrofoam


    Source link

  • Levitt Pavilion and LACMA Summer Art Hop


    Chris Burden’s Metropolis II is an intense kinetic sculpture, modeled…

    Perhaps the most dominant art form of the last 100 years, film has an important…

    Tuesday Matinees

    Enjoy concerts featuring leading international and local ensembles in programs o…

    Art & Music,Jazz at LACMA,Latin Sounds

    LACMA offers in-person art classes for kids, teens, and adults, offering the cha…

    Random International’s Rain Room (2012) is an immersive environment of…

    Rain Room

    Artist Robert Irwin’s work in the last five decades has investigated perception…

    Barbara Kruger’s Untitled (Shafted) features her distinctive use of advertising…

    Band (2006) may qualify as Richard Serra’s magnum opus, representing the fullest…

    LACMA’s Modern Art collection features primarily European and American art from…

    LACMA’s Acquisitions Group and Art Council members share a deep affinity for the…

    Art Councils,Acquisition Groups,Art of the Middle East: CONTEMPORARY,Asian Art Council,Costume Council,Decorative Arts and Design Council,LENS: Photography Council,Modern and Contemporary Art Council,Prints and Drawings Council

    Welcome to the employment page of the Los Angeles County Museum of Art. To see a…

    Jobs,Careers,Internships,Volunteer

    Join museum educators, artists, curators, and experts for artist talks, virtual…

    Create+Collaborate

    In Golden Hour, over 70 artists and three photography collectives offer an aesth…

    Established in 1967, the Conservation Center at LACMA supports the museum’s comm…

    painting conservation,paper conservation,object conservation,textile conservation,conservation science,conservation imaging

    Barbara Kruger: Thinking of You. I Mean Me. I Mean You. is a major exhibition de…

    Featuring Ai Weiwei, Huang Yong Ping, Wang Guangyi, Xu Bing, Yue Minjun and more…

    Beyond the concrete materials of ink and paper, there is an intangible spirit un…

    To complement the presentation of The Obama Portraits by Kehinde Wiley and Amy S…

    From the moment of their unveiling at the Smithsonian’s National Portrait Galler…

    (Los Angeles, CA—January 13, 2022) – The Los Angeles County Museum of Art (LACMA…

    (Los Angeles, CA—December 14, 2021) The Los Angeles County Museum of Art (LACMA)…

    Mixpantli: Contemporary Echoes showcases the lasting impact of Indigenous creati…

    LACMA marks the 500th anniversary of the fall of the Aztec capital Tenochtitlan…

    Since the mid-20th century, California has been a beacon of both inventive desig…

    Revealing insights about family life and the quotidian in the 21st century, Fami…

    One of the most significant contributors to fashion between 1990 and 2010, Lee A…

    Comprising approximately 400 works, including an unprecedented number of loans f…

    Archive of the World: Art and Imagination in Spanish America, 1500–1800 is the f…

    Scandinavian Design and the United States, 1890–1980 is the first exhibition to…

    In the work of American artist Sam Francis (1923–1994), Western and Eastern aest…


    Source link

  • Rainbow Tube Knitting with TP Roll Looms

    Rainbow Tube Knitting with TP Roll Looms


    Happy 2025! My last post about printing my hopeful Kamala prints has been staring at me every time I come back here. I am going to have to create 7 new posts in order to not see it anymore on my homepage, so that’s what I will do! I still love the prints, I love her, I’m so sad we don’t have a woman president, but it is too heartbreaking to see that post right now. I am moving on to rainbows and yarn and soft and cozy and happy. I rediscovered tube knitting and made some looms (is that what we call them?) from toilet paper rolls. It is so zen and relaxing, I think I might keep going and wrap a tree or create an installation. Must. Make. Art.

    Rainbow tube knitted bracelents wrapped around two hands holding each other.

    When I first started making these tube-knitted pieces I didn’t know what to do with them. I made a necklace for my mom for her 85th birthday which she loves because it’s easy to pull over her head, and it keeps her neck warm! I kept making long knitted pieces, trying out different ombre yarns, and just putting them in a basket. Then I went on a trip to Davis, CA to see my youngest at school and went to their famous farmer’s market. I found a woman who made wool yarn from the sheep in her backyard! I bought a rainbow skein and knew exactly what I was going to make with it (scroll down to see all the yarns in this heavenly stall).

    Yarn, tp roll, popsicle sticks, buttons, and a glue gun are are on a table ready to made into a tube knitting loom.

    [ I am a participant in affiliate programs designed to provide a means for bloggers to earn small fees at no cost to you by linking to Amazon.com and affiliated sites. ]

    Materials needed for Tube Knitting with TP Roll Looms:

    ~ Toilet paper rolls or cut-down paper towel rolls

    ~ Popsicle sticks – 5

    ~ Beads or small buttons – 5

    ~ Glue gun

    ~ Wooden skewer

    ~ Yarns in any color, but for this post I mostly show the rainbow yarn (here is Fiber Confections FB page and Instagram, I’m not sure how else she sells her wool)

    Popsicle sticks and beads are used with a glue gun to attach to a top roll to make a tube knitting loom.

    How to make the Tube Knitting Loom:

    ~ Glue the beads or small buttons to the tops of each popsicle stick

    ~ Glue each popsicle stick on the inside of the TP roll, leaving about 3/4 inch showing

    Rainbow yarn that will be used for tube knitting, and a variety of other wool yarns.

    Here is a photo from the Davis CA farmer’s market stall with all the yarns from the owner’s own sheep! Fair warning: The way this skein is wound – not in a ball but in a big loop – created a huge tangled mess. I have never worked with yarn that was packaged in this way, so I’m not sure what to do to prevent the tangled mess in the future, but my guess is I should have hung the yarn up instead of laying it on a table and been more careful when pulling. If anyone has any tips let me know!

    Steps 1-4 on how to tube knit with a tp roll loom.

    How to Knit on a TP Roll Loom:

    1. To begin, hold the end of the yarn against the side of the TP roll and then bring the yarn around the back of the first popsicle stick.

    2. Wrap it around the front, then go over to the next stick and do the same thing, going behind the stick then wrap around the front.

    3. Continue until you get back to the first stick.

    4. When you get back to the beginning, now the yarn goes straight across the front of the first stick above the first loop.

    Steps 5-6 on how to tube knit with a tp roll loom.

    5. Use the skewer to lift the bottom loop over the top yarn. This is where the beads/buttons come in handy because it helps the top thread stay in place as you lift the bottom one over the top.

    6. After you lift the bottom yarn over the top, move the loose yarn over one and do the same: above the loop, lift the bottom over the top.

    Showing the inside of a tp roll during tube knitting.

    7. When you’ve made it all the way around once, push the start thread through the middle so it’s dangling down the inside of the tube and pull on it to tighten the knitting. You can pull it tight every time you go around in the beginning. Eventually when it’s coming out the end and long enough you don’t have to keep pulling to tighten.

    Rainbow colored tube knitting on a table with a tp roll loom.

    Continue knitting in this way until you get the length you want.

    Steps 8-11 on how to finish the end of a tube knitting made with a tp roll.

    8. To finish the piece, cut the yarn leaving about 8-10 inches.

    9. Thread the loose yarn underneath the next loop, then lift that loop off the popsicle stick.

    10. Then thread the loose yarn again underneath the next loop and lift it off, continuing until you have threaded and lifted off all 5 loops.

    11. Pull the piece out of the tube. I like to thread the loose yarn back through that last loop one more time and tie it off.

    A pile of finished rainbow tube knittings ready to make bracelets.

    Each piece is about 12 inches long.

    A pile of rainbow tube knitted bracelets.

    12. Tie the two ends together to make a circle. You may have to do some double knotting before trimming the ends.

    A display of napkins on a table using rainbow tube knitted napkin holders.

    I decided to use the bracelets as napkin rings for the Thanksgiving table.

    Making placecards using a paper punch and brown paper bag.

    I made some name labels with brown paper bags and this tag-shaped paper punch. The letter stamp set is really old, like from high school (30 years ago!) and I haven’t been able to find anything like this, but you can use any letter set, or just hand write if you have good handwriting.

    Using alphabet stamps to make placecards with brown paper bags.

    A table set with handmade paper luminaries and napkins with handmade rainbow tube knitting.

    Here is a tutorial on how to make the paper luminaries.

    Napkin on a table wrapped with a tube knitted rainbow holder.

    The many ways to use a rainbow tube knitted bracelet.

    Here are some outtakes from Thanksgiving! I taught some people how to tube knit, and everyone had a different way to wear their rainbow yarns. My sister-in-law sent me a photo of her cat, Octavia, wearing it as a collar. She said it’s Octavia’s favorite.

    xx, Bar

    – – – – – – – – – – – – – – – – – – –

    Did you like this post? Here are more posts using yarn:


    Source link

  • Latin Sounds: Oskar Cartaya | LACMA


    Chris Burden’s Metropolis II is an intense kinetic sculpture, modeled…

    Perhaps the most dominant art form of the last 100 years, film has an important…

    Tuesday Matinees

    Enjoy concerts featuring leading international and local ensembles in programs o…

    Art & Music,Jazz at LACMA,Latin Sounds

    LACMA offers in-person art classes for kids, teens, and adults, offering the cha…

    Random International’s Rain Room (2012) is an immersive environment of…

    Rain Room

    Artist Robert Irwin’s work in the last five decades has investigated perception…

    Barbara Kruger’s Untitled (Shafted) features her distinctive use of advertising…

    Band (2006) may qualify as Richard Serra’s magnum opus, representing the fullest…

    LACMA’s Modern Art collection features primarily European and American art from…

    LACMA’s Acquisitions Group and Art Council members share a deep affinity for the…

    Art Councils,Acquisition Groups,Art of the Middle East: CONTEMPORARY,Asian Art Council,Costume Council,Decorative Arts and Design Council,LENS: Photography Council,Modern and Contemporary Art Council,Prints and Drawings Council

    Welcome to the employment page of the Los Angeles County Museum of Art. To see a…

    Jobs,Careers,Internships,Volunteer

    Join museum educators, artists, curators, and experts for artist talks, virtual…

    Create+Collaborate

    In Golden Hour, over 70 artists and three photography collectives offer an aesth…

    Established in 1967, the Conservation Center at LACMA supports the museum’s comm…

    painting conservation,paper conservation,object conservation,textile conservation,conservation science,conservation imaging

    Barbara Kruger: Thinking of You. I Mean Me. I Mean You. is a major exhibition de…

    Featuring Ai Weiwei, Huang Yong Ping, Wang Guangyi, Xu Bing, Yue Minjun and more…

    Beyond the concrete materials of ink and paper, there is an intangible spirit un…

    To complement the presentation of The Obama Portraits by Kehinde Wiley and Amy S…

    From the moment of their unveiling at the Smithsonian’s National Portrait Galler…

    (Los Angeles, CA—January 13, 2022) – The Los Angeles County Museum of Art (LACMA…

    (Los Angeles, CA—December 14, 2021) The Los Angeles County Museum of Art (LACMA)…

    Mixpantli: Contemporary Echoes showcases the lasting impact of Indigenous creati…

    LACMA marks the 500th anniversary of the fall of the Aztec capital Tenochtitlan…

    Since the mid-20th century, California has been a beacon of both inventive desig…

    Revealing insights about family life and the quotidian in the 21st century, Fami…

    One of the most significant contributors to fashion between 1990 and 2010, Lee A…

    Comprising approximately 400 works, including an unprecedented number of loans f…

    Archive of the World: Art and Imagination in Spanish America, 1500–1800 is the f…

    Scandinavian Design and the United States, 1890–1980 is the first exhibition to…

    In the work of American artist Sam Francis (1923–1994), Western and Eastern aest…


    Source link

  • Potholder Weaving with Cotton Loops

    Potholder Weaving with Cotton Loops


    I recently discovered my old-school potholder looms when I was reorganizing all my art supplies and materials in the basement. (Well, my daughter did the organizing since she could “not live with the mess one more minute,” as spoken like a true Virgo.) The loops were old and in bad colors, like the ones that come with those potholder weaving from long ago. I searched online for where I could buy some new cotton loops, and oh my word… I found my happy place. Shall I just stop working and make potholders now and forever? (Kate Kilmurray has literally made a career of it, and so can I!)

    A collection of potholders made with Lotta Loops gorgeous colored cotton loops.

    The shop is called Friendly Loom and their cotton loops product is called Lotta Loops. They come in these incredible colors in either packs of mixed colors or in one single color. Let’s just say if I became a full-time potholder maker I don’t even think I would ever tire of finding color combinations. Ever.

    A collection of potholders made with Lotta Loops gorgeous colored loops and one potholder still on the loom.

    Materials needed to make potholders:

    ~ Potholder loom kit (7″ traditional) from Friendly Loom

    ~ Cotton loops from Friendly Loom

    ~ Looms and curated hand-dyed loops from Kate Kilmurray

    The first steps in weaving a potholder is looping the "weft" then starting your over and under from the top or bottom.

    Weaving a potholder on a loom:

    1. Begin by choosing your color story. There are so many options: warm colors, cool colors, complimentary, rainbow, earth tones, one color, two colors, ombré, or just random. Anything works!

    2. Set up the loom by hooking the loops from top to bottom in a row all the way across. This will act as your “warp” where all horizontal “weft” loops will weave through.

    3. Start weaving from the top (I use my fingers until the end when I use the weaving hook). Just hook the end onto the peg, then go over & under until you get to the other side and hook it to the corresponding peg on the other side. 

    When weaving a potholder on a loom, start with and over/under technique, then alternate with each new loop.

    4. The next loop will go under and over in the opposite way, so if you begin by going over the first “weft” then begin the 2nd row by going under.

    When weaving a potholder, it’s easier going through the middle where it’s looser and then pushing the loops up with your fingers after you hook it on the other side.

    TIP: It’s easier going through the middle where it’s looser and then pushing the loop up with your fingers after you hook it on the other side. (You will be adjusting loops continuously throughout to make sure they are straight.)

    The last loop in a potholder weaving gets tricky and where using the weaving hook makes sense.

    5. When you get to the bottom it’s trickier to weave because it gets too tight for fingers. This is where using the weaving hook makes sense. Weave the hook over and under all the way across, then slip a loop over the hook and pull it back through. 

    Finishing the edges of a potholder so you can take it off the loom.

    Finishing the potholder:

    This is a little tricky to describe. It’s actually easy but becomes wordy when writing instructions. You can always look up videos on YouTube (I will make one soon, too). 

    6. Starting at one corner, reach through the first loop with the weaving hook then hook the second loop and pull it through the first. It helps to use your fingers to stretch the first loop as you pass the 2nd loop through.

    7. Now do it again — hook the 3rd loop and pull it through the 2nd. Continue all the way around, using your fingers to stretch the loops as you go, keeping in mind that there will always be one loop on the weaving hook. 

    As you finish one side of your potholder edge, it helps to loop one of the finished stitches from the middle back onto the loom temporarily to keep the tension so it doesn't fall off the loom.

    8. As you finish one side, it helps to loop one of the finished stitches from the middle back onto the loom temporarily. It took me a while to discover this trick but it helps keep the tension because as you get to finishing the last side, all the loops start popping off the loom. (When you are doing this in real time you will understand these helpful tips much more.)

    When you get to the end and you have the last loop left on the weaving hook, leave it on as you pull on the sides to even them out.

    9. When you get to the end and you have the last loop left on the weaving hook, leave it on as you pull on the sides to even them out. Then what I like to do is hook the last loop through itself just to double-secure it. 

    Finished potholder weaving in complimentary colors orange and blue.
    Finished potholder weaving in earthy and purple tones.
    Finished potholder weaving in a multi-color muted bright palette.

    That’s it you’re finished! Once you make one you won’t be able to stop. And you will get better and faster with each new potholder.

    I made all my potholders and used all the best colors before taking photos of the process, which is why the colors in this how-too are a bit strange. But it’s also good to show that if you get these gorgeous Lotta Loops from Friendly Loom, you can’t really go wrong with any combo!

    Share your potholders with me on Instagram if you make some from this tutorial! I would love to see them. 

    xo Bar

    – – – – – – – – – – – – – – – – – – – –

    Did you like this post? Here are more weaving ideas:

    Doodle weaving on a cardboard loom
    Doodle weaving with a cardboard loom
    6-Point God's Eyes in bright and muted tones using sticks and yarn.
    6-Point God’s Eyes with Sticks
    Rainbow tube knitting with a TP roll loom
    Rainbow Tube Knitting with a TP Roll Loom


    Source link

  • Jazz at LACMA: Tribute to Barbara Morrison


    Chris Burden’s Metropolis II is an intense kinetic sculpture, modeled…

    Perhaps the most dominant art form of the last 100 years, film has an important…

    Tuesday Matinees

    Enjoy concerts featuring leading international and local ensembles in programs o…

    Art & Music,Jazz at LACMA,Latin Sounds

    LACMA offers in-person art classes for kids, teens, and adults, offering the cha…

    Random International’s Rain Room (2012) is an immersive environment of…

    Rain Room

    Artist Robert Irwin’s work in the last five decades has investigated perception…

    Barbara Kruger’s Untitled (Shafted) features her distinctive use of advertising…

    Band (2006) may qualify as Richard Serra’s magnum opus, representing the fullest…

    LACMA’s Modern Art collection features primarily European and American art from…

    LACMA’s Acquisitions Group and Art Council members share a deep affinity for the…

    Art Councils,Acquisition Groups,Art of the Middle East: CONTEMPORARY,Asian Art Council,Costume Council,Decorative Arts and Design Council,LENS: Photography Council,Modern and Contemporary Art Council,Prints and Drawings Council

    Welcome to the employment page of the Los Angeles County Museum of Art. To see a…

    Jobs,Careers,Internships,Volunteer

    Join museum educators, artists, curators, and experts for artist talks, virtual…

    Create+Collaborate

    In Golden Hour, over 70 artists and three photography collectives offer an aesth…

    Established in 1967, the Conservation Center at LACMA supports the museum’s comm…

    painting conservation,paper conservation,object conservation,textile conservation,conservation science,conservation imaging

    Barbara Kruger: Thinking of You. I Mean Me. I Mean You. is a major exhibition de…

    Featuring Ai Weiwei, Huang Yong Ping, Wang Guangyi, Xu Bing, Yue Minjun and more…

    Beyond the concrete materials of ink and paper, there is an intangible spirit un…

    To complement the presentation of The Obama Portraits by Kehinde Wiley and Amy S…

    From the moment of their unveiling at the Smithsonian’s National Portrait Galler…

    (Los Angeles, CA—January 13, 2022) – The Los Angeles County Museum of Art (LACMA…

    (Los Angeles, CA—December 14, 2021) The Los Angeles County Museum of Art (LACMA)…

    Mixpantli: Contemporary Echoes showcases the lasting impact of Indigenous creati…

    LACMA marks the 500th anniversary of the fall of the Aztec capital Tenochtitlan…

    Since the mid-20th century, California has been a beacon of both inventive desig…

    Revealing insights about family life and the quotidian in the 21st century, Fami…

    One of the most significant contributors to fashion between 1990 and 2010, Lee A…

    Comprising approximately 400 works, including an unprecedented number of loans f…

    Archive of the World: Art and Imagination in Spanish America, 1500–1800 is the f…

    Scandinavian Design and the United States, 1890–1980 is the first exhibition to…

    In the work of American artist Sam Francis (1923–1994), Western and Eastern aest…


    Source link

  • Homemade Upcycled Crayons – ARTBAR

    Homemade Upcycled Crayons – ARTBAR


    The idea for these homemade upcycled crayons came from a search I was doing for my newsletter. I was trying to find some fresh sources — blogs that I didn’t know about (which is hard to imagine since I’ve been blogging for 12 years and blogs are becoming a dying breed), but guess what? I found one that I didn’t know about! It’s called Paper & Stitch and they have so many cool DIY ideas. Their crayon gems caught my eye, they really know how to style and photograph their projects. But I wanted to make crayon sticks because I feel like the round ones are hard to use. Commence search for silicone molds!

    An arrangement of homemade crayons on a table in rainbow colors.

    There was a lot to think about, like do I want a pointed tip? How long should they be? Will they break easily? Who will be using these, and how? I landed on these chocolate stick candy molds and they are good enough. I thought they might make crayons that were too thin, but they are chunky without being too block-y. Each crayon takes about 3 upcycled crayons so they are sturdier than the originals. Ideally, I would make something a bit rounder and easier to hold, but I think this is the best solution with what’s available.

    A divided container of old crayons on a table with a silicone mold with broken crayons bits, ready to make new crayons in the oven.

    [ I am a participant in affiliate programs designed to provide a means for bloggers to earn small fees at no cost to you by linking to Amazon.com and affiliated sites. ]

    Supplies needed to make homemade crayons:

    ~ Crayons with papers peeled off (I like to soak overnight in water first. Some papers come off really easily, while others take some scraping. It helps to have an X-acto knife to cut down the paper wrapper for an easier to start peeling off the tricky ones.) I like using Crayola because some off-brand crayons don’t even melt, which you will see below.

    ~ Silicone mold (you can use anything, there are so many to choose from! I used this one)

    ~ Paring knife (optional, read to find out why I used one)

    Old, unpeeled crayons on a table sorted by colors families.

    How to make homemade crayons:

    1. After you have peeled all your crayons, sort them into color families. You can also use one color per crayon, but I wanted each crayon to have a variety of shades and hues in one family. Some crayons are so dark you can’t tell if they are black or navy or burgandy, so have scratch paper nearby. (FYI – I made solid black and solid white crayons.)

    TIP: If you see some paper still on the crayons, you can just scratch it off with your nail.

    Broken pieces of old crayons in a silicone mold, and then showing them after they have been melted in the oven.

    2. Break the crayons up into small pieces (you can use scissors if you hand gets tired or if the pieces are too big). Above was my first try at filling the molds. It turned out not to be enough so I dropped some extra pieces in and returned it to the oven for a few more minutes. Below was my second set and it was a little bit too much. You will have to play around with the right balance, but I would say better too much than too little.

    3. Put the mold on an old cookie tray and place it in the oven, heated to 300F for about 10-12 minutes or until everything has melted. You will smell the wax and it may even be a little smokey inside the oven. (Using the microwave did not work for me, but mine is old so you can try that method.)

    A silicone mold with broken pieces of crayons in green and yellow color families, ready for the oven.
    Melted wax overflowing a silicone mold on a tray.

    You can see above how some of the crayons didn’t melt. I don’t know why, but I assume it’s some cheaper brands. It’s fine, I just trimmed them down with the knife.

    TIP: When taking the melted wax tray out of the oven, make sure you have a surface nearby and ready to set down the tray. You will have to move very carefully and slowly so the wax doesn’t run off the sides too much. (Tips on how to clean the mold and tray below.)

    Taking homemade crayons out of a silicone mold.

    4. Let the wax cool, I waited about an hour, and then pop the crayons out. If you underfill or fill the molds just right you won’t need to trim them. If you overfill then you can break off the extra on the sides but you might need to use the paring knife to clean them up. But there is another reason I used the paring knife.

    Trimming down homemade crayons with a paring knife.

    When melting down the old crayons, the pigment can sink to the bottom a little and leave a thin layer of wax that is clear-ish. I used the paring knife to cut that part off because it would be frustrating for a child to use and not see any color on the paper. I’ve read that maybe heating at a lower heat can avoid this, so maybe try a 250F oven. I didn’t try this because I kind of liked the paring part, I’m weird that way.

    Four homemade yellow crayons in a hand, showing size.

    You can see above some of the yellow crayon bits that didn’t melt. I kind of like the chunks.

    TIP: Cover your table in paper so you can roll it up and throw it away. Doing this project on a dropcloth made cleanup harder because the wax clippings got stuck in the cloth.

    5. Cleanup tips: I did not take photos of this part, but the silicone mold will be crusted with whatever color you melted after taking out the crayons. You will have to clean it well before setting in a new color. I cracked most of the remnants off by just folding the mold up and shaking it out. I also used my nail to scratch some bits off, and then washed it with soapy water. Make sure all the wax chunks go in the garbage, not the drain. Also, to clean the cookie sheet I poured some boiling water on it and then used paper towel to wipe it down. Again, all of it goes into the garbage, not the sink.

    A small wooden bowl holding a set of homemade crayons in pink and purple hues.
    A small wooden bowl holding a set of homemade crayons in green and yellow hues.
    A small wooden bowl holding a set of homemade crayons in red and orange hues.

    This DIY is quite time-consuming, so it’s not for everyone. If you want something a little easier I would try the small shape molds. But there was something so satisfying about this process for me, I just really loved it. I am thinking about how I can mass-produce these, so if anyone has any ideas I’m all ears!

    Enjoy!

    xx Bar

    – – – – – – – – – – – – – – – – – – –

    Did you like this post? Here are some more ways to make your own art materials:

    Jars of tempera paint on a table in an array of hand-mixed colors.
    Color Mixing with Tempera Paints
    Jars of tempera paint on a table in hand-mixed shades of brown.
    Color Mixing Skin Tones with Tempera Paint
    Jars of liquid watercolor on a table mixed in secondary and tertiary hues.
    Color Mixing with Liquid Watercolor


    Source link

  • Latin Sounds: Son Habana | LACMA


    Chris Burden’s Metropolis II is an intense kinetic sculpture, modeled…

    Perhaps the most dominant art form of the last 100 years, film has an important…

    Tuesday Matinees

    Enjoy concerts featuring leading international and local ensembles in programs o…

    Art & Music,Jazz at LACMA,Latin Sounds

    LACMA offers in-person art classes for kids, teens, and adults, offering the cha…

    Random International’s Rain Room (2012) is an immersive environment of…

    Rain Room

    Artist Robert Irwin’s work in the last five decades has investigated perception…

    Barbara Kruger’s Untitled (Shafted) features her distinctive use of advertising…

    Band (2006) may qualify as Richard Serra’s magnum opus, representing the fullest…

    LACMA’s Modern Art collection features primarily European and American art from…

    LACMA’s Acquisitions Group and Art Council members share a deep affinity for the…

    Art Councils,Acquisition Groups,Art of the Middle East: CONTEMPORARY,Asian Art Council,Costume Council,Decorative Arts and Design Council,LENS: Photography Council,Modern and Contemporary Art Council,Prints and Drawings Council

    Welcome to the employment page of the Los Angeles County Museum of Art. To see a…

    Jobs,Careers,Internships,Volunteer

    Join museum educators, artists, curators, and experts for artist talks, virtual…

    Create+Collaborate

    In Golden Hour, over 70 artists and three photography collectives offer an aesth…

    Established in 1967, the Conservation Center at LACMA supports the museum’s comm…

    painting conservation,paper conservation,object conservation,textile conservation,conservation science,conservation imaging

    Barbara Kruger: Thinking of You. I Mean Me. I Mean You. is a major exhibition de…

    Featuring Ai Weiwei, Huang Yong Ping, Wang Guangyi, Xu Bing, Yue Minjun and more…

    Beyond the concrete materials of ink and paper, there is an intangible spirit un…

    To complement the presentation of The Obama Portraits by Kehinde Wiley and Amy S…

    From the moment of their unveiling at the Smithsonian’s National Portrait Galler…

    (Los Angeles, CA—January 13, 2022) – The Los Angeles County Museum of Art (LACMA…

    (Los Angeles, CA—December 14, 2021) The Los Angeles County Museum of Art (LACMA)…

    Mixpantli: Contemporary Echoes showcases the lasting impact of Indigenous creati…

    LACMA marks the 500th anniversary of the fall of the Aztec capital Tenochtitlan…

    Since the mid-20th century, California has been a beacon of both inventive desig…

    Revealing insights about family life and the quotidian in the 21st century, Fami…

    One of the most significant contributors to fashion between 1990 and 2010, Lee A…

    Comprising approximately 400 works, including an unprecedented number of loans f…

    Archive of the World: Art and Imagination in Spanish America, 1500–1800 is the f…

    Scandinavian Design and the United States, 1890–1980 is the first exhibition to…

    In the work of American artist Sam Francis (1923–1994), Western and Eastern aest…


    Source link

  • Mixed-Media Process Art Weaving Invitation

    Mixed-Media Process Art Weaving Invitation


    It’s been a while since I’ve written about my open-studio library events. This mixed-media process art weaving invitation that I set out for a multi-age group was more prep than I usually do, but it was worth it and as successful as I had hoped!

    Child is at a table with lots of different textures and materials to use with a cardboard weaving loom.

    I will admit I was a little ambiguous about how this would go. I really needed to trust myself and trust that children would figure things out on their own. Since this was a process art experience, I didn’t set out an example or teach the weaving technique in any way. I hoped that the different textures and materials would spark interest, and I included some familiar materials like tempera paint sticks and dot labels for children to turn to if they didn’t feel quite ready to jump into something new.

    Table full of different materials and textures to use in weaving with a cardboard loom.

    [ I am a participant in affiliate programs designed to provide a means for bloggers to earn small fees at no cost to you by linking to Amazon.com and affiliated sites. ]

    I can’t wait to share what happened, but first, here is a materials list. These are just what I used because I had everything in my basement, but use whatever you have!!

    Materials for process art weaving invitation:

    ~ Cardboard (approx. 8×10 inch pieces but doesn’t have to be exact)

    ~ Fiskars Power-cut scissors or Zip-Snip to cut the cardboard

    ~ Good scissors for cutting up the materials

    ~ Hole punches

    ~ Soft textiles like yarn, chunky chenille yarn, ribbon, ricrac, felt, fabric strips

    ~ Recyclables to cut into strips like corrugated cardboard, thin foam, paint samples, honeycomb paper

    ~ I collected some twigs from outside, too. If it was fall or summer I would have collected leaves and/or flowers, too.

    ~ Dot labels, tempera sticks, gold tempera paint, thin masking tape

    A stack of cardboard looms on a table.

    My prep and set-up process:

    1. First I cut up the cardboard. They are not all the same size, I basically just cut down lots of boxes so whatever was easiest to make some rectangles from each box.

    2. I used a ruler to make even marks on either end of the cardboard pieces and then snipped with scissors.

    Wrapping yarn to create the warp on cardboard weaving looms.

    3. I didn’t make these looms in the typical way, like with a warp that could be removed. These are just quick-and-dirty, meant to give children a feel for the process but not actually take it off the loom. This also makes them much easier to put together. We just wrapped yarn around the cardboard and taped the ends on the backs. My superstar husband helped me. This was still a heavy prep project which I don’t normally do for these events. But I wanted to try it, even though it took some time.

    A pile of cardboard weaving looms, some have a yarn warp and some are empty.

    I made about 60 looms. I typically have about 45 children coming through the space within a 2-hour timespan, so I wanted to make sure I had enough in case some kids wanted to make more than one.

    A table set up with cardboard looms and weaving materials ready for children to come and use.
    A table set up with cardboard looms and weaving materials ready for children to come and use.

    4. I cut up all the different materials into strips that were a little longer than the width of the looms. I cut the felt into shapes, thinking that maybe they could be painted on or used later for something else.

    A table set up with cardboard looms and weaving materials ready for children to come and use.

    5. I set out the materials in lots of different baskets and divided trays (many of these come from Ikea). I know it looks like a lot so when I say “Less is More” it feels like I’m joking, but what I mean is that the low baskets and trays make it so that I can’t put a lot out at once. Children don’t want to sift through a big bin of materials, it’s much easier to have just 20 pieces on a flat tray. I have extra nearby to replenish.

    Young child weaving on a cardboard loom with different yarns.

    Notes on how children approached the weaving table:

    Process art is all about letting children guide their own experiences with materials, but sometimes we have to really practice taking ourselves out of the equation. At first, children wandered over to the weaving table and just walked around touching some materials and then moving away. Maybe they went to the liquid watercolor table, a familiar medium, or the maker table, also filled with familiar materials. Some parents came to the table very excited, exclaiming “Ohhhh, weaving!” They attempted to teach their child the technique. Some kids sat with their parents. But mostly, I noticed that it was the children who attempted weaving on their own, or who already had some knowledge about weaving and didn’t have a parent over their shoulder that stayed engaged the longest.

    Child embellishing their cardboard loom weaving with yellow dot stickers.

    This didn’t surprise me. My partner, Shannon, and I have built our whole approach at The Creativity Project around the very idea that children bring their creativity, and the materials do the teaching. Adults just need to step back and be there as support if needed. Children who have the freedom to move on their own and choose how to use materials are the ones who get into flow and build that creative confidence.

    Child holding up her cardboard loom weaving with one pink piece of thick, chenille yarn.

    I loved observing and documenting all the different ways that children made their weaving. Some were minimalist, some were maximalist. Some were orderly and repetitive, others were carefree and experimental. There was no right or wrong way to approach the materials, which is the beauty of open-ended tables like this.

    Child holding up their finished cardboard loom weaving that they have embellished with gold paint.

    I was really proud of parents for letting their children struggle and persevere. I heard a few, “I can’t do it” from children, and then “Try again” from their adult. I’ve been doing these open studios for a year and a half now, and parents have grown and learned along with their children. They have noticed how much more joy their child gets from a creative exploration when the adult doesn’t instruct or navigate the experience.

    Child holding up their cardboard loom weaving where they have used lots of different materials and textures, like yarn and ribbon and strips of corrugated cardboard.
    Child with an assortment of weaving materials at a table.

    I’m including this last photo because this child took some of the soft textiles and brought them to the painting table to make a toy for his dog. This is always what I hope might happen – when children take materials along with them to build on an idea. This could only happen in a setting where children are allowed to take risks and where they know that can try anything. It’s not too hard to create an environment like this. The part that takes the longest to learn is our part – the stepping back and not making it about us and our vision. Once we can learn this though, we realize that children are a thousand times more creative than we can ever hope to be.

    xo, Bar

    – – – – – – – – – – – – – – – – – – – –

    Did you like this post? Here are some more weaving ideas:

    Weaving with kids using a cardboard loom.
    Weaving with Kids using a Cardboard Loom
    Doodle weavings with a cardboard loom.
    Doodle Weavings
    Weaving with a cardboard loom using rainbow-dyed wool roving.
    Rainbow Dyed Wool Roving Weavings


    Source link